Logo
programming4us
programming4us
programming4us
programming4us
Home
programming4us
XP
programming4us
Windows Vista
programming4us
Windows 7
programming4us
Windows Azure
programming4us
Windows Server
programming4us
Windows Phone
 
Windows Server

Installing Microsoft SharePoint Server 2010 and Configuring PerformancePoint Services : Configuring PPS (part 3) - Creating the PerformancePoint Service Application

- Free product key for windows 10
- Free Product Key for Microsoft office 365
- Malwarebytes Premium 3.7.1 Serial Keys (LifeTime) 2019
3/22/2011 3:53:48 PM

Creating the PerformancePoint Service Application

Conceptually, the PerformancePoint service application is a collection of settings that will be used when a request is issued to PPS. For example, you might configure the following:

  • Unattended Service Account used to connect to data sources

  • Secure Store settings

  • Various application and timeout limits

The PerformancePoint service application differs from the PerformancePoint Service in one significant way. There can be multiple PerformancePoint service applications in the farm but only one PerformancePoint Service.

Note

Creating a service application automatically creates a proxy associated with that service application.


To create the PerformancePoint service application, follow these steps:
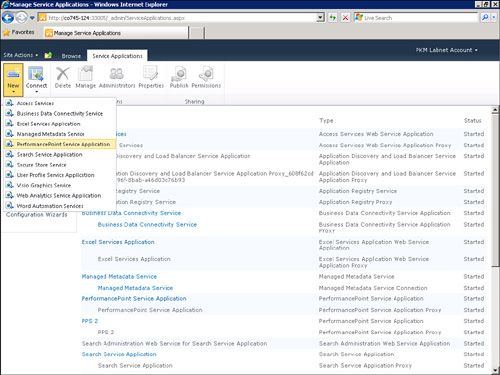
1.
Browse to the SharePoint Central Administration site, and then click Application Management in the left navigation pane.

2.
Under Service Applications, click Manage Service Applications.

3.
From the ribbon, click New. Click PerformancePoint Service Application to launch the PPS Service Application creation dialog box (see Figure 5).
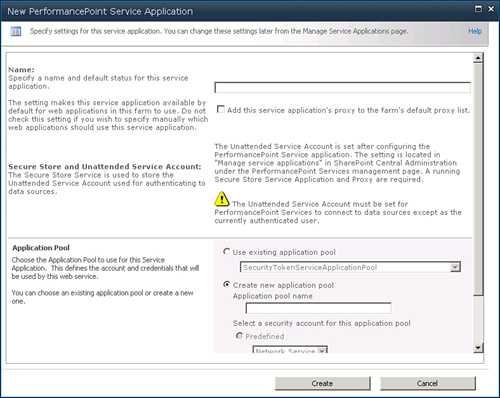
Figure 5. This option launches the PPS Service creation dialog box.

4.
Enter a name for the service application. If this is going to be the default service application, select Add This Service Application’s Proxy to the Farm’s Default Proxy List (see Figure 6).


Figure 6. Specify settings for the new PerformancePoint service application in this screen.

Tip

If you select the Add This Service Application’s Proxy to the Farm’s Default Proxy List check box, the service application will be associated automatically with any web application that is created. There can be only one active service application per web application.

5.
In the Application Pool section of this screen, you can select to either Use Existing Application Pool or Create New Application Pool. If you select Create New Application Pool, enter the application pool name. After you have made your selection, click Create to create the service application. This may take a few minutes. When the process has completed, you see a message confirming a successful creation.

Note

If you use a new security account for the application pool that was not created by the SharePoint wizard, it is necessary to grant permission for that account to access the content database for each web application it will be associated with. This can be done by executing the following two PowerShell commands in a SharePoint 2010 Management Shell instance:

$w = Get-SPWebApplication -Identity http://webapplicationurl
$w.GrantAccessToProcessIdentity("domain\serviceaccount")


This completes the second of the four tasks you must perform.

Other -----------------
- Manage the Active Directory Domain Services Schema : Add Attributes to Ambiguous Name Resolution Filter
- Manage the Active Directory Domain Services Schema : Remove Attributes from the Index
- Manage the Active Directory Domain Services Schema : Index Attributes
- Windows Communication Foundation Primer : Implementing contracts in services
- Windows Communication Foundation Primer : Defining the contract
- Implementing Edge Services for an Exchange 2010 Environment : Implementing Safelist Aggregation for Outlook 2003 and Outlook 2007
- Implementing Edge Services for an Exchange 2010 Environment : Using EdgeSync to Synchronize Active Directory Information to the Edge Transport Server
- Implementing Edge Services for an Exchange 2010 Environment : Using Address Rewriting to Standardize on Domain Address Naming for an Organization
- Application Development with SharePoint Designer 2010 and Visual Studio 2010 : Developing a Visual Web Part
- Using Visual Studio 2010 with SharePoint 2010
 
 
Top 10
- Microsoft Visio 2013 : Adding Structure to Your Diagrams - Finding containers and lists in Visio (part 2) - Wireframes,Legends
- Microsoft Visio 2013 : Adding Structure to Your Diagrams - Finding containers and lists in Visio (part 1) - Swimlanes
- Microsoft Visio 2013 : Adding Structure to Your Diagrams - Formatting and sizing lists
- Microsoft Visio 2013 : Adding Structure to Your Diagrams - Adding shapes to lists
- Microsoft Visio 2013 : Adding Structure to Your Diagrams - Sizing containers
- Microsoft Access 2010 : Control Properties and Why to Use Them (part 3) - The Other Properties of a Control
- Microsoft Access 2010 : Control Properties and Why to Use Them (part 2) - The Data Properties of a Control
- Microsoft Access 2010 : Control Properties and Why to Use Them (part 1) - The Format Properties of a Control
- Microsoft Access 2010 : Form Properties and Why Should You Use Them - Working with the Properties Window
- Microsoft Visio 2013 : Using the Organization Chart Wizard with new data
 
programming4us
Windows Vista
programming4us
Windows 7
programming4us
Windows Azure
programming4us
Windows Server