Logo
programming4us
programming4us
programming4us
programming4us
Home
programming4us
XP
programming4us
Windows Vista
programming4us
Windows 7
programming4us
Windows Azure
programming4us
Windows Server
programming4us
Windows Phone
 
Windows Server

InfoPath with Sharepoint 2010 : Create a Master or Detail Display Form for SharePoint Lists

- Free product key for windows 10
- Free Product Key for Microsoft office 365
- Malwarebytes Premium 3.7.1 Serial Keys (LifeTime) 2019
12/24/2011 11:12:31 AM
You can modify the display form for the Region list such that the corresponding offices are shown on the same page.

To accomplish this, navigate to the parent list and follow these steps:

1.
From the List ribbon bar select the Modify Form Web Parts button and select (Item) Display Form, as shown in Figure 1, to edit the display form page. The display form is presented in edit mode.
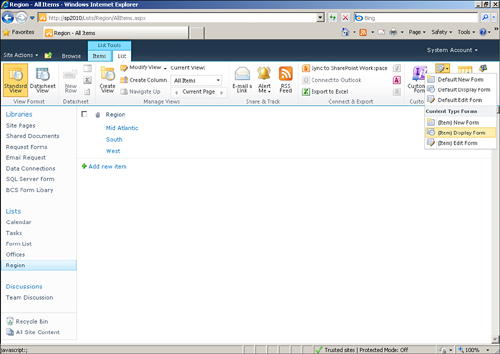
Figure 1. Clicking Modify Form Web Parts allows you to edit the form pages.


Note

If you did not customize the form of the list, the drop-down will display only the default forms.

2.
From the Insert ribbon bar, select Related List and click the related list to insert the details onto the display form page, as shown in Figure 2.

Figure 2. Inserting a related list adds the details to the display form page.

3.
On the Page ribbon bar, click Stop Editing to save your changes.

4.
Back in the Regions list, clicking a region opens the display form and shows the related offices, as shown in Figure 3.

Figure 3. Viewing a region item displays the related offices.


Tip

If you don’t want the lookup column to be displayed (because it shows the same entry for each item), you can create a new view in the related list that doesn’t show the lookup column and edit the related list web part to use that view.

Other -----------------
- Add an InfoPath Form Web Part to a SharePoint Web Part Page
- Working with the Windows Home Server 2011 Registry : Keeping the Registry Safe
- Working with the Windows Home Server 2011 Registry : Starting the Registry Editor & Navigating the Registry
- BizTalk 2006 : Deploying and Managing BizTalk Applications - Important Deployment Artifacts
- BizTalk 2006 : Deploying and Managing BizTalk Applications - BizTalk Applications
- Microsoft Dynamics AX 2009 : Changing automatic transaction text
- Microsoft Dynamics AX 2009 : Creating and posting ledger vouchers
- Planning the Installation : Installation Scenarios for IIS 7.0 (part 3) - Server Core Web Edition Server Workload
- Planning the Installation : Installation Scenarios for IIS 7.0 (part 2) - IIS Managed Modules and .NET Extensibility Server Workload & IIS Full Install
- Planning the Installation : Installation Scenarios for IIS 7.0 (part 1)
 
 
Top 10
- Microsoft Visio 2013 : Adding Structure to Your Diagrams - Finding containers and lists in Visio (part 2) - Wireframes,Legends
- Microsoft Visio 2013 : Adding Structure to Your Diagrams - Finding containers and lists in Visio (part 1) - Swimlanes
- Microsoft Visio 2013 : Adding Structure to Your Diagrams - Formatting and sizing lists
- Microsoft Visio 2013 : Adding Structure to Your Diagrams - Adding shapes to lists
- Microsoft Visio 2013 : Adding Structure to Your Diagrams - Sizing containers
- Microsoft Access 2010 : Control Properties and Why to Use Them (part 3) - The Other Properties of a Control
- Microsoft Access 2010 : Control Properties and Why to Use Them (part 2) - The Data Properties of a Control
- Microsoft Access 2010 : Control Properties and Why to Use Them (part 1) - The Format Properties of a Control
- Microsoft Access 2010 : Form Properties and Why Should You Use Them - Working with the Properties Window
- Microsoft Visio 2013 : Using the Organization Chart Wizard with new data
 
programming4us
Windows Vista
programming4us
Windows 7
programming4us
Windows Azure
programming4us
Windows Server