All financial transactions regardless of where they are originated end up in the General ledger
module. When it comes to customized functionality, developers should
use Dynamics AX APIs to create the required system entries. No
transactions can be created directly as this is a very critical step and
it may impact on the accuracy of financial data.
To ensure system
data consistency, Dynamics AX provides numerous APIs for developers to
use. One of them is ledger voucher processing. It is a very basic
interface and all other interfaces are based on it if they require
financial transaction posting. Vouchers in Dynamics AX are balancing
financial entries representing an operation. They include two or more
ledger transactions. The ledger voucher API ensures that all required
criteria like voucher numbers, financial periods, ledger accounts,
financial dimensions, balances, and others are valid.
In this recipe, we will demonstrate how to process ledger vouchers. We will create code that posts a single voucher.
How to do it...
1. In AOT, create a new class called VoucherPost with the following code:
class VoucherPost

{
}
public static void main(Args _args)

{
LedgerVoucher voucher;
LedgerVoucherObject voucherObj;
LedgerVoucherTransObject voucherTrObj1;
LedgerVoucherTransObject voucherTrObj2;
Dimension dim;
;
voucher = LedgerVoucher::newLedgerPost(
DetailSummary::Detail,
SysModule::Ledger,
'');
voucherObj = LedgerVoucherObject::newVoucher('SYS00001');
voucher.addVoucher(voucherObj);
voucherTrObj1 = LedgerVoucherTransObject::newCreateTrans(
voucherObj,
LedgerPostingType::LedgerJournal,
'110180',
dim,
'USD',
1000,
0,
0);
voucherTrObj2 = LedgerVoucherTransObject::newCreateTrans(
voucherObj,
LedgerPostingType::LedgerJournal,
'170150',
ledger voucherledger vouchercreating, stepsdim,
'USD',
-1000,
0,
0);
voucher.addTrans(voucherTrObj1);
voucher.addTrans(voucherTrObj2);
voucher.end();
}
2. Run the class to post a new voucher to the ledger.
3. To check what has been posted, open General Ledger | Inquiries | Voucher transactions and type in the voucher number used in the code:
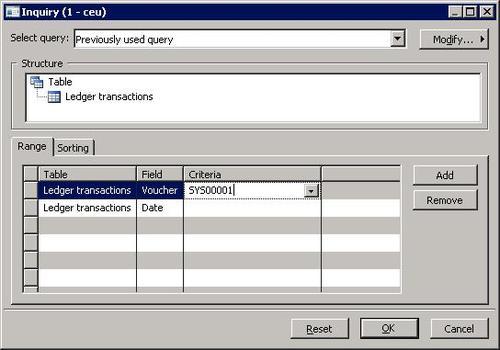
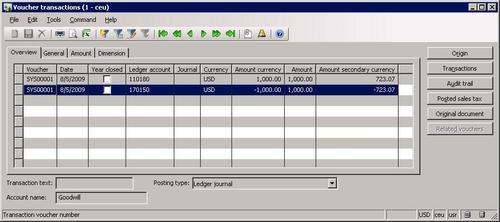
4. Click OK to display the posted voucher:
How it works...
To demonstrate the usage of ledger vouchers, we create a new class and place all the code in its main() to make sure we can run this class from AOT.
The first step is to create a voucher object of type LedgerVoucher. It should be created for each posting per each company. Here, we call newLedgerPost() on LedgerVoucher. It accepts three mandatory and four optional arguments:
Post detailed or summarized ledger transactions.
The system module from which the transactions are originating.
A
number sequence code, which is used to generate the voucher number. In
this example, we will set the voucher number manually, so this argument
can be set to empty.
The transaction type that will appear in the transaction log.
The transaction text.
A boolean value specifying whether this voucher should meet approval requirements.
A boolean value defining whether the voucher could be posted without a posting type when posting inventory transactions.
The second step is to create voucherObj of type LedgerVoucherObject. This object represents a single voucher. We call the newVoucher() method of the LedgerVoucherObject. It accepts one mandatory and a number of optional parameters:
The voucher number. Normally, this should be generated by using a number sequence, but in this example we set it manually.
The transaction date. The default is the session date.
The system module from which the transactions are originating.
The ledger transaction type.
A flag that defines a correcting voucher. The default is No.
The posting layer. The default is Current.
The document number.
The document date.
An argument of type Map used when all voucher numbers must be continuous.
The acknowledgement date.
The method addVoucher() adds the created voucher object to the voucher.
Third step is to create voucher transactions. Transactions are handled by the LedgerVoucherTransObject class. They are created by calling its static newCreateTrans() with eight mandatory and seven optional arguments:
The ledger voucher object.
The ledger posting type.
The ledger account number.
The financial dimension. In this example, we create a voucher with no dimensions by passing an empty Dimension type variable.
The currency code.
The amount in currency.
The related table number.
The related record number.
The quantity if used.
The exchange rate.
The exchange rate of the secondary currency.
Is triangulation used?
Is the transaction marked for bridging?
A ProjectLedger object for Project module specific postings.
The amount in the company currency.
In this demonstration, we call this method twice to create sample transactions.
The fourth step is to add the created transaction objects to the voucher by calling its addTrans().
And finally we call end() on the voucher, which posts the transactions to the ledger.
