MapPoint Web Services
MapPoint web services integration makes use of the MapPoint web service application programming interfaces (APIs).
When working with
Microsoft Dynamics CRM accounts, there are already longitude and
latitude parameters for addresses. (Most organizations don’t use these
attributes, however). When working with MapPoint web services, we can
pass an address from Microsoft Dynamics CRM to MapPoint web services via
the FindAddress service and receive back the longitude and latitude
parameters. (Locations and thumbtacks in MapPoint require longitude and
latitude values for address.)
Unlike Microsoft Live
Search, MapPoint web services is not a free service; however, you can
get a free developer account, which will allow you start to create some
integrations. To sign up for an account, navigate to https://mappoint-css.partners.extranet.microsoft.com/MwsSignup/Eval.aspx.
Note
With the developer
account for MapPoint web services, you will get full access to the
MapPoint web services APIs and a staging environment that you can use to
build applications for proof-of-concept purposes.
For our example, we’re
going to create a custom web application that we’ll integrate into the
Microsoft Dynamics CRM account form via an IFrame to show the map, and
we’ll pass the address values from Microsoft Dynamics CRM to MapPoint
web services.
To deploy a MapPoint web services application, complete the following steps:
1. | Using Visual Studio, create an ASPX page with the following code:
<%@ Page Language="C#" AutoEventWireup="true" CodeFile="Default2.aspx.cs"
Inherits="Default2" %>
<!DOCTYPE html PUBLIC "-//W3C//DTD XHTML 1.0 Transitional//EN"
"http://www.w3.org/TR/xhtml1/DTD/xhtml1-transitional.dtd">
<html xmlns="http://www.w3.org/1999/xhtml" >
<head runat="server">
<title>Untitled Page</title>
<script type="text/javascript">
function GetCRMAddress()
{
var address = '';
var addressLine1 = parent.document.forms[0].all.address1_line1.DataValue;
var postalCode = parent.document.forms[0].all.address1_postalcode.DataValue;
var city = parent.document.forms[0].all.address1_city.DataValue;
var stateOrProvince = parent.document.forms[0].all.address1_stateorprovince.DataValue;
var country = parent.document.forms[0].all.address1_country.DataValue;
var address = '';
if(addressLine1 == null && postalCode == null && city == null && stateOrProvince == null && country == null)
{
address = '';
}
else
{
address = addressLine1 + '!' + postalCode + '!' + city + '!' + stateOrProvince + '!' + country;
document.getElementById('hdnaddress').value = address;
alert(address);
alert(document.getElementById('hdnaddress').value);
}
return address;
}
</script>
</head>
<body>
<form id="form1" runat="server">
<div>
<asp:ImageMap ID="ImageMap1" runat="server" Width="505px">
</asp:ImageMap>
<asp:HiddenField ID="hdnaddress" runat="server" />
</div>
</form>
</body>
</html>
And the following code-behind:
using System;
using System.Data;
using System.Configuration;
using System.Collections;
using System.Web;
using System.Web.Security;
using System.Web.UI;
using System.Web.UI.WebControls;
using System.Web.UI.WebControls.WebParts;
using System.Web.UI.HtmlControls;

public partial class Default2 : System.Web.UI.Page
{
    protected void Page_Load(object sender, EventArgs e)
    {
           string crmAddress = Request.QueryString["Address"].ToString();
           ImageMap1.ImageUrl = "Default.aspx?address =" + crmAddress;

    }
}
|
2. | Create another ASPX page with no code on it, but with the following code in the code-behind (CS) page:
using System;
using System.Data;
using System.Configuration;
using System.Web;
using System.Web.Security;
using System.Web.UI;
using System.Web.UI.WebControls;
using System.Web.UI.WebControls.WebParts;
using System.Web.UI.HtmlControls;
using System.Net;
using System.IO;
using net.mappoint.staging;

public partial class _Default : System.Web.UI.Page
{
    protected void Page_Load(object sender, EventArgs e)
    {
           FindServiceSoap FindService = new FindServiceSoap();
           FindService.Credentials = new NetworkCredential("Account ID", "Password");
           FindService.PreAuthenticate = true;

           string crmAddress = Request.QueryString["address"].ToString();

           string[] arAddress = new string[4];

           // define which character is separating fields
           char[] splitter = { '!' };

           arAddress = crmAddress.Split(splitter);

           // mAddress = (Address)addresses[i];
           FindAddressSpecification spec = new FindAddressSpecification();
           spec.InputAddress = new Address();
           spec.InputAddress.AddressLine = arAddress[0];
           spec.InputAddress.PostalCode = arAddress[1];
           spec.InputAddress.PrimaryCity = arAddress[2];
           spec.InputAddress.CountryRegion = arAddress[3];
           spec.InputAddress.Subdivision = "Seattle";

           //spec.InputAddress = new Address();
           //spec.InputAddress.AddressLine = "2360 Mendocino Ave.";
           //spec.InputAddress.PostalCode = "95403";
           //spec.InputAddress.PrimaryCity = "Santa Rosa";
           //spec.InputAddress.CountryRegion = "United States";


           spec.DataSourceName = "MapPoint.NA";

           FindResults results = FindService.FindAddress(spec);


           Location[] myLocation = new Location[1];
           myLocation[0] = new Location();
           myLocation[0].LatLong = new LatLong();
           myLocation[0].LatLong = results.Results[0].FoundLocation.LatLong;
           Pushpin[] pushpins = new Pushpin[1];
           pushpins[0] = new Pushpin();
           pushpins[0].PinID = "Pin1";
           pushpins[0].IconName = "0";
           pushpins[0].Label = "CustomerAddress";
           pushpins[0].IconDataSource = "MapPoint.Icons";
           pushpins[0].LatLong = results.Results[0].FoundLocation.LatLong;


           //Call MapPoint Render Web Service
           RenderServiceSoap RenderService = new RenderServiceSoap();
           RenderService.Credentials = new NetworkCredential("Account ID", "Password");

           MapViewRepresentations mvRep = RenderService.GetBestMapView(myLocation, "MapPoint.NA");
           ViewByBoundingRectangle[] mviews = new ViewByBoundingRectangle[1];
           mviews[0] = mvRep.ByBoundingRectangle;

           MapSpecification mspec = new MapSpecification();
           //mspec.Options = moptions;
           mspec.Views = mviews;
           mspec.Pushpins = pushpins;
           mspec.DataSourceName = "MapPoint.NA";
           MapImage[] image = RenderService.GetMap(mspec);

           //Display the resulting map in the picture box.
           System.IO.Stream streamImage;
           streamImage = new System.IO.MemoryStream(image[0].MimeData.Bits);

           Response.Clear();
           Response.ContentType = image[0].MimeData.MimeType;
           //myImage.MimeData.MimeType;
           Response.BinaryWrite(image[0].MimeData.Bits);
           Response.End();
    }
}
Note
Be sure to change the account ID and the password in the previous code, as shown here:
FindServiceSoap FindService = new FindServiceSoap();FindService.Credentials = new NetworkCredential
  ("Account ID", "Password");
FindService.PreAuthenticate = true;
Use the account ID and password that you created when signing in to the developer access portal at https://mappoint-css.partners.extranet.microsoft.com/MwsSignup/Eval.aspx.
This aspect of the code
is important in that it initializes the application to make use of the
methods and classes in the web service.
Note
The FindAddress service mentioned previously is contained within this code via the following snippet:
FindAddressSpecification spec = new FindAddressSpecification();
spec.InputAddress = new Address();
spec.InputAddress.AddressLine = arAddress[0];
spec.InputAddress.PostalCode = arAddress[1];
spec.InputAddress.PrimaryCity = arAddress[2];
spec.InputAddress.CountryRegion = arAddress[3];
spec.InputAddress.Subdivision = "Seattle";
spec.DataSourceName = "MapPoint.NA";
FindResults results = FindService.FindAddress(spec);
This is
where the address information retrieved from Microsoft Dynamics CRM is
used to return the longitude and latitude parameters with reference to
the selected Microsoft Dynamics CRM account.
Note
The MapPoint web service
provides a Render Server API to automatically zoom based on the
geography covered by address and location via the following snippet:
//Call MapPoint Render Web Service
           RenderServiceSoap RenderService = new RenderServiceSoap();
           RenderService.Credentials = new NetworkCredential("Account ID", "Password");
           MapViewRepresentations mvRep = RenderService.GetBestMapView(myLocation, "MapPoint.NA");
           ViewByBoundingRectangle[] mviews = new ViewByBoundingRectangle[1];
           mviews[0] = mvRep.ByBoundingRectangle;
           MapSpecification mspec = new MapSpecification();
                   //mspec.Options = moptions;
           mspec.Views = mviews;
           mspec.Pushpins = pushpins
           mspec.DataSourceName = "MapPoint.NA";
           MapImage[] image = RenderService.GetMap(mspec);
Use the account ID and password that you created when signing into the developer access portal at https://mappoint-css.partners.extranet.microsoft.com/MwsSignup/Eval.aspx.
Note
The image map control is what’s used to show the map with the selected address and location, as shown here:
System.IO.Stream streamImage;
streamImage = new System.IO.MemoryStream(image[0].MimeData.Bits);
Response.Clear();
Response.ContentType = image[0].MimeData.MimeType;
Response.BinaryWrite(image[0].MimeData.Bits);
Response.End();
|
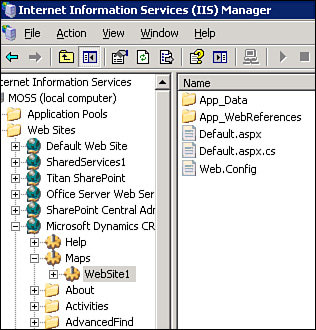
3. | Save
the solution into a new folder where the CRMWeb is served (normally in
C:\Program Files\Microsoft Dynamics CRM Server\CRMWeb or in
C:\InetPub\wwwroot). In this example, we’ve created a new directory
called Maps, as shown in Figure 6. (Be sure the directory is configured in IIS as a virtual directory.)
|
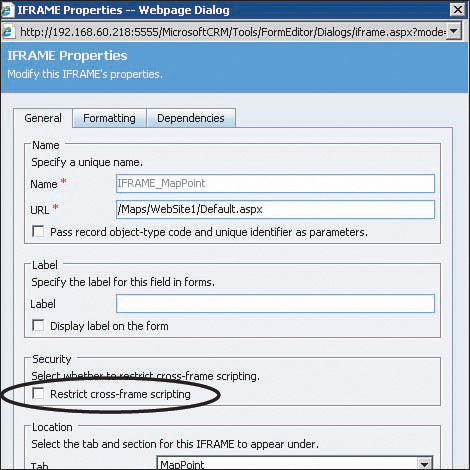
4. | Navigate to the customization screen for accounts in Microsoft Dynamics CRM, and add a new tab, section, and IFrame.
Be sure to configure the IFrame, as shown in Figure 7,
by adding a name and the URL to the page you just created. In addition,
be sure to unselect Restrict Cross-Frame Scripting in the Security
section.
|
5. | For the Account form, add the following code to the OnLoad event:
var address = '';
var schemaNames =
'address1_line1,address1_postalcode,address1_city,address1_country';

var schemaNameArray = schemaNames.split(",");

for(count = 0; count < schemaNameArray.length; count++)
{
   var o = document.getElementById(schemaNameArray[count]);
 if(o != null)
 {
  if(o.value != '')
   {
   address = address + '!' + o.value ;
   }
 }
}

var URL = '/Maps/WebSite1/Default2.aspx?Address=' + address;

crmForm.all.IFRAME_MapPoint.src = URL; |
