MapPoint is an extendable product and technology that
enables users to create complex mapping and data scenarios. It is
significantly more sophisticated than the other mapping technologies in
that it has geographic information system (GIS) integration with
latitude and longitude options. We have included it within its own
section because the application, MapPoint 2009, can be used without an
Internet connection, which is a common scenario where users don’t have
access to call the MapPoint web services.
We will review two different options:
MapPoint 2009
With this option, we
can leverage the MapPoint 2009 software development kit (SDK) to display
Microsoft Dynamics CRM data within the application.
Note
It is important to note that MapPoint is a compiled .NET application and not a web application.
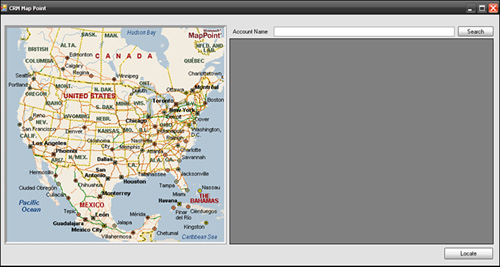
In the example, we
modify a MapPoint user interface control and create a text box that
shows the Microsoft Dynamics CRM accounts based on the account name, add
a Search button, and a data grid to show the resulting/matching
accounts and finally include a Locate button that locates the selected
address on the MapPoint map.
The Search button
includes the business logic to fetch the Microsoft Dynamics CRM accounts
using a fetch query based on the user input to retrieve all the
accounts in Microsoft Dynamics CRM that match the account name entered
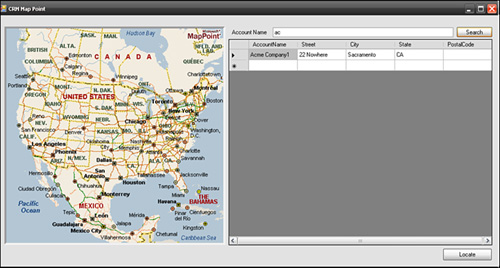
in the text box. Figure 1 shows the final custom application.
To deploy the Windows-based usage of MapPoint 2009, complete the following steps:
1. | On a computer that has MapPoint 2009 installed, create a new Windows application and reference the MapPoint assemblies.
|
2. | Create two class files: one for Business Logic and one for Data Access.
For the Business Logic page, use this code:
using System;
using System.Collections.Generic;
using System.Collections.Specialized;
using System.IO;
using System.Data;
using System.Configuration;
using System.Text;
using System.Xml;

namespace MapPointApp
{
    class BusinessLogic
    {
        #region Global Declaration
        DataAccessLayer mscrmAccess = null;
        #endregion

        public BusinessLogic()
        {
            mscrmAccess = new DataAccessLayer();
        }

        public DataTable GetAccountDetails(string accName)
        {
            StringBuilder fetchXML = new StringBuilder();
            fetchXML.Append(@"<fetch mapping=""logical""><entity name=""account"">");
            fetchXML.Append(@"<attribute name=""name"" />");
            fetchXML.Append(@"<attribute name=""address1_line1"" />");
            fetchXML.Append(@"<attribute name=""address1_city"" />");
            fetchXML.Append(@"<attribute name=""address1_stateorprovince"" />");
            fetchXML.Append(@"<attribute name=""address1_postalcode"" />");
            fetchXML.Append(@"<filter><condition attribute=""name"" operator=""like"" value=""");
            fetchXML.Append(accName);
            fetchXML.Append(@"%""/></filter></entity></fetch>");

            string resultSet = mscrmAccess.ExecuteCRMQuery(fetchXML.ToString());
            XmlDocument xmlDocument = new XmlDocument();

            xmlDocument.LoadXml(resultSet);
            string xPath = @"/resultset/result";
            XmlNodeList xmlNodeList = xmlDocument.SelectNodes(xPath);

            DataTable caseDataTable = new DataTable();

            DataColumn dColumn;

            dColumn = new DataColumn();
            dColumn.DataType = Type.GetType("System.String");
            dColumn.ColumnName = "AccountName";
            caseDataTable.Columns.Add(dColumn);

            dColumn = new DataColumn();
            dColumn.DataType = Type.GetType("System.String");
            dColumn.ColumnName = "Street";
            caseDataTable.Columns.Add(dColumn);

            dColumn = new DataColumn();
            dColumn.DataType = Type.GetType("System.String");
            dColumn.ColumnName = "City";
            caseDataTable.Columns.Add(dColumn);

            dColumn = new DataColumn();
            dColumn.DataType = Type.GetType("System.String");
            dColumn.ColumnName = "State";
            caseDataTable.Columns.Add(dColumn);

            dColumn = new DataColumn();
            dColumn.DataType = Type.GetType("System.String");
            dColumn.ColumnName = "PostalCode";
            caseDataTable.Columns.Add(dColumn);

            foreach (XmlNode node in xmlNodeList)
            {
                DataRow dRow = caseDataTable.NewRow();
                if (node.SelectSingleNode("name") != null)
                {
                    dRow["AccountName"] =node.SelectSingleNode("name").InnerText;
                }
                if (node.SelectSingleNode("address1_line1") != null)
                {
                    dRow["Street"] =node.SelectSingleNode("address1_line1").InnerText;
                }
                if (node.SelectSingleNode("address1_city") != null)
                {
                    dRow["City"] =node.SelectSingleNode("address1_city").InnerText;
                }
                if (node.SelectSingleNode("address1_stateorprovince") != null)
                {
                    dRow["State"] = node.SelectSingleNode("address1_stateorprovince").InnerText;
                }
                if (node.SelectSingleNode("address1_postalcode") != null)
                {
                    dRow["PostalCode"] = node.SelectSingleNode("address1_postalcode").InnerText;
                }
                caseDataTable.Rows.Add(dRow);
            }

            return caseDataTable;
        }

    }
}
For the Data Access layer, use this code:
using System;
using System.Collections.Generic;
using System.Text;
using System.Web.Services.Protocols;
using MapPointApp.CRMSDK;

namespace MapPointApp
{
    class DataAccessLayer
    {
        #region global Declaration
        protected string crmServer = null;
        protected CrmService crmService = null;
        protected string crmWebServicesUrl = null;
        #endregion

        public DataAccessLayer()
        {
            crmServer = "http://192.168.0.1:5555/mscrmservices";
            string userName = "administrator";
            string userPwd = "password";
            string userDomain = "crmdev";
            string crmOrgName = "Webfortis";

            if (crmServer.Length == 0 || (!crmServer.StartsWith("http://") && !crmServer.StartsWith("https://")))
            {
                throw new ApplicationException("CRM server url is wrong, please contact your system administrator.");
            }

            if (!crmServer.EndsWith("/"))
            {
                crmServer += "/2007/";
            }
            else
            {
                crmServer += "2007/";
            }

            crmWebServicesUrl = string.Concat(crmServer, "CrmService.asmx");


            crmService = new CrmService();
            crmService.Url = crmWebServicesUrl;
            crmService.Credentials = new System.Net.NetworkCredential(userName, userPwd, userDomain);

            crmService.PreAuthenticate = true;
            CrmAuthenticationToken token = new CrmAuthenticationToken();
            token.OrganizationName = crmOrgName;
            token.AuthenticationType = 0;
            crmService.CrmAuthenticationTokenValue = token;
        }

        public string ExecuteCRMQuery(string fetchXML)
        {
            try
            {
                //Fetch XML Execution
                return crmService.Fetch(fetchXML);
            }
            catch (SoapException Ex)
            {
                throw new ApplicationException("Unable to retrieve CRM records. Please contact your system administrator", Ex);
            }
            catch (Exception Ex)
            {
                throw new ApplicationException("Unable to retrieve CRM records. Please contact your system administrator", Ex);
            }
        }
    }
}
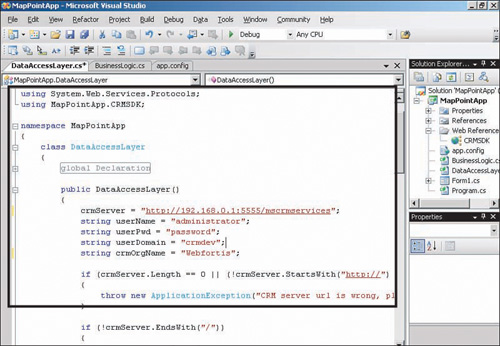
Be sure to change the section in the Data Access layer with your
server, username, user password, domain, and organization, as shown in Figure 2.
|
3. | Create a new form within the solution with the following code:
using System;
using System.Collections.Generic;
using System.ComponentModel;
using System.Data;
using System.Drawing;
using System.Text;
using System.Windows.Forms;

namespace MapPointApp
{
    public partial class Form1 : Form
    {

        #region Global Declaration
            BusinessLogic bLogic = null;
            MapPoint.Map objMap = null;
            MapPoint.Location objLoc = null;
            MapPoint.FindResults objResults = null;
            MapPoint.Pushpin objPushpin = null;
            MapPoint.Symbol objSymbol = null;
            object key = 1;
        #endregion

        public Form1()
        {
            InitializeComponent();

            bLogic = new BusinessLogic();

            objMap = MPC.NewMap(MapPoint.GeoMapRegion.geoMapNorthAmerica);

        }

        public void GetAccountDetails()
        {
            DataTable accountTable = bLogic.GetAccountDetails(txtAccName.Text);
            dataGridView1.DataSource = accountTable;
        }

        private void btnLocate_Click(object sender, EventArgs e)
        {
            DataGridViewRow selectedRow = dataGridView1.SelectedRows[0];

            string accName = selectedRow.Cells[0].Value.ToString();
            string street = selectedRow.Cells[1].Value.ToString();
            string city = selectedRow.Cells[2].Value.ToString();
            string state = selectedRow.Cells[3].Value.ToString();
            string postalCode = selectedRow.Cells[4].Value.ToString();

            objResults = objMap.FindAddressResults(street, city, "", state, postalCode, MapPoint.GeoCountry.geoCountryUnitedStates);

            objLoc = (MapPoint.Location)objResults.get_Item(ref key);

            objMap.AddPushpin(objLoc, accName).Highlight = true;

            objPushpin = objMap.FindPushpin(accName);
            objPushpin.BalloonState = MapPoint.GeoBalloonState.geoDisplayBalloon;
            //objSymbol = objMap.Symbols.Add("C:/WINDOWS/Prairie Wind.bmp");
            //objPushpin.Symbol = objSymbol;
            //objPushpin.BalloonState = MapPoint.GeoBalloonState.geoDisplayBalloon;
            objLoc.GoTo();
        }

        private void btnSearch_Click(object sender, EventArgs e)
        {
            GetAccountDetails();
        }
    }
}
|
4. | The resulting solution will look similar to Figure 3 and will allow you to enter CRM account information and search for matches.
|
To use the form, enter
all or part of a CRM account and click Search. The grid will display the
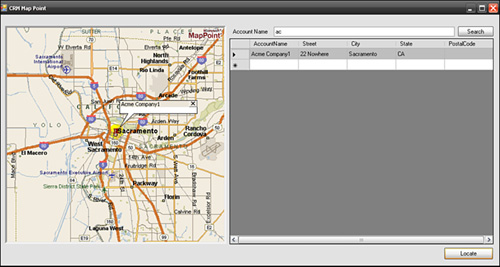
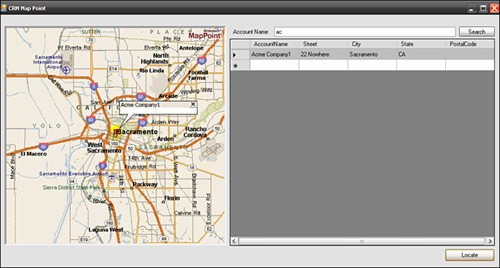
resulting matches from CRM (as shown in Figure 4), and when you select a row and click Locate, the location will display (see Figure 5).
