3. Using Server Name Mappings
In scenarios in which
content must be crawled using an address other than one of the Alternate
Access Mapping URLs defined for user access to SharePoint content, you
can create server name mappings to override how URLs are shown in search
results and correct the name displayed to users. You can access the
management page by clicking Server Name Mapping in the Crawling section
of the Search Service management page of the Quick Launch navigation
area (refer back to Figure 11-5).
Click the New Mapping link to open the page to create the mapping. The
configuration simply requires you to enter the address in the index to
be replaced in search results and the address you want to use in the
search results.
A server name mapping might be required when
Content is crawled via HTTP but users will access it using HTTPS.
It
is necessary to crawl with Windows authentication when the user
authentication method is not supported for the crawler, such as
smart-card authentication.
A
file system is presented to users via WebDAV. The crawler must access
via a file share to retrieve ACLs for security trimming search results.
A file system is presented to users internally and you don’t want the file server names exposed in the result set.
4. Controlling Host Distribution
In SharePoint Search 2010,
the number of crawl components and crawl databases can be increased as
the workload increases with automatic distribution of addresses, or if
desired, specific addresses can be assigned to specific crawl databases
using Host
Distribution rules. You cannot even open the page to create a Host
Distribution rule until more than one crawl database has been created. A
rule can only be applied to a database that is associated with a crawl
component. If a database is dedicated to accept Host
Distribution rules assignments, it only accepts content assigned by
rules and does not participate in automatic distribution of addresses.
The Host Distribution Rules
management page is accessed from the Quick Launch menu of the Search
Service Application Management page. Click the Add Distribution Rule
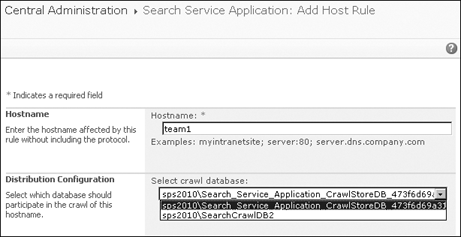
link to display the Add Host Rule page shown in Figure 6
and then enter the host name without the protocol, select the
appropriate database, and click OK. All content from that host will be
placed in the database regardless of what protocol was used to crawl the
content.

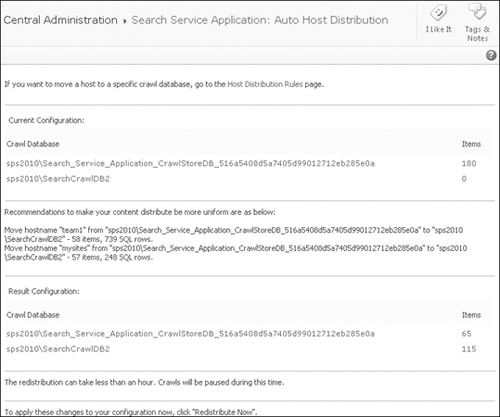
The distribution of content across content databases can be viewed from the Auto Host Distribution page displayed in Figure 7.
This page is accessed from the Host Name view of the Crawl Log
management pages.

5. Managing File Types
You can give each search
service application a unique configuration that determines what type of
files should be crawled. The list is controlled on the Manage File Types
page accessed from the Quick Launch (refer back to Figure 11-5).
Crawl components will only request the file types from content sources
that appear on this page. Crawl rules can exclude file types included on
this page from specific addresses, but they cannot include file types
not listed on this page.
The page has a New File Type
link that only requires entry of the file type extension. If there is no
iFilter for the file type, then only the metadata (properties) for the
files will be indexed. Unfortunately, SharePoint does not provide an
interface to display which iFilters have been installed on your servers.
Add-on iFilters
have their own installation processes that are generally individual to
the product. SharePoint does not provide an installation tool for
third-party iFilters. So, if you do need to crawl a new file type, be sure to
Install the correct iFilter.
Configure the Managed File Type for the new file.
Install the graphic image for the file (usually available from the file type’s manufacturer).
Update the Docicon.xml file.
6. Resetting the Index
An index reset is
probably the most drastic action that you can take on a search service
application short of deleting the application itself. Resetting the
crawled content erases all portions of the content index including the
metadata databases, the index files on all query components, the crawl
logs, and the crawl history. If you initiate a reset, no search results
will be available until full crawls have been run on all content sources.
By default, search
alerts are deactivated during the reset so that alerts subscribers do
not have their inbox flooded with e-mails on every item matching their
saved search alert. You will have to manually re-enable search alerts
after the full crawls have been completed.