2. Security Configuration and Analysis
The Security
Configuration and Analysis (SCA) MMC snap-in lets you compare systems in
their current configuration against settings specified within a
security template, or within multiple templates. Using the report
generated by that process, you can make wholesale changes to a system's
security to bring it in line with an entire template, or you can modify
configurations on an item-by-item basis. This is a great tool for
initial system rollouts and deployments because you can have one
template containing your business's entire security policy that you can
apply using a simple tool. You also can save the current system
configurations and export them to a template should a rollback be
needed.
To begin using the SCA snap-in, you'll need to add it to a console. To do so, follow these steps:
Run mmc
from the command line to load the MMC in author mode. Author mode
allows you to construct new consoles from scratch and add snap-ins to
them.
From the Console menu, select Add/Remove Snap-in. Then select Add. This raises a dialog box entitled Add Standalone Snap-in.
From the list, select Security Configuration and Analysis, click Add, and then click Close.
Click OK in the next box to confirm the addition of the snap-in.
2.1. Creating and using template databases with SCA
SCA uses databases, which have a .SDB
extension, to store security templates for faster access and data
retrieval. You can either create a new template database if this is your
first time using SCA, or open an existing SDB file, by doing the
following:
Right-click Security Configuration and Analysis in the left pane of your console and select Open Database from the context menu.
The
Open Database dialog box appears. Type a name or select one from the
list to open an existing database, or enter a name for a new database.
If
you enter a new filename, you will be given the option of importing a
base security template. Choose either a predefined template that ships
with Windows Server 2003 or one that you've modified or customized.
Once you've created a
database with an initial security template inside it, you can import
any number of other templates into it as well. Simply right-click
Security Configuration and Analysis, and from the context menu choose
Import Template. From there, select the .INF file that is the template you want, and click OK. The settings are added to the database.
In the case of templates whose settings conflict, the settings imported last will apply. |
|
Keep in mind that when you
make changes to a security policy from within SCA, those settings are
saved to the database and not to a template file that you can import
into a GPO or otherwise apply to other systems. You'll need to export
any saved settings to another template to use the template in other
systems. To do so, right-click Security Configuration and Analysis, and
from the context menu choose Export Template. From there, choose a
filename with a .INF extension for the exported template, and click OK.
2.2. Scanning system security
To analyze a
system using SCA, right-click Security Configuration and Analysis in the
console and select Analyze System Now from the context menu. The
Perform Analysis dialog box will appear. Select a filename for the
results and accompanying log and click OK.
Two reports will be
generated. First, events will be written to a log file to correspond
with each success and failure of a component analyzed by SCA. And
second, SCA will write the current state of each component to the
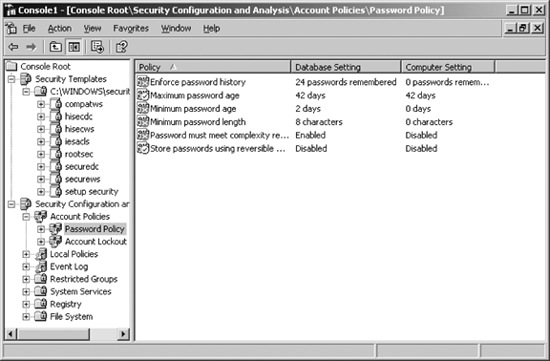
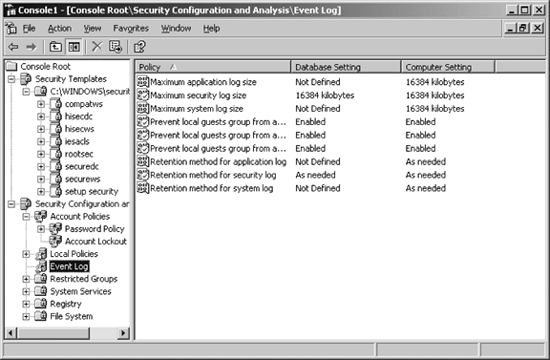
configuration trees within SCA, as shown in Figure 2.
To view the
log file, right-click Security Configuration and Analysis in the left
pane, then select View Log File. Windows will load the log file into the
right pane and will show generally what portions of the computer's
security policy don't match up to a certain baseline as set in the
database. For a more exact analysis
, you'll need to examine the policy tree itself. To do so, expand
Security Configuration and Analysis and select one of the seven security
areas to consider. Figure 3 shows the password policy tree under Account Policies.


Note the Database
Setting and Computer Setting columns in the right pane. These indicate
exactly which configuration options match between the current computer
and the settings configured in the SCA database. Settings that agree are
preceded by an icon with a small green checkmark. Likewise, settings
that disagree are preceded by a small red X.
You can also have an exclamation point, depending on the severity of
the difference and Windows' ability to comprehend what's going on.
Settings that don't appear in the database are not analyzed and thus are
not marked.
2.3. Correcting system security
If you want to
make changes to a computer's security policy as specified by SCA in a
wholesale manner, simply right-click Security Configuration and Analysis
and select Configure Computer Now. The changes will be updated on the
local computer.
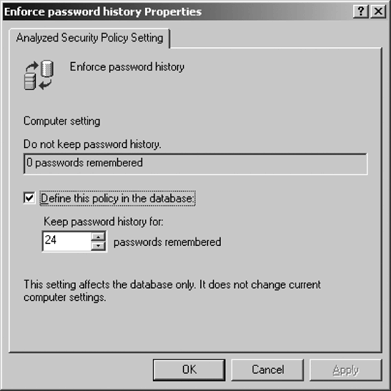
If you want to make a
change in the database based on an actual configuration object, you can
right-click the attribute in question to raise the Analyzed Security
Policy Setting dialog box, as shown in Figure 4.

Simply adjust the settings
in the box and then click OK. The change will be committed to the
database, but not to the local computer, and all future computers you
examine with that SCA database will be analyzed with that change
committed.