The mail profile used with Outlook determines which
information services are available and how they are configured. A
default mail profile is created when you install and configure Outlook
for the first time. This mail profile is usually called Outlook.
The active
mail profile defines the mail setup for the user who is logged on to
the computer. You can define additional profiles for the user as well.
You can use these additional profiles to customize the user's mail
environment for different situations. Here are two scenarios:
A manager needs to check the Technical Support and Customer Support mailboxes
only on Mondays when she writes summary reports. On other days, the
manager doesn't want to see these mailboxes. To solve this problem, you
create two mail
profiles: Support and Standard. The Support profile displays the
manager's mailbox as well as the Technical Support and Customer Support
mailboxes. The Standard profile displays only the manager's mailbox. The
manager can then switch between these mail profiles as necessary.
A
laptop user wants to check Exchange mail directly while connected to
the LAN. When at home, the user wants to use remote mail with scheduled
connections. On business trips, the user wants to use Simple Mail
Transfer Protocol (SMTP) and POP3. To solve this problem, you create
three mail profiles: On-Site, Off-Site, and Home. The On-Site profile
uses the Exchange Server service with a standard configuration. The
Off-Site profile configures Exchange Server for remote mail and
scheduled connections. The Home profile doesn't use the Exchange
information service and uses the Internet mail service instead.
Common tasks you'll use to manage mail profiles are examined in the sections that follow.
1. Creating, Copying, and Removing Mail Profiles
You manage mail profiles through the Mail utility. To access this utility and manage profiles, follow these steps:
Start
the Mail utility. Click Start, and then click Control Panel. In Control
Panel, click Small Icons on the View By list and then double-click
Mail. If you are using a 64-bit operating system, the Mail utility is
listed under the 32-bit Control Panel. In Control Panel, click Small
Icons on the View By list, double-click 32-Bit Control Panel, and then
double-click Mail.
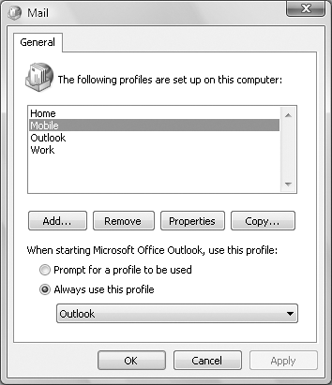
In the Mail Setup–Outlook dialog box, click Show Profiles.
As Figure 16-8
shows, you should see a list of mail profiles for the current user.
Mail profiles for other users aren't displayed. You can now perform the
following actions:
Click Add to create a new mail profile using the Account Settings Wizard.
Delete a profile by selecting it and clicking Remove.
Copy an existing profile by selecting it and clicking Copy.
View a profile by selecting it and clicking Properties.
2. Selecting a Specific Profile to Use on Startup
You can configure Outlook to
use a specific profile on startup or to prompt for a profile to use. To
start with a specific profile, follow these steps:
Start
the Mail utility. Click Start, and then click Control Panel. In Control
Panel, click Small Icons on the View By list and then double-click
Mail. If you are using a 64-bit operating system, the Mail utility is
listed under the 32-bit Control Panel. In Control Panel, click Small
Icons on the View By list, double-click 32-Bit Control Panel, and then
double-click Mail.
In the Mail Setup–Outlook dialog box, click Show Profiles.
Select Always Use This Profile, and then use the drop-down list to choose the startup profile. Click OK.
To prompt for a profile before starting Outlook, follow these steps:
Start
the Mail utility. Click Start, and then click Control Panel. In Control
Panel, click Small Icons on the View By list and then double-click
Mail. If you are using a 64-bit operating system, the Mail utility is
listed under the 32-bit Control Panel. In Control Panel, click Small
Icons on the View By list, double-click 32-Bit Control Panel, and then
double-click Mail.
In the Mail Setup–Outlook dialog box, click Show Profiles.
Select Prompt For A Profile To Be Used, and then click OK.
