Managing WMI
This section is
intended to illustrate the options available for configuring WMI rather
than as a “how-to” guide to administering WMI. You will rarely need to
modify the WMI settings directly during day-to-day ConfigMgr
administration. However, understanding the available options will help
you understand the inner workings and functionality of WMI.
The Windows WMI
Control is a graphical tool for managing the most important properties
of the WMI infrastructure. Only members of the local Administrators
group can use the WMI Control. To run this tool, perform the following
steps:
1. | Launch
the Computer Management MMC snap-in. The exact procedure will vary
depending on the version of Windows you are running. Generally you can
right-click Computer or My Computer, and choose Manage.
|
2. | Expand the Services and Applications node in the tree pane.
|
3. | Right-click WMI Control and choose Properties.
|
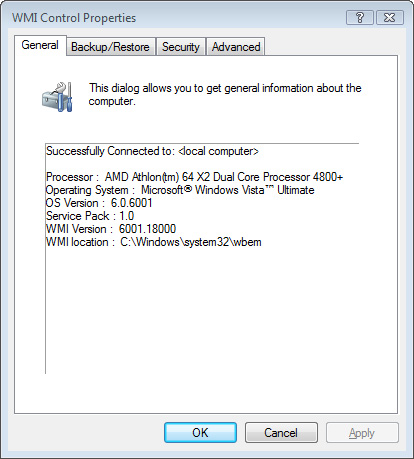
The WMI Control opens to the General tab. As shown in Figure 3,
the General properties confirm you have successfully connected to WMI
on the local machine, display a few basic properties of your system, and
specify the installed version of WMI.
Note: About Managing WMI on a Remote Machine
You can use the WMI
Control tool to manage WMI on the local machine or on a remote machine.
To connect to WMI on a remote machine, you follow the same procedure
previously described in this section, with one additional step.
Immediately after step 1, right-click the Computer Management node at
the top of the tree and choose Connect to another computer. Then enter
the name or IP address of the computer you want to manage and click OK.
After connecting to the remote machine, complete steps 2 and 3 in the
procedure.
Note that in addition
to administrative privilege on the remote machine, you will need
appropriate DCOM permissions (described later in this section). Also,
DCOM network protocols must not be blocked on the remote machine or on
any intermediary devices.
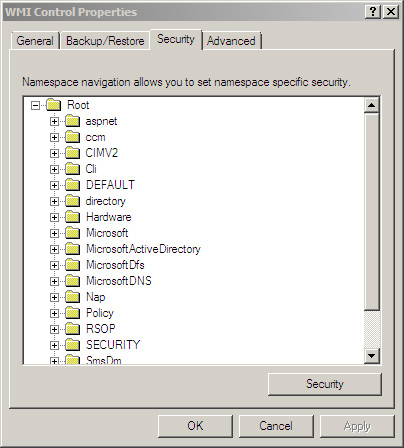
You can manage WMI
security from the Security tab of the WMI Control tool. WMI uses
standard Windows access control lists (ACLs) to secure each of the WMI
namespaces that exist on your machine. A namespace, is a container that holds other WMI elements.
The tree structure in the Security tab shows the WMI namespaces, as
displayed in Figure 4.
It
is important to note that the namespace is the most granular level in
which to apply ACLs in WMI. The process of setting security on WMI
namespaces, and the technology behind it, is very similar to the process
of setting NTFS (NT File System) security. If you click a namespace to
select it and click Security, you will see a dialog box similar to the
one displayed in Figure 5.
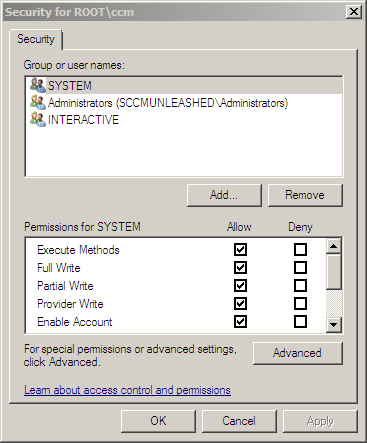
The dialog box in Figure 5
allows you to add security principals to the discretionary ACL (DACL)
of the WMI namespace. The DACL specifies who can access the namespace
and the type of access they have. Prior to Windows Vista, this was the
only namespace access control implemented in WMI.
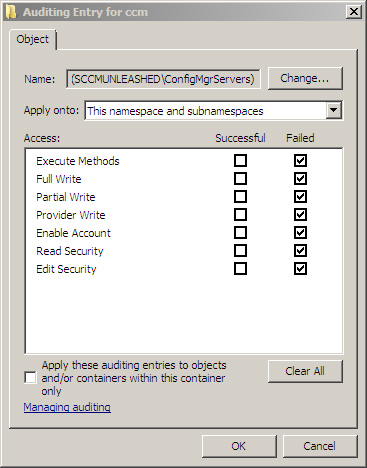
Tip: About Auditing
As with other
auditing of object access in Windows, auditing access to WMI namespaces
requires the effective value of the group policy setting Audit Object
Access to be enabled. The Windows Security event log records the events
specified in the auditing settings.
To specify auditing on a WMI namespace, perform the following steps:
1. | From the Security dialog box shown in Figure 3.12, click the Advanced button.
|
2. | In the Advanced Security Settings dialog box, click the Auditing tab.
|
3. | Click the Add button and then enter the name of the user, group, or built-in security principal (see Figure 6). Click OK.

|
4. | Complete the selections in the Auditing Entry dialog box and click OK.
|
Figure 7 shows the entries to enable auditing for all access failures by members of the ConfigMgr Site Servers group.
The remaining tabs
of the WMI Control tool allow you to change the default namespace for
WMI connections, and they provide one of several methods of backing up
the WMI repository. Windows system state backups also back up the
repository. Prior to Windows Vista, the WMI Control tool also contained a
logging tab that allowed you to specify verbose, normal, or no logging,
as well as choose the WMI log location and maximum log size. In Windows
Server 2008 and Vista, you can enable logging and configure log options
in the Windows Event Viewer.
To enable WMI Trace Logging in Windows 2008 and Vista, perform the following steps:
1. | Open Event Viewer.
|
2. | On the View menu, select Show Analytic and Debug Logs.
|
3. | In the tree control, expand Applications and Service Logs -> Microsoft -> Windows -> WMI Activity.
|
4. | Right-click
Trace and then select Enable Log from the context menu. Choosing
Properties from the same menu allows you to configure logging properties
for WMI. You will now be able to view, filter, and manage the WMI log
from this node in the Event Viewer tree.
|
You can read more about WMI Logging at http://msdn.microsoft.com/en-us/library/aa394564(VS.85).aspx.
You should be aware that
User Account Control, also introduced in Windows Vista, applies to
privileged WMI operations. This can affect some scripts and command-line
utilities. For a discussion of User Account Control and WMI, see http://msdn.microsoft.com/en-us/library/aa826699(VS.85).aspx.
Additional command-line tools are available for managing WMI, which you can download from http://msdn.microsoft.com/en-us/library/aa827351(VS.85).aspx.
Tip: Using the WMIDiag Utility
SMS was one of the
first applications to take advantage of WMI. At one time, SMS was often
the only WMI management application running on many Windows machines.
In those days, it was a common practice among SMS administrators to
simply delete the repository when WMI errors were detected, and then
restart WMI to re-create the repository. This is no longer a safe
practice, because many applications depend on data stored in the
repository. Moreover, WMI errors can result from many other problems in
your environment and may have nothing to do with WMI itself.
Rather than deleting the repository, you should obtain the WMI Diagnosis Utility (WMIDiag) from the Microsoft download site (http://www.microsoft.com/downloads/details.aspx?familyid=d7ba3cd6-18d1-4d05-b11e-4c64192ae97d&displaylang=en, or go to www.microsoft.com/downloads and search for WMIDiag).
WMIDiag can help you diagnose most WMI problems, and in many cases it
provides detailed instructions on how to correct those problems.
