Wizard Step 2: Install CRM Reports
1. | Within
the Event Management accelerator Installation Wizard, click Step 2:
Install CRM Reports. This displays the location of the CRM reports
you’ll be importing next.
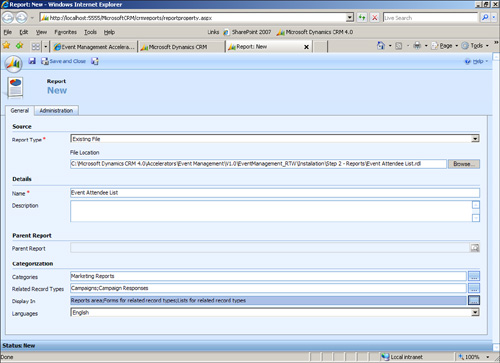
| 2. | Within CRM, navigate to Workplace, Reports, New. You’ll be prompted with a New Report screen. Configure each field as follows:
- Report Type: Existing File
- File Location: \Installation\Step 2 – Reports\Event Attendee List.rdl (making sure the full path to your extracted files exists)
- Name: Event Attendee List
- Description: Optional text describing the report
- Categories: Marketing Reports
- Related Record Types: Campaigns and Campaign Responses
- Display In: Reports Area, Forms for related record types, Lists for related record types
- Administration Tab, Viewable By: Organization
After you’ve completed the configurations, your New Report screen should match Figure 6.
| 3. | Click Save and Close to create the new CRM report.
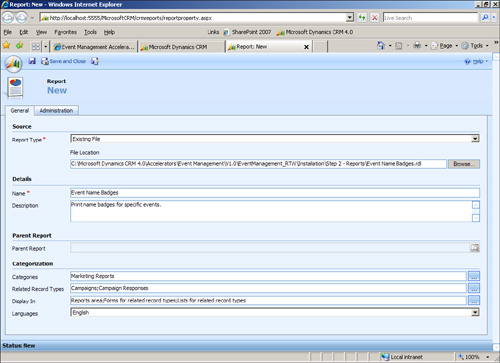
| 4. | Within CRM, navigate to Workplace, Reports, New. You’ll be prompted with a New Report screen. Configure each field as follows:
- Report Type: Existing File
- File Location: \Installation\Step 2 – Reports\Event Name Badges.rdl (making sure the full path to your extracted files exists)
- Name: Event Name Badges
- Description: Optional text describing the report
- Categories: Marketing Reports
- Related Record Types: Campaigns and Campaign Responses
- Display In: Reports Area, Forms for related record types, Lists for related record types
- Administration Tab, Viewable By: Organization
After you’ve completed the configurations, your New Report screen should match Figure 7.
| 5. | Click Save and Close to create the new CRM report.
|
Wizard Step 3: Full Sample Portal
1. | Create a new folder for the sample portal (for example, C:\Program Files\Microsoft Dynamics CRM Customer Portal\EventMgr).
| 2. | Within
the Event Management accelerator Installation Wizard, click Full Sample
Portal. This displays the location of the full sample portal files.
Copy all files within this folder, and then paste them to the \Microsoft
Dynamics CRM Customer Portal\EventMgr folder you just created.
| 3. | Within
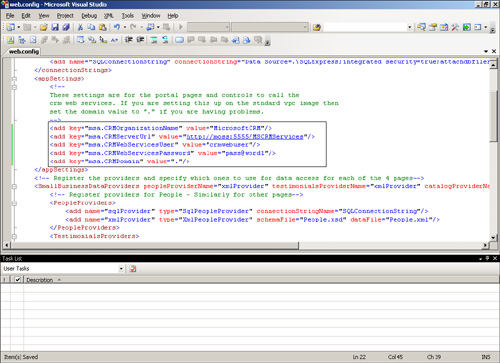
the \Microsoft Dynamics CRM Customer Portal\EventMgr folder, edit the
web.config file and modify the following entities (see Figure 8).
| 4. | Save your changes to the web.config file and then close it.
| 5. | Open Internet Information Services Manager (inetmgr).
| 6. | Create a new website named Microsoft Dynamics CRM Event Manager.
| 7. | Select port 4444 as the default TCP port this website should use.
| 8. | Select
the folder (for example, C:\Program Files\Microsoft Dynamics CRM
Customer Portal\EventMgr) as the website home directory, making sure to
Allow Anonymous Access to This Web Site.
| 9. | Allow the following permissions:
| 10. | Once created, navigate to the Properties window of the new website, click the ASP.NET tab, and select ASP.NET version 2.0.50727.
| 11. | Within the Properties window, click the Documents tab and add Default.aspx.
| 12. | Click OK to save your changes and close the Properties window.
|
CRM Customizations
1. | Within
CRM, we need to ensure that the Event Management Configuration entity
is displayed within CRM Settings. Navigate to Settings, Customization,
Customize Entities; open the Event Management Configuration window, and
place a check mark within the Settings check box.
| 2. | Close your browser and reopen it and then open CRM.
| 3. | Navigate to Settings, Customization, Customize Entities, Campaign, and open the Campaign entity.
| 4. | Navigate to Attributes and open the statuscode attribute.
| 5. | Within the Type section, edit the following types and note their list value:
- Launched: Default value is 2.
- Waitlisting: Default value is 200,000.
- Sold Out: Default value is 200,001.
| 6. | Close the Campaign entity windows.
| 7. | Navigate to the Campaign Response entity and note the following list values for the responsecode attribute:
- Registered: Default value is 200,000.
- Waitlist: Default value is 200,002.
- Registration Canceled: Default value is 200,001.
| 8. | Navigate to the Campaign Response entity and note the following list values for the channeltypecode attribute:
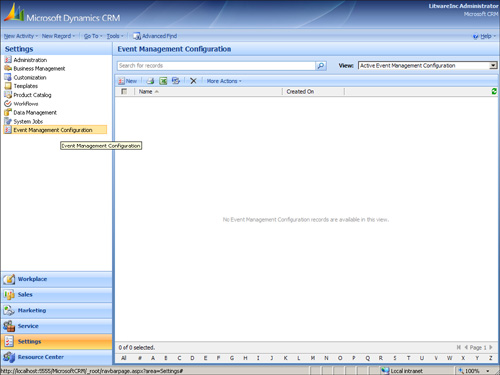
| 9. | Close all open entity windows; navigate to Settings and then to the Event Management Configuration entity (see Figure 9).
| 10. | Click
New, and the New Event Management Configuration window will display.
We’ll now apply the settings we’ve just recorded within previous steps.
Configure the window with the following settings (see Figure 10):
- Name: Event Management Config V1
- Event Is Open Status Code: Launched
- Event Is Waitlisting Status Code: Waitlisting
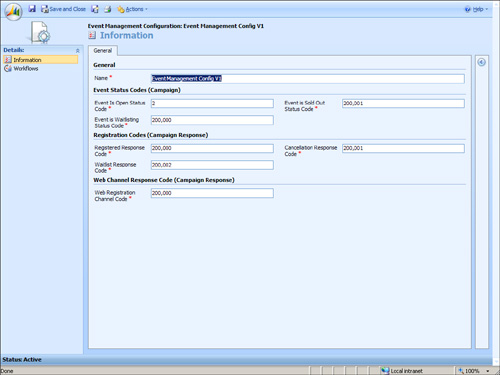
- Event Is Sold Out Status Code: Sold Out
- Registered Response Code: Registered
- Waitlist Response Code: Waitlist
- Cancellation Response Code: Registration Canceled
- Web Registration Channel Code: Web
| 11. | Click Save and Close to save your configurations. |
|