Building a Custom Search Implementation
As
outlined previously, there are advantages and disadvantages to the MCMS
Connector search controls. The most obvious is the fact that the SearchResultControl
does not allow us to configure the results returned by the SPS search
We will now build our own search implementation that will leverage the
SPS search Web Service, offer advanced and specialized searching to our
users, and present the results in a customizable manner.
About the SharePoint Portal Server Query Service
Everything we are
about to build depends upon the Query Service Web Service, included in
SPS, that exposes search functionality to remote clients, such as our
website. This web service accepts a request in the Microsoft.Search.Query XML format and returns a response in the Microsoft.Search.Response
XML format. In order to build a robust solution, the request we submit
will use the Microsoft SQL Syntax for full-text Search. One method
offered by the Query Service is QueryEx, which we will use as it returns results in the form of a DataSet.
Building a Search Input Control
The first thing we’ll do is
build a search input control that will submit a search query to a page
for processing. This implementation will allow us to add a small search
component to all of our templates quickly. Upon submitting a search
query, our user control will add the query parameters to the querystring
and redirect the request to the results page.
Let’s first start by creating a new user control.
1. | In Visual Studio .NET, right-click the User Controls folder in the Tropical Green project, and select Add | Add Web User Control.
|
2. | Name the new control SearchInput.ascx.
|
3. | While in Design view, drop controls from the Toolbox onto the Web Form and arrange them as shown below:
| Control | Properties |
|---|
| TextBox | ID = txtSearchInput | | Button | ID = btnExecuteSearch
Text = Go | | LinkButton | ID = lnkAdvancedSearch
Text = advanced
searchoptions
|

|
4. | The LinkButton
we created will take the user to the search results page, which we’ll
add some advanced searching features to later. Double-click our LinkButton. Visual Studio .NET will create an empty event handler for the Click() event. Add a single line of code to this empty event handler to redirect the user to the search results page:
private void lnkAdvancedSearch_Click(object sender, System.EventArgs e)
{
  Response.Redirect(Request.ApplicationPath + "/SearchResults.aspx");
}
|
5. | Next, we need to create an event handler for when a user clicks our Go button. We’ll take the keywords entered in the TextBox and send the search request to the search results page. Double-click the Go button and add the following code to the event handler:
private void btnExecuteSearch_Click(object sender, System.EventArgs e)
{
  string keywords = this.txtSearchInput.Text;
keywords = HttpUtility.UrlEncode(keywords);
Response.Redirect(Request.ApplicationPath
+ "/SearchResults.aspx?keywords="
+ keywords);
}
|
Let’s see if everything is
OK with our new search input control. Save your changes and build the
project. If you receive any error messages, retrace your steps and
ensure that there are no typos.
Before this control can be
used, we need to add it to an existing template. While we’d ideally
want to provide the search on all pages on our site (typically by adding
it to a global heading control), we’ll just add it to the homepage for
now.
1. | Open the \Templates\HomePage.aspx template and drag our new SearchInput.ascx into the top cell, to the right of the logo.
|
2. | Switch to HTML view and find the control we just added. It will likely have an opening tag of uc1:SearchInput. Wrap this control in an HTML DIV and set its alignment to right as shown in the following code:
<td width="100%" colspan="2" valign="top" bgcolor="#ffcc00">
<img src="/tropicalgreen/images/Logo.gif">
<div align="right">
<uc1:SearchInput id="SearchInput1" runat="server"></uc1:SearchInput>
</div>
</td>
|
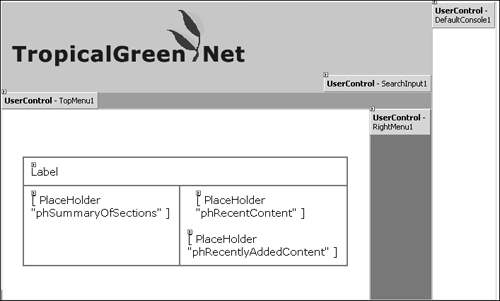
The HomePage.aspx template should now look similar to the following:

The Advanced Search and Results Page
Once we have our search
input control built, we need a page that will execute the search against
the SPS Query Service Web Service and display the results. In addition,
like all other search result pages, we need to add advanced searching
options such as limiting our search to the Tropical Green plant catalog.
Before we can start building the results page, we need to add a web reference to the SPS Query Service Web Service:
1. | In Visual Studio .NET, right-click the TropicalGreen project and select Add Web Reference.
|
2. | Enter the URL of the web service that will retrieve the search results. The URL of the Query Service is http://[portal]/_vti_bin/search.asmx. Then click the Go
button. You will likely be prompted for a user ID and password since
this is part of the SharePoint portal virtual server, which isn’t
configured for anonymous access.
|
3. | Once the web service loads and the available methods are shown in the Add Web Reference Dialog, click the Add Reference button to add the web service to our project.
|
For simplicity, the
search results page we will create will not be a CMS template, rather it
will be a standard ASP.NET Web Form in the root of the Tropical Green
project.
1. | Right-click the project and select Add | Add Web Form.
|
2. | Give the new page the name SearchResults.aspx.
|
3. | In Design view, drag and drop the Styles.css file from Solution Explorer onto the form to apply the stylesheet to the page.
|
4. | Change the page layout to FlowLayout.
|
5. | Drag the following user controls into the designer:
|
6. | Switch to HTML view and modify the body tag as follows: <body topmargin="0" leftmargin="0">
|
7. | Add the following HTML code to the page between the <form> tags, replacing the two controls we just added: <form id="Form1" method="post" runat="server"> <table width="100%" border="0" cellspacing="0" cellpadding="0">
|
<form id="Form1" method="post" runat="server">
<table width="100%" border="0" cellspacing="0" cellpadding="0">
<tr>
<td width="100%" colspan="2" valign="top" bgcolor="#ffcc00">
<img src="/tropicalgreen/images/Logo.gif">
</td>
<td vAlign="top" rowSpan="10">
</td>
</tr>
<tr bgColor="#66cc33">
<td colSpan="2">
<uc1:TopMenu id="TopMenu1" runat="server">
</uc1:TopMenu>
</td>
</tr>
<tr>
<td vAlign="top" style="PADDING-RIGHT:30px; PADDING-LEFT:30px;
PADDING-BOTTOM:30px; PADDING-TOP:10px">
<p> </p>
<table cellspacing="0" cellpadding="10" border="1"
bordercolor="#669900">
<tr vAlign="top">
<td>
<b>Tropical Green Search:<b/>
</td>
</tr>
<tr>
<td vAlign="top">
<b>Advanced Search</b>
<p>
<b>Search Results</b>
</td>
</tr>
</table>
</td>
<td class="RightMenuBar" width="20%" valign="top" height="100%"
align="center" rowspan="2" bgcolor="#669900">
<uc1:RightMenu id="RightMenu1" runat="server">
</uc1:RightMenu>
</td>
</tr>
</table>
</form>
We
now have the basic layout for our advanced search and search results
page, which looks similar to the other templates in our site. Let’s add
some controls for our advanced search.
1. | In Design view, drag a TextBox from the Toolbox and place it under the Advanced Search text.
|
2. | In Design view, drag a Button from the Toolbox and place it to the right of the TextBox.
|
3. | The next thing we need to add is a DataGrid to contain the results of the search. In Design view, drag a DataGrid control from the Toolbox to just under the Add Search Results Here text. We’ll worry about formatting this control later, for now we just need something to show us our data.
|
4. | Set
the properties of the controls we just added according to the following
table: Our advanced search page should now look like this:
| Property | Value |
|---|
| TextBox | ID = txtAdvancedSearch | | Button | ID = btnAdvancedSearch
Text = Go | | DataGrid | ID = dgrSearchResults |
|
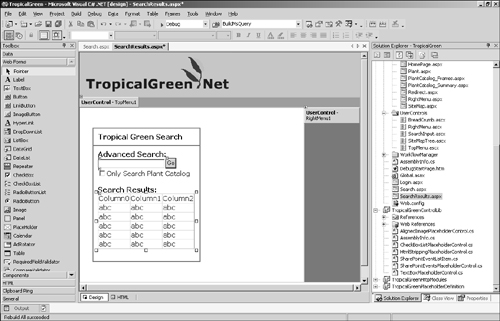
Our advanced search page should now look like this:

Now it’s time to start coding our search logic. First, we need to add an event handler for our advanced search button.
1. | In Design view, double-click the btnAdvancedSearch button to create a click event handler. Visual Studio .NET will add an event handler method to the code-behind file.
|
2. | Add the following code to the btnAdvancedSearch_Click() event handler:
private void btnAdvancedSearch_Click(object sender, System.EventArgs e)
{
  string keywords = this.txtAdvancedSearch.Text;
keywords = HttpUtility.UrlEncode(keywords);
Response.Redirect(Request.ApplicationPath
+ "/SearchResults.aspx?keywords="
+ keywords);
}
|
Next, we need to check the querystring in the Page_Load() event handler to see if any keywords were passed from our SearchInput.ascx control or the txtAdvancedSearch
TextBox.
Add the following code to check if there are any keywords supplied and execute the search if so:
private void Page_Load(object sender, System.EventArgs e)
{
  if (Request.QueryString["keywords"] != null
&& Request.QueryString["keywords"] != String.Empty)
{
string keywords = Request.QueryString["keywords"];
DataSet ds = ExecuteSearch(keywords);
this.dgrSearchResults.Visible = true;
this.dgrSearchResults.DataSource = ds;
this.dgrSearchResults.DataBind();
// autofill the keyword input box with the search keywords
this.txtAdvancedSearch.Text = keywords;
}
else
{
this.dgrSearchResults.Visible = false;
}
}
Now we need to create the method that will execute the search against our SPS content index. This method will:
Create an instance of the Query Service Web Service we just added to the project.
Call a method that will build the MSQuery to submit to the Query Service.
Execute the search.
Bind the search results to a DataGrid.
Import the following namespaces in the SearchResults.aspx.cs file:
using System.Security.Principal;
using System.Runtime.InteropServices;
using System.Net;
using System.Text;
using System.Text.RegularExpressions;
using Microsoft.ContentManagement.Publishing;
Add the following method to the SearchResults.aspx.cs file after the Page_Load()
event handler. This method will ensure the current thread is running
under the original security context regardless of any impersonations
that may have been invoked previously:
// Get reference to the RevertToSelf method
[DllImport("ADVAPI32.DLL")]
public static extern int RevertToSelf();

/// <summary>
/// Builds the appropriate MSQuery,
/// submits the query to the SPS Query Service,
/// and returns the results as a DataGrid.
/// </summary>
/// <param name="keywords">String of keywords to search for.</param>
/// <returns>DataSet of search results.</returns>
private DataSet ExecuteSearch(string keywords)
{
  // decode the list of keywords
  keywords = HttpUtility.UrlDecode(keywords);

  // create reference to the Query Service Web service
  net.tropicalgreen.portal.QueryService spsQueryService =
                           new net.tropicalgreen.portal.QueryService();

  // use the current application pool identity to login
  // to the SharePoint Query Service Web service
  WindowsIdentity CurrentUser = WindowsIdentity.GetCurrent();

  try
  {
    // use the Application Pool account to do access the
    // SharePoint Search Services
    RevertToSelf();
    spsQueryService.Credentials = CredentialCache.DefaultCredentials;
  }
  catch(System.Exception exception)
  {
    throw new System.Exception(exception.Message);
  }
  finally
  {
    // ensure that the original user is being impersonated again
    CurrentUser.Impersonate();
    CurrentUser = null;
  }

  // build MSQuery XML string to send to the Query Service
  // - change the content source to "CMSChannels" if you used SearchSetup.exe
  string msQuery = BuildMSQuery(keywords, "Tropical Green website");

  // execute the query and return the dataset
  return spsQueryService.QueryEx(msQuery);
}
|
If you used the SearchSetup.exe
program to create your content sources, you should use the content
source group “CMSChannels” instead of “Tropical Green website” in the
code above.
|
Our ExecuteSearch() method calls another method, called BuildMsQuery(), which constructs the MSQuery for sending to the QueryEx()
web method. An MSQuery is composed of XML tags that provide
instructions to the Query Service, such as the number of results to
return in the request and
a Microsoft SQL full-text (MSSQLFT) query. Building the MSSQLFT query
and MSQuery is likely to be the most complicated task in implementing
the SharePoint search. We’ll break it into two tasks: building the
actual MSSQLFT query and building the MSQuery XML string. We’ll first
build the full-text query that our MSQuery will use in the construction
of the XML string we’ll send to the Query Service.