Customizing the Videos Share with a Template
You learned about the folder templates that apply special features to the Pictures and Music folders (My Pictures and My Music in Windows XP). There is also a template associated with the Videos library (in Windows 7), the Videos folder (in Windows Vista), and the My Videos folder (in Windows XP). This template provides some features that aren’t part of the normal folder view:
You get access to video-related file metadata, such as Date Taken and Duration.
In Windows 7 and Vista, the task pane includes extra commands such as Play and Slide Show.
In Windows XP, the task pane includes a Video Tasks group with links such as Play All and Copy to CD.
However, when you access the Windows Home Server Videos folder, Vista and XP treat it like a normal folder. (In Windows 7, if you access the Videos share through the Videos library, you get the extra video-related features; if you access the share via the Network folder, you don’t see those features.) If you want to see the extras that are part of the local Videos (or My Videos) folder, follow these steps to customize the Videos share to use a video folder template:
1. | Open the folder containing the Windows Home Server shares.
|
2. | Right-click the Videos folder, and then click Properties to open the folder’s property sheet.
|
3. | Display the Customize tab.
|
4. | In the Use This Folder as a Template list, select the template you want to apply:
Picture and Videos—(Windows Vista) Choose this template to give the folder the same features as Vista’s Videos folder. Videos—(Windows 7 and Windows XP) Choose this template to give the folder the same features as XP’s My Videos folder.
|
5. | If you also want Windows to apply this template to all the subfolders in the Pictures share, click to activate the Also Apply This Template to All Subfolders check box.
|
6. | (Windows
XP only) If you also want to change the image used for the folder icon,
click Choose Picture, choose a new picture in the Browse dialog box,
and then click Open.
|
7. | Click OK.
|
Adding the Videos Folder to Windows Media Player
If you turn on Media Library Sharing for Windows Home Server’s Videos share, that folder appears in Media Player’s Navigation pane as part of the User 1 (server)branch (or the User 1 on server branch), where server is the Windows Home Server name. If you’re not streaming the Videos share, you can still add it to Windows Media Player’s library in the Video
section. Note, however, that you don’t have to bother with this in
Windows 7 if you have the Windows Home Server Connector software
installed, because the Connector automatically adds the \\SERVER\Videos share to Windows 7’s Videos library.
Here are the steps to follow in Windows Media Player 11:
1. | Select Start, All Programs, Windows Media Player.
|
2. | Pull down the Library menu, and select Add to Library. Media Player displays the Add to Library dialog box.
|
3. | If you don’t see the Monitored Folders list, click Advanced Options to expand the dialog box.
|
4. | Click Add to display the Add Folder list.
|
5. | Select Windows Home Server’s Videos share, and then click OK. Media Player adds the folder to the Monitored Folders list.
|
6. | Click OK. Media Player begins adding the contents of the Videos share to the library.
|
7. | Click
Close. (Note that you don’t have to wait until Media Player has added
all the videos to the library; the process continues in the background,
although it might take a bit longer than if you had left the dialog box
open.)
|
To view the folder
contents in Media Player, pull down the Library menu and select Video.
In the Navigation pane, click Library, and then double-click the Folder
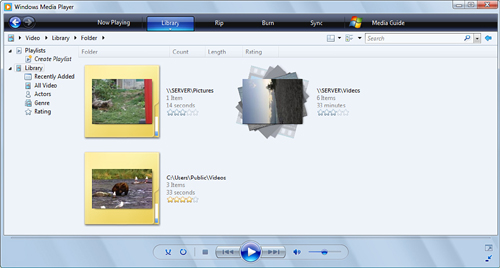
view. You then see an icon for \\SERVER\Videos, as shown in Figure 1. Double-click that icon to view the video files.

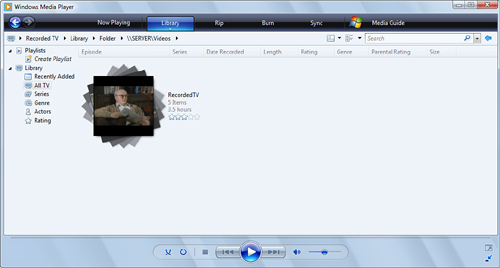
If the Windows Home Server Videos share contains recorded TV shows, Media Player displays them separately. Pull down the Library menu and select Recorded TV. Figure 2 shows a Media Player icon for a Windows Home Server folder that contains some recorded TV content.

Archiving Recorded TV on Windows Home Server
When
you record TV in Windows Media Center, the program stores the resulting
files—which use the Microsoft Recorded TV Show file type with the .dvr-ms extension—in the following folder:
%SystemDrive%\Users\Public\Recorded TV
If you want to stream your
recorded TV shows to Windows Media Connect programs and devices on your
network, you need to move or copy the Recorded TV files to Windows Home
Server’s Recorded TV share.
As with ripping music , this extra step is a hassle, particularly because Recorded TV
files are often multigigabyte affairs that can take quite a while to
transfer. A better solution is to record TV shows directly to Windows
Home Server. In previous versions of Windows Home Server, this wasn’t as
simple as tweaking a folder value, because by default Media Center has
no such setting. It was possible to work around this problem by
modifying some Media Center services and Registry settings, but it was a hassle.
Fortunately, it’s a hassle
that’s now history. Windows Home Server 2011 comes with a new Windows
Media Center Connector feature, which adds a Home Server menu item to
the Media Center interface. The Home Server menu item includes a tile
called TV Archive that enables you to configure Media Center to record
TV shows directly to the server. Finally!
Caution
Recording a TV show is
incredibly bandwidth-intensive, so the modification in this section
stretches your home network to its limit. So, although it’s possible to
record shows to Windows Home Server on a 100Mbps wired or 54Mbps
wireless connection, for best results, you really should do this only on
a network that uses 1Gbps wired or 802.11n (248Mbps) wireless
connections.
Assuming you’ve installed Windows Media Center Connector, follow these steps to configure TV archiving in Media Center:
1. | In Windows Media Center, select Home Server, and then click TV Archive.
|
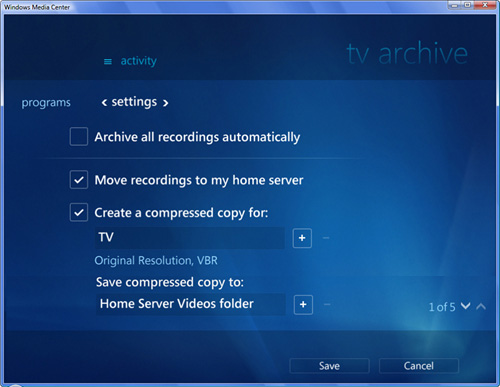
2. | Click Settings. Media Center shows the TV archiving settings, as shown in Figure 3.

|
3. | If
you want Media Center to archive all your TV shows—that is, shows
you’ve already recorded and shows you record in the future—to Windows
Home Server’s Recorded TV share, activate the Archive All Recordings Automatically check box.
|
4. | If you want Media Center to record TV shows directly to Windows Home Server’s Recorded TV share, activate the Move Recordings to My Home Server check box.
Note
Actually, it’s not really
accurate to say that, if you activate the Move Recordings to My Home
Server check box, Media Center records TV shows “directly” to the
server. Instead, Media Center creates a temporary copy of the recorded
TV show locally, and it then moves that copy to the server.
|
5. | If
you want Media Center to also create a compressed version of each
recorded TV show, activate the Create a Compressed Copy For check box,
and then choose a format and location:
- Create a Compressed Copy For—
Use this list to choose one of the following three formats: TV (uses
the original resolution of the recording); Windows Mobile (320×240,
500Kbps bitrate); or Zune (720×480, 1,500Kbps). Note that in all cases,
the resulting file uses the Windows Media Audio/Video (.wmv) format.
- Save Compressed Copy To—
Use this list to select a location for the compressed copies. The
default is Home Server Videos folder, and you should leave that as is if
you want your compressed copies on the server. Otherwise, you can
choose either Public Videos Folder or Let Me Use a Different Folder.
(The latter requires a path to the save location.)
|
6. | Click Save to put the new settings into effect.
|
If you left the Archive All
Recordings Automatically check box deactivated, you can select which of
your existing recordings get archived to the server. In Media Center,
select the Home Server item, and then click the TV Archive tile. You
have two choices from here, as follows:
Series— Click this tab to see a list of your recorded TV series. Activate the check box beside each series that you want to archive.
Programs— Click this tab to see a list of your recorded TV programs. Activate the check box beside each program that you want to archive.
Click Save to put the settings
into effect. Remember that how your existing series and programs are
archived depends on the options you configured in the Settings tab:
If you activated the Move Recordings to My Home Server check box, your selected series and programs are moved to the server’s Recorded TV share.
If
you activated the Create a Compressed Copy for Server check box, Media
Center creates compressed copies of your selected series and programs
and stores the copies in the server’s Videos share.