Logo
programming4us
programming4us
programming4us
programming4us
Home
programming4us
XP
programming4us
Windows Vista
programming4us
Windows 7
programming4us
Windows Azure
programming4us
Windows Server
programming4us
Windows Phone
 
Windows Server

Microsoft Dynamics CRM 4.0 Accelerators : eService Accelerator (part 4)

- Free product key for windows 10
- Free Product Key for Microsoft office 365
- Malwarebytes Premium 3.7.1 Serial Keys (LifeTime) 2019
1/17/2012 3:45:26 PM
Full Sample Portal
1.
Within the Installation Wizard, click Full Sample Portal. This is the same as navigating to the \Installation\Sample Portal folder.

2.
Select all files within this folder and copy.

3.
Within C:\Program Files, create a new folder called Microsoft Dynamics CRM Customer Portal, and then paste all files from the Sample Portal folder.

4.
Within this new folder, edit the web.config file and edit the following entities (see Figure 19).
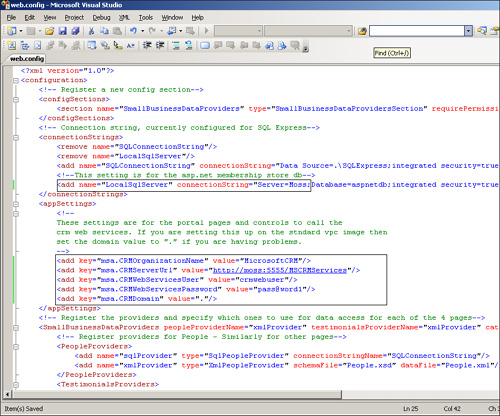
Figure 19. Edit the Web Config file.

  • LocalSqlServer

  • msa.CRMOrganizationName so that it matches your organization name.

  • msa.CRMServerURL

  • msa.CRMWebServicesUser

  • msa.CRMWebServicesPassword

  • msa.CRMDomain

5.
Open Internet Information Services Manager (inetmgr).

6.
Create a new website named Microsoft Dynamics CRM Customer Portal.

7.
Select Port 4444 as the default TCP port this website should use.

8.
Select C:\Program Files\Microsoft Dynamics CRM Customer Portal as the website home directory, making sure to Allow Anonymous Access to This Web Site.

9.
Allow the following permissions:

Read

Run scripts (such as ASP)

10.
Once created, navigate to the Properties window of the new website, click the ASP.NET tab, and select ASP.NET version 2.0.50727.

11.
Within the Properties window, click the Documents tab and add Default.aspx.

12.
Click OK to save your changes and close the Properties window.

Configure the SQL Server User

For the NT Authority\Network Service to properly access the ASPNETDB database, you must create a new NT Authority\Network Service user within SQL Server Management Studio, and grant db_owner access to schemas owned by the user, and db_owner to the Database role membership.

Testing the eService Accelerator
1.
We’re now ready to view the site. Open a web browser and navigate to the server at the port specified (for example, http://localhost:4444/). Then click the Customer Service link to view the customer’s access to the portal (see Figure 20).
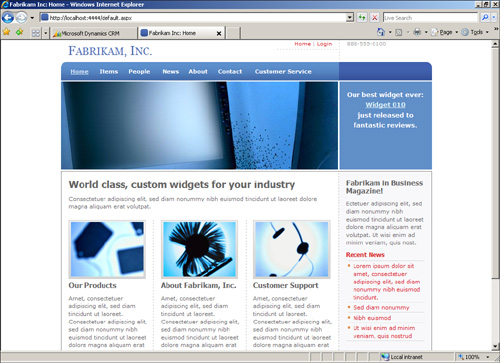
Figure 20. Sample portal.

2.
We can test the system by returning to CRM and adding a new contact, making sure to select Web Portal Contact-Level Customer to the new eServices Access Level field.

3.
Once added, CRM will fire workflow to send the contact an email. Check to see your workflows fired (see Figure 21).
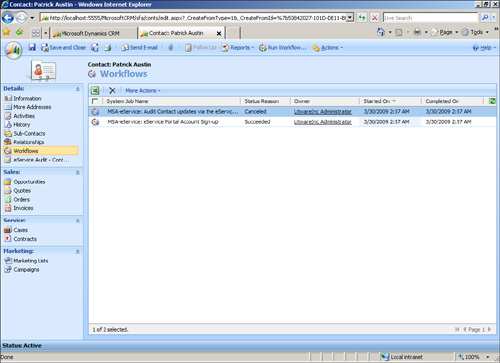
Figure 21. View eService workflow.

4.
The contact’s History should contain the notification email. Open it to see the email details, including links to log in. The link within the email can then be used within the sample portal to create a new user and to log in (see Figure 22).
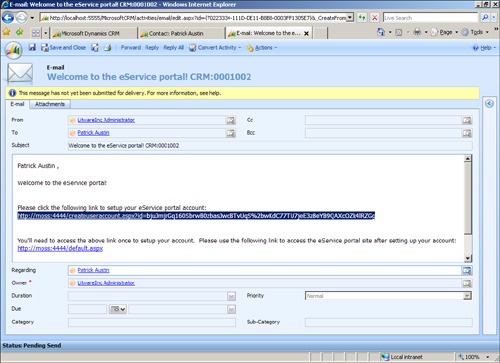


Figure 22. Contact email notification.

5.
Copy the link from the notification email and paste it into your browser. You should then see the default new user login page. Complete the fields to create a new portal user, as shown in Figure 23.
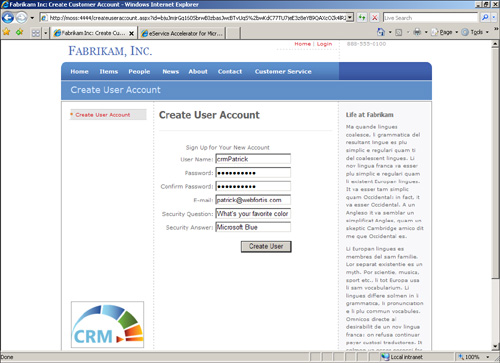
Figure 23. Portal login example.

6.
Once you’ve created a new user and logged in to the site using your new credentials, you’ll have direct access to contact data within CRM (see Figure 24).
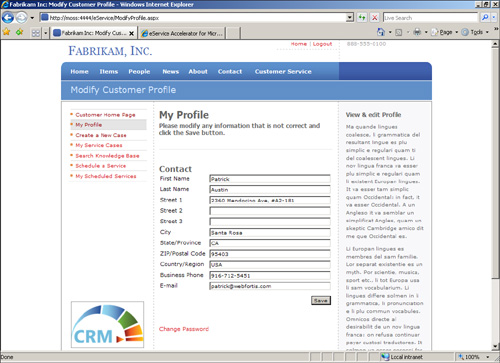
Figure 24. Portal profile example.

Your portal should now be installed. With some minor HTML/CSS changes, you can match the look and feel of your website.

Other -----------------
- Microsoft Dynamics CRM 4.0 Accelerators : eService Accelerator (part 3) - Modify the New Workflows & eService Configuration
- Automating Dynamics GP 2010 : Speeding up document delivery with e-mail
- Automating Dynamics GP 2010 : Getting control of accruals and deferrals with Recurring GL batches
- Microsoft Systems Management Server 2003 : Disaster Recovery - Restoring Site Systems
- Microsoft Systems Management Server 2003 : Disaster Recovery - Recovering the SMS Site
- Windows Server 2003 : Configuring Virtual Server
- Windows Server 2003 : Installing Virtual Server
- Microsoft Content Management Server : Searching MCMS with SharePoint - Configuring SharePoint Portal Server Search
- Microsoft Content Management Server : Searching MCMS with SharePoint - Preparing the MCMS Site for Indexing
- InfoPath with Sharepoint 2010 : Create a Custom List Page That Displays the List Item Form
 
 
Top 10
- Microsoft Visio 2013 : Adding Structure to Your Diagrams - Finding containers and lists in Visio (part 2) - Wireframes,Legends
- Microsoft Visio 2013 : Adding Structure to Your Diagrams - Finding containers and lists in Visio (part 1) - Swimlanes
- Microsoft Visio 2013 : Adding Structure to Your Diagrams - Formatting and sizing lists
- Microsoft Visio 2013 : Adding Structure to Your Diagrams - Adding shapes to lists
- Microsoft Visio 2013 : Adding Structure to Your Diagrams - Sizing containers
- Microsoft Access 2010 : Control Properties and Why to Use Them (part 3) - The Other Properties of a Control
- Microsoft Access 2010 : Control Properties and Why to Use Them (part 2) - The Data Properties of a Control
- Microsoft Access 2010 : Control Properties and Why to Use Them (part 1) - The Format Properties of a Control
- Microsoft Access 2010 : Form Properties and Why Should You Use Them - Working with the Properties Window
- Microsoft Visio 2013 : Using the Organization Chart Wizard with new data
 
programming4us
Windows Vista
programming4us
Windows 7
programming4us
Windows Azure
programming4us
Windows Server