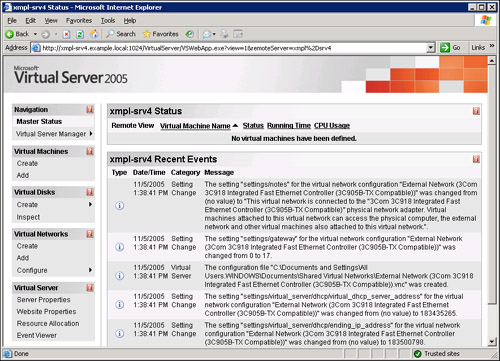
Virtual Server is entirely configured from the Administration Website shown in Figure 1.
When you first log on to this Web site, you’ll be prompted by the
Windows Server 2003 Internet Explorer Enhanced Security Configuration.
For simplicity, if you’ll be configuring Virtual Server from the
server’s console, you should add the Web site to your Trusted Sites. You
can also connect from your personal workstation by pointing Internet
Explorer at http://machinename:1024, assuming you used the default port for the Virtual Server Web site.
By default, only members
of the local Administrators group on the Virtual Server host machine
have access to the Administration Website, and you’ll be prompted for
credentials when you attempt to log on.
You
can create virtual networks, virtual disks, and virtual machines from
within the Web site. All the settings for individual machines and their
virtual hardware are controlled from this Web interface. We’ll start by
configuring our networks, and then setting some useful defaults before
we actually create a virtual machine. While you can also preconfigure
and create Virtual Disks, we prefer to create the disks when we are
creating the virtual machine.
Configuring Virtual Networks
Virtual Server will
create a virtual network card for each enabled physical network card it
sees on the computer during initial installation, plus another virtual
network card that is only for connecting to other virtual machines on
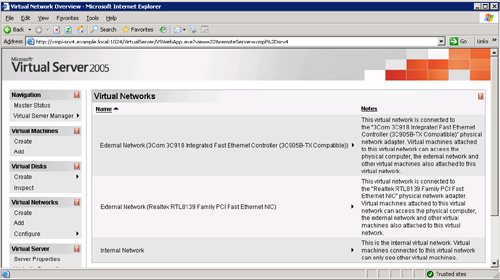
the same physical computer. To see the list of available virtual network
cards, log on to the Administration Website if you aren’t already
logged on, and click Configure- and then View All in the Virtual
Networks section of the leftmost frame of the Web site. This will
display all the virtual network cards that are currently configured, as
shown in Figure 2.
This
is a nice feature because it lets you see what virtual networks you
have. But you can’t actually change anything from this page. On the
server xmpl-srv4, we see that there are three virtual networks
defined—two external networks and the Internal Network. The Internal
Network is not connected to any physical network card on the host
server; rather, it is connected to a private, virtual network on the
host that only other virtual machines can connect to.
Configuring the Internal Network
To configure the Internal Network, perform the following steps:
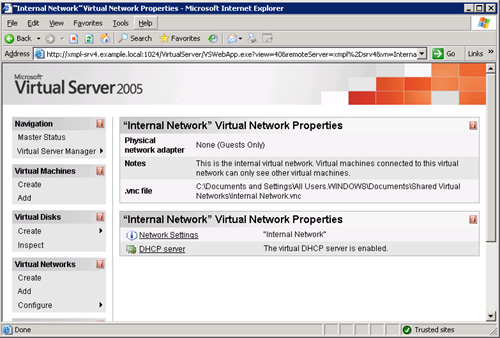
1. | Click
Configure, Internal Network under the Virtual Networks section of the
leftmost frame of the Administration Website to open the “Internal
Network” Virtual Network Properties shown in Figure 3.
|
2. | Click Network Settings to change the settings for this adapter. They’re not terribly interesting for the Internal Network.
|
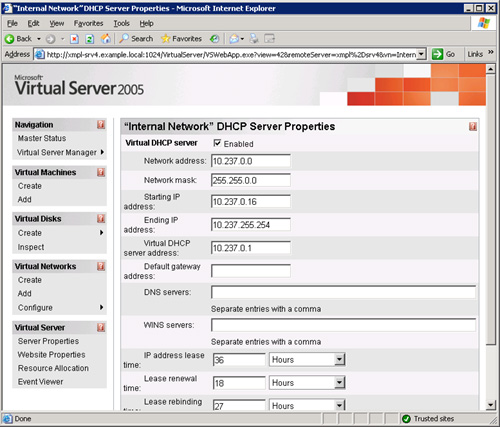
3. | Click DHCP Server to change the settings for the built-in Dynamic Host Configuration Protocol (DHCP) server, as shown in Figure 4. By default, the DHCP server is enabled for this network and uses a 10.237.0.0 network address.
|
4. | Make
any changes to the default DHCP settings and then click OK to save
them. If you’ll be creating and assigning a DHCP role to one of your
virtual machines on this network, you should disable this virtual DHCP
server to avoid issues. Otherwise, it would be good to enter in the IP
addresses of the DNS server or servers that will be created on the
network, along with WINS servers, and a gateway if you will be
configuring this network to connect to an outside network.
|
Configuring External Networks
To configure the external networks, follow these steps:
1. | Click
Configure, External Network under the Virtual Networks section of the
leftmost frame of the Administration Website to open the External
Network Virtual Network. If you have multiple physical network cards on
the host computer, you’ll actually be choosing from multiple external
networks, each with a very long name that describes the hardware.
|
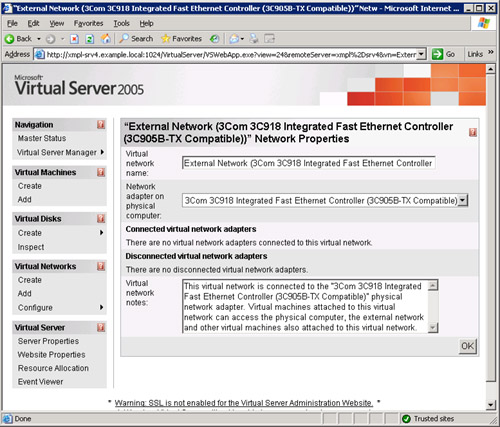
2. | Click Network Settings to open the Network Properties page shown in Figure 5.
|
3. | Give
the virtual network a useful name that identifies it clearly, but that
also is a bit easier to work with. You can also change the physical
network card that this network is connected (bridged) to if you need to
change the default. Add any administrative notes, and click OK to save
the settings.
|
Important
Always click OK to save
your changes on any page in the Administration Website. If you navigate
off the page without clicking OK, your changes will not be saved. There
is no way to do several sets of changes together and then save them all
at once.
Configuring Server Properties
There are two server
properties that you can set for the host server to simplify management
and creation of virtual machines. There are other settings for the
server and Web site we can set. The two settings we’ll worry about now are these:
Virtual Machine Remote Control A feature of Virtual Server that allows a remote connection directly to the virtual machine
Search Paths The path that Virtual Server will use to find resources and components it needs
Enabling Virtual Machine Remote Control
To enable Virtual Machine Remote Control, follow these steps:
1. | Log on to the Virtual Server Administration Website if you aren’t already logged on.
|
2. | Click Server Properties in the Virtual Server section of the leftmost frame.
|
3. | Click Virtual Machine Remote Control (VMRC).
|
4. | Select Enable to allow the VMRC client to be able to connect to virtual machines on this host.
|
5. | Set
the TCP/IP address. The default is All Assigned. If you have externally
facing adapters on the host, you should specify only the internal
adapter IP address to limit access to the virtual machines.
|
6. | Set
the Idle timeout. The default is enabled, and it times out after 15
minutes of inactivity. We find that a bit short for how we use Virtual
Server, so we set it to 30 minutes.
|
7. | Configure any other settings here you want to change, and then click OK to actually enable the changes.
|
Setting Search Paths
To set search paths, perform the following steps:
1. | Log on to the Virtual Server Administration Website if you aren’t already logged on.
|
2. | Click Server Properties in the Virtual Server section of the leftmost frame.
|
3. | Click Search paths.
|
4. | The
default search path is in a bad place and would put all your virtual
machines on the system drive by default. We suggest creating a
SharedVirtualMachines folder on a different volume where you have plenty
of space. Enter that folder path into the Default virtual machine
configuration folder box.
|
5. | You
can also specify additional search paths that Virtual Server will use
when it looks for CD, floppy, and hard drive images. When you’ve entered
any additional paths you want to add, click OK to save the changes. |