With our MCMS site ready for indexing, we now turn to
SPS. First, we will configure SharePoint to index our Tropical Green
site. After creating the index, we’ll create a source group that will contain
the content source. Source groups are used to group content sources
together in a logical collection. In our case, we’ll have a single
content source in our source group. The source group is what we’ll
reference when we create our search logic in the Tropical Green site.
Creating a New Content Source
The first step in configuring SPS search is to create a content source. One way to accomplish this is to use the SearchSetup.exe command-line tool included with the MCMS Connector. This utility can be found in the MCMS 2002 Connector for SharePoint Technologies\WSS\bin folder. The SearchSetup.exe
utility creates the necessary content sources in SharePoint as well as
all the site rules to include the root channel and all top-level
channels in your site hierarchy in order to include and exclude the
appropriate content. For more information on the SearchSetup.exe utility, refer to the help included with the MCMS Connector.
|
In order to use the MCMS Connector search controls SearchInputControl and SearchResultControl, you need to use the SearchSetup.exe
utility to create your content source and source group in your
SharePoint portal. This is because the MCMS Connector search controls
are hard-coded to look for a specific SharePoint search group named
“CMSChannels”.
|
Creating a Content Source with the MCMS Connector Utility
Let’s use the MCMS Connector SearchSetup.exe command-line utility to create a new content source and source group:
1. | Open a command prompt and change the current directory to the following MCMS Connector default utility directory: cd “C:\Program Files\MCMS Connector for SharePoint Technologies\WSS\Bin”
|
2. | Enter
the following command to create a new content source that will index
our Tropical Green website, using the MCMS guest account to crawl the
content, and initiate the crawl immediately after creating the content
source (replacing the user and password credentials with your MCMS guest
account credentials):
searchsetup.exe -url "http://www.tropicalgreen.net/TropicalGreen/"
                -crawl "1"
                -user "<domain>\SearchCrawler"
                -password "<password>"
                -portalurl "http://portal.tropicalgreen.net"
|
The table below describes each of the possible switches:
| Switch | Description |
|---|
| url | The MCMS URL that will be used by SharePoint as the start point of the crawl. |
| crawl | Indicates
whether or not a crawl is performed immediately after SharePoint
creates the content source.
A value of “1” instructs SharePoint to perform a crawl
immediately. Otherwise, set it to a value of “0” to stop SharePoint from
crawling the site.
|
| user | The user account that has access to the MCMS content to be indexed. |
| password | Password of the user account. |
| portalurl | URL of the SharePoint portal server that will contain the content source. |
|
You only have to run
this command-line program once, not every time you update the site. If
you need to perform a full crawl of the site again, you can do so by
resetting the content source and executing a full crawl. Refer to the
SharePoint Portal Server documentation for more information on this.
|
Now that we have a new content source created, let’s create a new search scope to make it easier to test our search results.
Creating a New Search Scope
While SharePoint is indexing our site, we should go ahead and create a search scope.
1. | Open the General Content Settings and Indexing Status page by browsing to your portal and clicking the Site Settings link in the upper right. Under the Search Settings and Indexed Content section, click the Configure search and indexing link. Then click the Manage search scopes link.
|
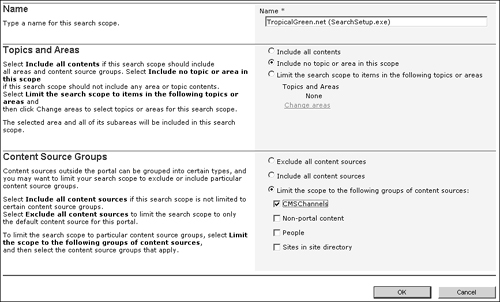
2. | On the Manage Search Scopes page, click the New Search Scope button. When prompted to create a new search scope, enter the following:
| Field | Value |
|---|
| Name: | TropicalGreen.net (SearchSetup.exe) | | Topics and Areas: | Include no topic or area in this scope | | Content Source Groups: | Limit the scope to the following groups of content sources: CMSChannels |
 |
3. | After clicking OK, SharePoint will take us back to the Manage Search Scopes page with our new scope.
|
4. | Let’s get back to the search configuration page. Click the Site Settings link in the heading of the Manage Search Scopes page. Then click the Configure search and indexing link under the Search Settings and Indexed Content section.
|
5. | At
this point, we should make sure everything is configured correctly.
We’ve created a content source and added that source to a new site
group. By now, SharePoint should have finished indexing our site (unless
you added hundreds of postings to it). Look at the Non-portal content
column. If you see errors, warnings, or zero documents indexed, examine
the log—some errors might not be errors at all, others may indicate
errors within the MCMS site itself.

|
One common error, The address could not be found,
is usually caused by links to empty channels that are not configured to
use channel rendering scripts. Since we’d expect guests to receive this
error when browsing the site, it’s not surprising the SharePoint
gatherer ran into the same problem. This is not a problem with the
SharePoint index, but rather with the structure or of our site: channels
that could be empty should have channel rendering scripts or be hidden
from the navigation.
|
|
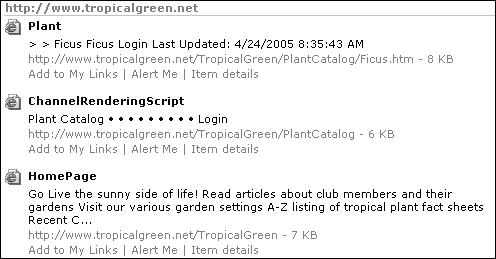
6. | If there are no problems, we can test our index. Click the Home link in the portal navigation to get to the homepage. In the upper-right corner, select TropicalGreen.net (SearchSetup.exe) in the dropdown (the whole name may not appear due to design constraints on the width of the dropdown), enter ficus
in the search box, and click the green arrow to execute the search. The
search results should find the posting in the plant catalog.

|
|
Your search results may not match what is indicated in the image above as your postings may have been modified recently.
|
We now have a
SharePoint search scope created and indexing our Tropical Green site.
While this search scope can be used within the portal to search our
site, we will use it via the SPS Query Service Web Service from our MCMS
site to provide search functionality to our users.
Creating a Content Source Manually
Another option is to manually create the content source in SharePoint rather than allowing the SearchSetup.exe
utility to create it for us. We’ll walk you though these steps so you
will have an understanding of what’s involved in creating a content
source and source group in a SharePoint portal.
|
Although we’re explaining how to create a content source both with the SearchSetup.exe
utility and manually using the same content source names, you must
choose only one method as it is not possible to create two content
sources with the same name.
|
Let’s start by creating an index of our Tropical Green website in our SharePoint portal:
1. | Start the SharePoint Central Administration by pointing to Start | All Programs | SharePoint Portal Server | SharePoint Central Administration.
|
2. | Click List and manage portal site under the Portal Site and Virtual Server Configuration section.
|
3. | The Manage Portal Sites
page contains a list of all portals in the SharePoint farm. Drag your
mouse cursor over the right-hand side of the list and click the
drop-down arrow that appears when the mouse cursor is over a portal and
select Manage Portal Site Properties (as seen in the image below):

|
4. | Under the section Search Settings and Indexed Content, click the Configure search and indexing link.
|
|
The following
instructions assume you have not enabled SharePoint’s advanced search
administration mode. The main difference between basic and advanced mode
is advanced mode allows you to work directly with content indexes.
Basic mode creates content indexes when you create a content source. In
our example, basic mode is adequate for our needs.
|
Now we will create the content source.
1. | Under the General Content Settings and Indexing Status section, click the link Add content source.
|
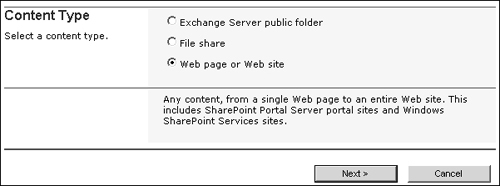
2. | On the Add Content Source page, select Web page or Web site and click Next.
 |
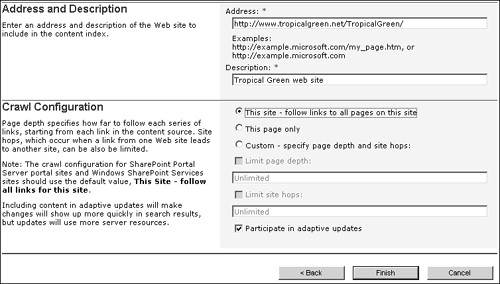
3. | After selecting that you want to create an external website index, enter the following information on the Add Content Source: Web page or Web site page. Once you have filled out the form, click Finish.
|
If you intend to use the
manually-created content source with the MCMS Connector controls, you
need to name the content source “CMSChannels” as this name is hard-coded
in the connector controls.
In this example, the virtual server acting as an MCMS Web Entry Point for our Tropical Green website handles requests for http://www.tropicalgreen.net/. The example will still work if you have set up the Tropical Green website on http://localhost/; you’ll just need to make the appropriate changes in the steps to point to the correct domain.
|
 |
4. | Once you click Finish in the previous step, SharePoint will create the content source and present you with a confirmation page. At the bottom of the Created Web page or Web site Content Source, in the Start Update section, check the Start full update option and click OK. This will trigger the gatherer to start building an index of the Tropical Green website.
|
Once you have created a content source manually, follow the instructions under the section Creating a New Search Scope above to create a new source group using the settings in the following table:
| Field | Value |
|---|
| Name: | TropicalGreen.net |
| Topics and Areas: | Include no topic or area in this scope |
| Content Source Groups: | Limit the scope to the following groups of content sources: |
| | Tropical Green web site |
Search Rights for the MCMS Application Pool Account
SharePoint portals typically do not allow anonymous users to access the site, and users must log in. The SearchResultControl
included with the MCMS Connector, which we’ll use in a moment, uses the
account of the application pool identity that contains the MCMS site
from which a search query is triggered to access the SharePoint search
service.
1. | Browse to the portal we created earlier by opening Internet Explorer and navigating to http://portal.tropicalgreen.net. Then, click Site Settings in the upper right corner.
|
2. | Under the General Settings section, select Manage security and additional settings.
|
3. | On the Manage Site Groups page, click Add a Site Group. When prompted to enter information about the new group, enter the following values:
| Property | Value |
|---|
| Site group name | Search Only | | Description | This site group grants a user the right to query the search index | | Rights | Search – Search the portal site and all related content |
|
When you select Search – Search the portal site and all related content, SharePoint automatically checks the View Pages – View pages in an area option. Uncheck the View Pages option after you check the Search option.
|
|
4. | On the Manage Site Groups page, click Search Only, the name of our new group.
|
5. | On the Members of “Search Only” page, click Add Members.
Add the account that’s configured as the identity of the application
pool your MCMS site runs under. Once you’ve selected the account, click OK.
|
To find the identity
of the application pool your MCMS site runs under, open Internet
Information Services. Expand the nodes for local computer | Application Pools.
Look for the application pool that your MCMS site is configured to use
and view its properties. The identity is listed under the Identity tab.
|
|
6. | After selecting the account, on the Add User page, ensure that Search Only under the Step 2: Choose Site Groups section is checked and click OK.
|
7. | On the last page, where SharePoint asks you to confirm the details of the account you’re adding, make sure the Send the following e-mail to let these users know they have been added option is unchecked, and click Finish.
|
Our MCMS site now has the permissions needed to log in to our portal and execute a search.