Modify the New Workflows
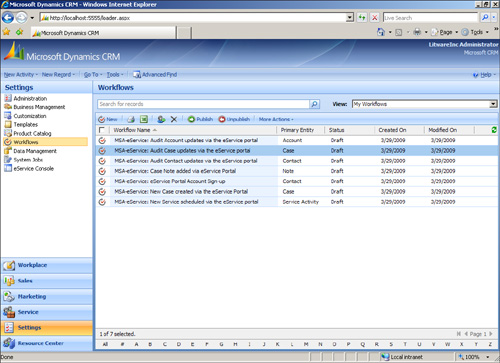
1. | Now you need to make edits to the new workflows (see Figure 13).
Six of the workflows will need to reference the crmwebuser we
previously created. You can assign a user within your organization that
has been designated as the primary portal user, or you can choose to use
crmwebuser. In addition, one of the workflows will require you to
update the URL that directs a customer to the website.
Note
The accelerator ships
with a Microsoft Dynamics CRM web user assigned. We need to remove this
user and add an appropriate user, such as the crmwebuser we created.
| 2. | Edit the workflow labeled MSA-eService: New Case created via the eService Portal. Figure 14 shows this workflow.
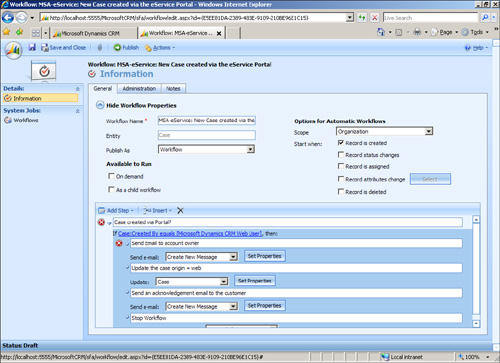
| 3. | Edit the Case:Created By Equals field to the appropriate CRM user.
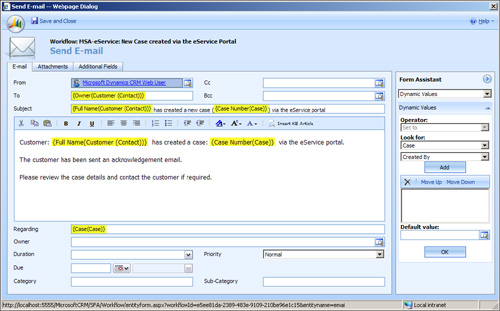
| 4. | Edit
the Send Email to Account Owner portion of this workflow by clicking
the Set Properties button, and then update the From field with the
appropriate CRM user (see Figure 15).
| 5. | Click Save and Close to close the email template window. Then click Save and Close to save the changes to this workflow.
| 6. | Edit the MSA-eService: Case Note added via the eService Portal workflow (see Figure 16).
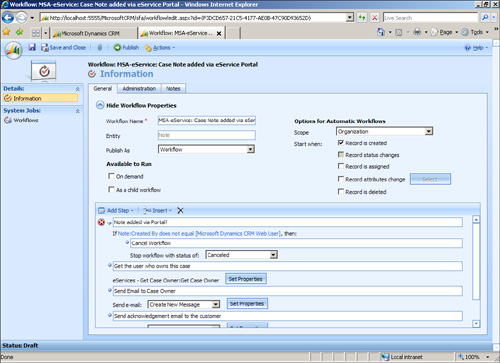
| 7. | Update
the Note: Created by Does Not Equal field with the appropriate user,
making sure to remove reference to Microsoft Dynamics CRM Web User user.
| 8. | Edit the MSA-eService: Audit Account
Updates via the eService Portal workflow and update the Modified by
(User) Does Not Equal field with the appropriate user, making sure to
remove reference to Microsoft Dynamics CRM Web User user.
| 9. | Edit the MSA-eService: Audit Case
Updates via the eService Portal workflow and update the Case: Modified
by Does Not Equal field with the appropriate user, making sure to remove
reference to Microsoft Dynamics CRM Web User user.
| 10. | Edit the MSA-eService: Audit Contact
Updates via the eService Portal workflow and update the Modified by
(User): User Does Not Equal field with the appropriate user, making sure
to remove reference to Microsoft Dynamics CRM Web User user.
| 11. | Edit
the MSA-eService: New Service Scheduled via the eService Portal
workflow and update the Service Activity: Created by Equals field with
the appropriate user, making sure to remove reference to Microsoft
Dynamics CRM Web User user.
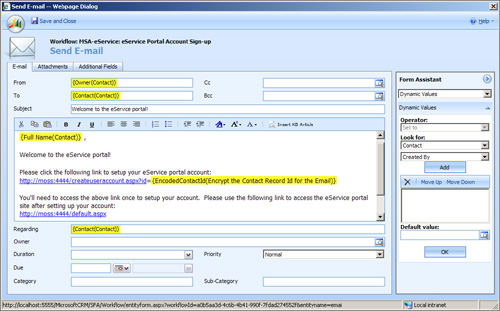
| 12. | Edit
the MSA-eService: eService Portal Account Sign-Up workflow and edit
both URLs within the Send an Email with Instructions on How to Create an
eService Portal Account (Set Properties) window (see Figure 17).
The first page will allow users to create a new account. (By default,
this is the CreateUserAccount.aspx page in the Sample Portal site.) The
second URL is the default page that existing users will see when they
visit the site.
| 13. | Within
the CRM Workflows window, select all workflows that begin with
MSA-eService, and then publish them. You should be prompted to publish
seven workflows. If for any reason the workflows do not publish, review
the previous steps and make sure the CRM user you’ve assigned has the
appropriate CRM security role.
|
eService Configuration
1. | Within
Settings, Customization, eService Configuration, verify that the
eService Configuration entity is displayed within the Settings area of
CRM. If it is not, check the Settings check box and then Save and Close.
(You don’t have to publish the eService Configuration entity again.)
Restart your browser.
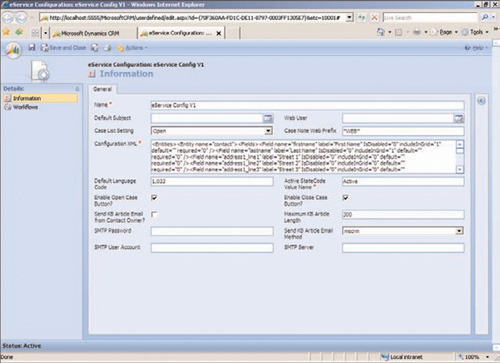
| 2. | Configure
the settings for the eService Configuration entity via Settings,
eService Configuration. Select and then edit the eService Config V1
eService configuration listed (see Figure 18).
|
Note
If you do not see the
eService Config area or the eService Config V1, make sure you’ve
followed the Console instructions discussed previously. In addition, you
can close your browser and try again. Don’t try to add a new eService
configuration at this point.
The fields within the eService Configuration screen are as follows:
Default Subject: When a case is created via the web portal, it will be assigned the default subject that you select here. Web User: Select the appropriate CRM user (for example, crmwebuser) to use as the portal user who has the following privileges: Create, Read, and Update CRM cases, notes, and document attachments Create and Read CRM service activities Send and Read emails Create, Read, and Update the custom entities associated with this accelerator
Case List Setting: This field contains two options: Case Note Web Prefix:
Use this prefix within a CRM note or keyword within a Knowledge Base
(KB) article to make it public to a web user. This provides a layer of
flexibility so that internal notes can be added without a customer
seeing them. It also means that a KB article using this keyword can be
searched via the web portal. By default, nothing is public unless the
prefix is typed. Configuration XML:
Do not make edits to this field, because this XML should be configured
only through the eService Console. To keep users from accidentally
editing this field, make it read-only. Default Language Code: 1033 is the default code for English. For a full list of country codes, visit: http://msdn.microsoft.com/en-us/library/0h88fahh.aspx. Active StateCode Value Name: This is the default names of the case state code. In the English edition of Microsoft Dynamics CRM, this is Active. Enable Open Case Button: By checking this field, you’re allowing customers to reopen cases. Enable Close Case Button: By checking this field, you’ll enable customers to be able to close open cases. Send KB Article Email from Contact Owner?:
If you check this field, KB articles will be emailed from the contact’s
owner (CRM user). If you uncheck this field, the email will be sent
from the portal user (for example, crmwebuser). Maximum KB Article Length: This sets the maximum number of returned characters for KB articles. Send KB Article Email Method: This drop-down list contains two items: SMTP: Set to SMTP if KB articles are emailed to customers through an SMTP account. MSCRM:
Set to MSCRM if KB articles are emailed via Microsoft Dynamics CRM.
This is the recommended item if the CRM Email Router component is
installed.
Note
It is recommended that
the following fields be completed even if using the MSCRM drop-down list
item. Failure to do so may result in email errors from the web portal.
SMTP Server: Your SMTP server. SMTP User Account: The user account used to authenticate access to the SMTP account. SMTP Password: The user account password used to authenticate access to the SMTP account.
|