Building the MSQuery XML String
We know that the SPS
Query Service Web Service accepts a single parameter: an MSQuery string.
This string is actually an XML document, but it’s passed to the Query
Service as a string. The XML tags in this string tell the Query Service
the type of response it supports, how many records to return in the
result, and the result index to start the search results at. The <StartAt></StartAt>
element is what you can use in paging your result set. We won’t be
incorporating paging into our site as it is small, but you can see how
easy it would be to do so.
Let’s get started, by creating our BuildMsQuery()
method that returns a complete MSQuery XML string containing all the
information necessary to execute a query against a SharePoint index. Add
the following method at the end of the SearchResults.aspx.cs page:
/// <summary>
/// Builds an MSQuery with an embedded MSSQLFT query embedded
/// for submission to SharePointPS Query Service.
/// </summary>
/// <param name="keywords">Keywords submitted for search.</param>
/// <param name="searchScope">SPS Search scope to filter.</param>
/// <returns>MSQuery</returns>
public string BuildMSQuery(string keywords, string searchScope)
{
  StringBuilder msQuery = new StringBuilder();

  // create the main header of the XML string
  msQuery.Append("<?xml version=\"1.0\" encoding=\"utf-8\" ?>"
               + "<QueryPacket xmlns=\"urn:Microsoft.Search.Query\" "
               + "Revision=\"1000\">"
               + "<Query domain=\"QDomain\">"
               + "<SupportedFormats>"
               + "<Format>urn:Microsoft.Search.Response.Document.Document"
               + "</Format></SupportedFormats>");

  // create the actual full-text query
  msQuery.Append("<Context>"
               + "<QueryText language=\"en-US\" type=\"MSSQLFT\">"
               + "<![CDATA[" + this.BuildMSsqlftQuery(keywords, searchScope)
               + "]]></QueryText></Context>");

  // create the range, page, and number of results
  // to return
  msQuery.Append("<Range><StartAt>1</StartAt><Count>20</Count>"
               + "</Range></Query></QueryPacket>");

  return msQuery.ToString();
}
|
The two nodes of an MSQuery after the opening QueryPacket node (Query, and SupportedFormats) should not be modified. The Context node contains the actual search query, which you can change to suit your requirements. The last node, Range,
contains directives used to tell the SPS Query Service Web Service how
many results to return and at what index to start the result set.
For example, if you displayed 20 results per page and you wanted to show the third page of results, you’d set the StartAt node to 41 and leave the Count node at 20.
|
We now have a complete MSQuery string with an included full-text query.
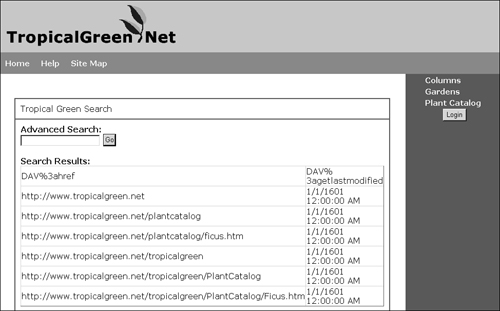
Let’s see if our search will now work. Build the Tropical Green project and navigate to http://www.tropicalgreen.net/. Enter ficus in the search box and click Go. You should see results similar to those in the following image (we’ll worry about making it more presentable in a moment):

Every good search
engine provides more than just keyword search. Some sites filter by
topic and others by product. In our case, we could filter all our
results to only the plant catalog, excluding the rest of the site. You
would not be able to do this in a user-friendly manner using the
controls provided by the MCMS Connector. While a knowledgeable guest
could realize they could put in part of the CMS path in one of the
advanced search options, it’s not straightforward to the typical guest
of the site. This is where you can really start to leverage your custom
search components.
Let’s add a filter to search just our plant catalog:
1. | Open SearchResults.aspx in the Design view, and drag a CheckBox just below our advanced search textbox and assign it the following properties:
| Property | Value |
|---|
| CheckBox | ID
=
chkFilterPlantCatalog | | | Text
=
Only
Search
Plant
Catalog |
|
2. | Open the code-behind file for the SearchResults.aspx page and add the following highlighted code to the btnAdvancedSearch_Click() event handler:
private void btnAdvancedSearch_Click(object sender, System.EventArgs e)
{
  string keywords = this.txtAdvancedSearch.Text;
  keywords = HttpUtility.UrlEncode(keywords);

  string filter = string.Empty;
if (this.chkFilterPlantCatalog.Checked)
{
filter = "&filterPlantCatalog=1";
}
  Response.Redirect(Request.ApplicationPath
                  + "/SearchResults.aspx?keywords=" + keywords + filter);
}
|
3. | Add the highlighted code below to the BuildMSsqlftQuery() method:
private string BuildMSsqlftQuery(string keywords, string searchScope)
{
  System.Text.StringBuilder mssqlftQuery =
  new System.Text.StringBuilder();
  ArrayList whereClause = new ArrayList();
  #region FILTER: keywords
    . . . code continues . . .
  #endregion

  #region FILTER: plant catalog
// list of keywords to include
if ( Request.QueryString["filterPlantCatalog"] != null
&& Request.QueryString["filterPlantCatalog"].ToString() == "1" )
{
whereClause.Add("(\"urn:schemas.microsoft.com:htmlinfo:metainfo:PATH"
+ "\" LIKE '/channels/tropicalgreen/plantcatalog/%')");
}
#endregion
. . . code continues . . .
|
Notice how we are using the urn:schemas.microsoft.com:htmlinfo:metainfo:PATH index property, which is mapped to the CMS Channel Path thanks to the SearchPropertyCollection.xml file provided with the MCMS Connector.
|
|
4. | Let’s
see how the filter works. Save your changes and build the Tropical
Green project. Once the build is complete, open your browser and
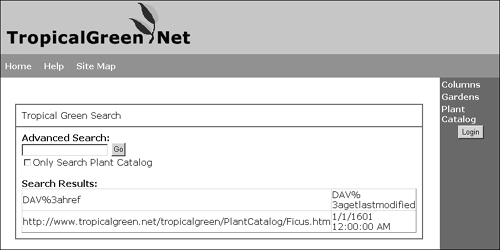
navigate to http://www.tropicalgreen.net/TropicalGreen/SearchResults.aspx. Enter ficus in the textbox, check the Only Search Plant Catalog
CheckBox, and click the Go button:
 |
Fantastic! We now
only see records inside our Tropical Green plant catalog! This gives a
good idea of what filtering brings to the table. We could filter by so
many things, such as displaying only postings that have been updated in
the last month or week. The possibilities are almost endless.
Let’s see if we can’t clean up those search results by getting rid of the DataGrid and replacing it with a Repeater. At the same time, we’ll add filtering of the search results so users will only see postings that they have rights to access.
Although we listed numerous SharePoint index properties in our full text query, we will only use the DAV:href
property when analyzing the results in our main results page to obtain a
reference to the specified MCMS channel or posting to determine if the
user has rights to browse the resource and also to determine and return
the actual posting’s name and description.
1. | Open the SearchResults.aspx page in Design view. Delete the DataGrid.
|
2. | Drag a Repeater object onto the page where the DataGrid was. Assign the Repeater an ID of rptSearchResults.
|
3. | While in Design view, select our new Repeater and open the Properties window. At the top of the window, click the  Events button to show all possible events we can use. Double-click the box to the right of ItemDataBound to create an empty event handler that will fire every time an item is bound to the repeater.
|
4. | Switch back to HTML view for the SearchResults.aspx and scroll to our new Repeater.
|
5. | Add the following highlighted tags into the ItemTemplate of our Repeater:
<asp:repeater id="rptSearchResults" runat="server">
<ItemTemplate>
<asp:Placeholder ID="phdSearchResult" Runat="server" visible="false">
<p>
<b><asp:HyperLink ID="hlkResultTitle" Runat="server" /></b>
<br>
<asp:Literal ID="litResultDescription" Runat="server" />
</p>
</asp:Placeholder>
</ItemTemplate>
</asp:repeater>
|
|
Notice the ASP.NET
Placeholder we’ve added surrounding the search result. We’ll use this to
show and hide results that the user does or does not have permission to
view.
|
Now that we have a Repeater filled with some placeholders for the content, we need to modify our data binding, which is still using a DataGrid.
1. | Open the code-behind file for SearchResults.aspx, find the Page_Load() event handler, and modify the code to bind the only DataTable in the DataSet to the Repeater as shown below:
private void Page_Load(object sender, System.EventArgs e)
{
  if (Request.QueryString["keywords"] != null
   && Request.QueryString["keywords"].Length >0)
  {
    string keywords = Request.QueryString["keywords"];
    DataSet ds = ExecuteSearch(keywords);
    this.rptSearchResults.Visible = true;
this.rptSearchResults.DataSource = ds.Tables[0].Rows;
this.rptSearchResults.DataBind();
}
  else
  {
    this.rptSearchResults.Visible = false;
  }
}
|
2. | Before we implement the ItemDataBound event, we need to create a method that will try to obtain the MCMS ChannellItem reference of the URL returned in the results. Add the following method after the Page_Load() event handler we just modified:
private HierarchyItem GetResult(string url)
{
  try
  {
    // check if it's a GUID based URL
    if (url.IndexOf("RDONLYRES") >= 0)
    {
      // try to get the GUID if it's a RDONLYRES URL
      string guidRegEx = "[a-fA-F0-9]{8}-[a-fA-F0-9]{4}-[a-fA-F0-9]{4}-"
                       + "[a-fA-F0-9]{4}-[a-fA-F0-9]{12}";
      Regex regex = new Regex(guidRegEx);
      Match m = regex.Match(url);
      if (m.Success)
      {
        return CmsHttpContext.Current.Searches.GetByGuid("{"+m.Value+"}");
      }
    }
    else
    {
      // try to get the object via the URL
      return CmsHttpContext.Current.Searches.GetByUrl(url);
    }
    // if this point reached, unknown URL
    return null;
  }
  catch
  {
      return null;
  }
}
|
3. | Now, find the rptSearchResults_ItemDataBound() event handler. We need to trap the event when it’s binding a data item to the ItemTemplate or AlternateItemTemplate in the Repeater. Then, we’ll get a reference to the data item being bound to the template, in our case a DataRow, and get references to the ASP.NET objects we added to the template. Finally, we’ll use the data in the DataRow to populate the properties of our controls. Here’s what our completed ItemDataBound() event handler will look like:
private void rptSearchResults_ItemDataBound(object sender,
System.Web.UI.WebControls.RepeaterItemEventArgs e)
{
  if ( (e.Item.ItemType == ListItemType.AlternatingItem)
|| (e.Item.ItemType == ListItemType.Item) )
{
// get a reference to the datarow being bound
DataRow row = e.Item.DataItem as DataRow;
HierarchyItem hi = GetResult(row[0].ToString());
// get references to all the ASP.NET objects
PlaceHolder resultContainer = e.Item.FindControl("phdSearchResult")
as PlaceHolder;
HyperLink resultTitle = e.Item.FindControl("hlkResultTitle")
as HyperLink;
Literal resultDesc = e.Item.FindControl("litResultDescription")
as Literal;
// if the URL doesn't resolve to an MCMS resource,
// output it to the results
if (hi != null)
{
// user has rights to this item so display it.
resultContainer.Visible = true;
// use values in DataRow to populate objects
resultDesc.Text = hi.Description;
if (hi is ChannelItem)
{
resultTitle.Text = (hi as ChannelItem).DisplayName;
resultTitle.NavigateUrl = (hi as ChannelItem).Url;
}
else
{
if (hi is Resource)
resultTitle.NavigateUrl = (hi as Resource).Url;
resultTitle.Text = hi.Name;
}
}
}
}
|
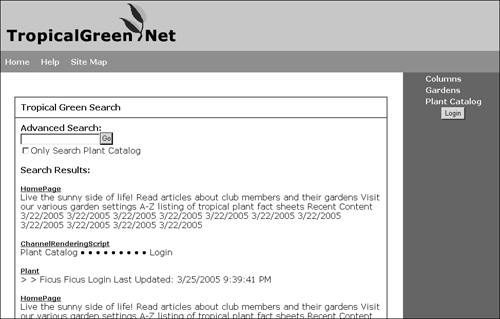
The final result looks something like this:

You’ll see that the
description field may not have exactly what we’re looking for, but this
technique lets us customize the search result list to our hearts’
content. You could pull the description of the posting straight out of
the indexed values, provided you exposed the page description using the SearchPropertyCollection.xml file. Or you could even have an HtmlPlaceholder
called “Search Description” in all your templates that content owners
could use to enter a description to show when the posting appears in
search results.