Another high-availability
technology provided with the Windows Server 2003 platform is Network
Load Balancing (NLB). NLB clusters provide high network performance and
availability by balancing client requests across several server systems.
When the client load increases, Windows NLB clusters can easily be
scaled out by adding more nodes to the NLB configuration, to maintain an
acceptable client response time to client requests.
Using NLB offers administrators the ability to
leverage two dynamic features: First, to implement Windows NLB clusters,
no proprietary hardware is required and NLB clusters can be implemented
and configured through Windows management interfaces fairly easily and
quickly.
NLB clusters are most effectively used to provide
front-end support for web applications, virus scanning, and Simple Mail
Transfer Protocol (SMTP) gateways. Because they are a very effective
solution when used for web application functionality, NLB technology is a
very effective solution for front-end access to Exchange Outlook Web
Access and terminal servers maintaining Exchange client software.
NLB clusters can grow to 32 nodes, and if larger
cluster farms are necessary, the Microsoft Application Center server can
be considered as an option for server platform support, along with
technologies such as domain name system (DNS) round-robin to meet larger
client access demands.
NLB Modes and Port Configuration Overview
In Unicast mode, clients and servers maintain a
one-to-one relationship when communicating. In Multicast mode, servers
respond by broadcasting a single, multicast address, which clients
attach to when accessing information such as websites.
Another option when
configuring NLB with Outlook Web Access is the ability to define the
ports in which NLB cluster members will respond to client requests. This
option is effective for the scenario because administrators can
restrict and allow access to ports such as Hypertext Transfer Protocol
(HTTP) port 80 and Secure Sockets Layer (SSL) port 443.
NLB Network Card Configurations
One of the first steps when configuring NLB
cluster nodes is the configuration of the NICs in each server. A
configuration of network cards can be completed using the NLB Manager
and the TCP/IP properties of each node’s network interface. One other
option for configuring NICs is the command-line tool nlb.exe. This utility enables administrators to configure TCP/IP properties on NLB cluster nodes remotely and through the command line.
Configuring Network Load Balancing with Client Access Servers
Using the NLB Manager is
the simplest method in configuring Client Access servers into a
load-balanced cluster configuration. When using the Network Load
Balancing Manager, all information regarding the NLB cluster and
load-balancing TCP/IP addresses is added dynamically to each cluster
node when configured. Using the NLB Manager also simplifies the tasks of
adding and removing nodes by enabling administrators to use the NetBIOS
name or TCP/IP address to identify nodes.
In the following example, NLB services will be
implemented to provide support with two separate Outlook Web Access
servers. This scenario assumes that each Outlook Web Access server has
already been installed and configured and is functioning.
To begin, configure the network cards for each Outlook Web Access system that you plan to configure in the NLB cluster:
1. | Log on to the local console of a cluster node using an account with local Administrator privileges.
|
2. | Select Start, Control Panel, and then double-click network connections.
|
3. | Right-click the network adapter icon for the network adapter device managing the NLB cluster interface and choose properties.
|
4. | Choose the Network Load Balance option and click the Properties button.
|
5. | Modify
the properties by setting the binding for the appropriate cluster and
dedicated IP addresses to each node’s network card; use the advanced
pages accessed through the General tab of the TCP/IP property page.
|
Tip
It is a good practice to rename each network
card so you can easily identify it when configuring interfaces and
troubleshooting problems.
After the TCP/IP properties of the network card
for the two OWA servers have been configured and tested, configure the
NLB cluster by accessing the NLB Manager in the Administrative Tools of
the Windows 2003 server. To begin, open the NLB Manager and complete the
following steps:
1. | From the NLB Manager menu bar, click Cluster, and then click New.
|
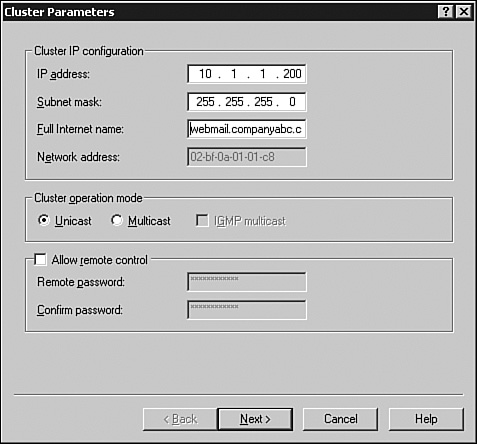
2. | Enter
the cluster IP address and subnet mask of the new cluster that will be
used for both OWA servers’ cluster members, similar to what is shown in Figure 1.

- a. Enter the fully qualified domain name for the cluster in the Full Internet Name text box.
- b. Choose the Cluster Operation Mode (change the default to Multicast because this is a web functional configuration).
- c. Configure a remote control password if you will be using the command-line utility (nlb.exe) to remotely manage the NLB cluster.
|
3. | Click Next to continue.
|
4. | Enter any additional TCP/IP addresses that will be load-balanced and click Next to continue.
|
5. | Configure
the appropriate port rules for each IP address in the cluster. For CAS
services being accessed from the Internet only, click the Edit tab and
configure the port range to be 443, allowing HTTPS traffic between
cluster NLB servers.
|
6. | On
the Connect page, type the name of the server you want to add to the
cluster in the Host text box, and click Connect. Review the server
information and highlight the network interface to be used for the
server; click Next to continue.
|
7. | On
the Host Parameters page, set the cluster node priority. Each node
requires a unique host priority, and because this is the first node in
the cluster, leave the default of 1; click Finish when you are done.
|
Additional
CAS servers can be added to the NLB cluster by repeating these steps at
any time. Validate that the state of the clustered NLB system is listed
in the NLB Manager as Started, and close the Manager to complete the
configuration of additional servers.