Moving Operation Master
Roles
Active Directory
Domain Services uses a multimaster replication model, in which any one
server can take over directory functionality, and each full domain
controller contains a read/write copy of directory objects (with the
exception of Read-Only Domain Controllers, which hold, as their name
suggests, a read-only copy). There are, however, a few key exceptions to
this, in which certain forestwide and domainwide functionality must be
held by a single domain controller in the forest and in each domain
respectively. These exceptions are known as Operation Master (OM) roles,
also known as Flexible Single Master Operations (FSMO) roles. There are
five OM roles, as shown in Table 1.
Table 1. FSMO Roles and Their Scope
| FSMO Roles | Scope |
|---|
| Schema master | Forest |
| Domain naming master | Forest |
| Infrastructure master | Domain |
| RID master | Domain |
| PDC emulator | Domain |
If the server or servers
that hold the OM roles are not directly upgraded to Windows Server 2008
R2 but will instead be retired, these OM roles will need to be moved to
another server. The best tool for this type of move is the NTDSUTIL
command-line utility.
Follow these steps using
NTDSUTIL to move the forestwide OM roles (schema master and domain
naming master) to a single Windows Server 2008 R2 domain controller:
1. | Open a
command prompt on the Windows Server 2008 R2 domain controller (choose
Start, type cmd, and press Enter).
|
2. | Type ntdsutil and press Enter. The prompt will
display “ntdsutil:”.
|
3. | Type roles and press Enter. The prompt will
display “fsmo maintenance:”.
|
4. | Type connections and press Enter. The prompt
will display “server connections:”.
|
5. | Type connect to server <Servername>,
where <Servername> is the name of the target Windows
Server 2008 R2 domain controller that will hold the OM roles, and press
Enter.
|
6. | Type quit
and press Enter. The prompt will display “fsmo maintenance:”.
|
7. | Type transfer schema master and press Enter.
|
8. | Click
Yes at the prompt asking to confirm the OM change. The display will show
the location for each of the five FSMO roles after the operation.
|
9. | Type transfer naming master and press Enter.
|
10. | Click Yes at the prompt asking to confirm the OM
change.
|
11. | Type quit
and press Enter, then type quit and press Enter again to exit
the NTDSUTIL.
|
12. | Type
exit to close the Command Prompt window.
|
Now the forestwide FSMO
roles will be on a single Windows Server 2008 R2 domain controller.
The domainwide FSMO roles
(infrastructure master, RID master, and PDC emulator) will need to be
moved for each domain to a domain controller within the domain. The
steps to do this are as follows:
1. | Open a
command prompt on the Windows Server 2008 R2 domain controller (choose
Start, click Run, type cmd, and press Enter).
|
2. | Type ntdsutil and press Enter.
|
3. | Type roles and press Enter.
|
4. | Type connections and press Enter.
|
5. | Type connect to server <Servername>,
where <Servername> is the name of the target Windows
Server 2008 R2 domain controller that will hold the OM roles, and press
Enter.
|
6. | Type quit
and press Enter.
|
7. | Type transfer
pdc and press Enter.
|
8. | Click Yes at the prompt asking to confirm the OM change.
|
9. | Type transfer rid master and press Enter.
|
10. | Click Yes at the prompt asking to confirm the OM
change.
|
11. | Type transfer
infrastructure master and press Enter.
|
12. | Click Yes at the prompt asking to confirm the OM
change.
|
13. | Type quit
and press Enter, then type quit and press Enter again to exit
the NTDSUTIL.
|
14. | Type exit
to close the Command Prompt window.
|
The preceding steps need
to be repeated for each domain.
Retiring Existing
Windows Server 2003/2008 Domain Controllers
After the entire Windows
Server 2003/2008 domain controller infrastructure is replaced by
Windows Server 2008 R2 equivalents and the OM roles are migrated, the
process of demoting and removing all down-level domain controllers can
begin. The most straightforward and thorough way of removing a domain
controller is by demoting it using the dcpromo utility, per the standard
Windows Server 2003/2008 demotion process. After you run the dcpromo command, the domain controller becomes a member
server in the domain. After disjoining it from the domain, it can safely
be disconnected from the network.
Retiring “Phantom”
Domain Controllers
As
is often the case in Active Directory, domain controllers might have
been removed from the forest without first being demoted. They become
phantom domain controllers and basically haunt the Active Directory,
causing strange errors to pop up every so often. This is because of a
couple remnants in the Active Directory, specifically the NTDS Settings
object and the SYSVOL replication object. These phantom DCs might come
about because of server failure or problems in the administrative
process, but you should remove those servers and remnant objects from
the directory to complete the upgrade to Windows Server 2008 R2. Not
doing so will result in errors in the event logs and in the DCDIAG
output as well as potentially prevent raising the domain and forest to
the latest functional level.
Simply deleting the
computer object from Active Directory Sites and Services does not work.
Instead, you need to use a low-level directory tool, ADSIEdit, to remove
these servers properly. The following steps outline how to use ADSIEdit
to remove these phantom domain controllers:
1. | Launch
Server Manager.
|
2. | Expand
the Roles node and select the Active Directory Domain Services node.
|
3. | Scroll down to the Advanced Tools section of the page
and click on the ADSI Edit link.
|
4. | In the ADSIEdit window, select Action, Connect To.
|
5. | In the Select a Well Known Naming Context drop-down
menu, select Configuration, and click OK.
|
6. | Select the Configuration node.
|
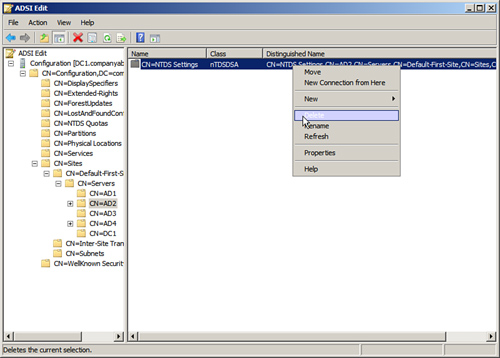
7. | Navigate to Configuration\CN=Configuration\CN=Sites\CN=<Sitename>\CN=Servers\CN=<Servername>,
where <Sitename> and <Servername>
correspond to the location of the phantom domain controller. |
8. | Right-click the CN=NTDS Settings, and click Delete, as
shown in Figure 3.
|
9. | At the
prompt, click Yes to delete the object.
|
10. | In the ADSIEdit window, select the top-level ADSIEdit
node, and then select Action, Connect To.
|
11. | In the Select a Well Known Naming Context drop-down
menu, select Default Naming Context, and click OK.
|
12. | Select the Default Naming Context node.
|
13. | Navigate to Default naming
context\CN=System\CN=File Replication Service\CN=Domain System
Volume(SYSVOL share)\CN=<Servername>, where <Servername>
corresponds to the name of the phantom domain controller.
|
14. | Right-click the CN=<Servername>, and select
Delete.
|
15. | At the
prompt, click Yes to delete the object.
|
16. | Close ADSIEdit.
|
At this point, after the NTDS
Settings are deleted, the server can be normally deleted from the Active
Directory Sites and Services snap-in.
Note
ADSIEdit was included in the Support Tools in
Windows Server 2003, but is now included in the AD DS Tools that are
installed automatically with the Active Directory Domain Services role
in Windows Server 2008 R2.
