Creating a test server
In order to perform simple tests, such as
connecting to the server with a web browser, we need to set up a website
for Nginx to serve. A test page comes with the default package in the html folder (/usr/local/nginx/html/index.html) and the original nginx.conf is configured to serve this page. Here is the section that we are interested in for now:
http {
    include mime.types;
    default_type application/octet-stream;
    sendfile on;
    keepalive_timeout 65;
    server {
    listen 80;
    server_name localhost;
    location / {
    root html;
    index index.html index.htm;
    }
    error_page 500 502 503 504 /50x.html;
    location = /50x.html {
    root html;
    }
    }
As you can already tell, this segment configures Nginx to serve a website:
HTTP Configuration and go to the HTTP module configuration section. Anyhow, fire up your favorite web browser and visit http://localhost/:

You should be greeted with a welcome message; if you
aren't, then check the configuration again and make sure you reloaded
Nginx in order to apply the changes.
Performance tests
Having configured the basic functioning and the
architecture of your Nginx setup, you may already want to proceed with
running some tests. The methodology here is experimental run the tests,
edit the configuration, reload the server, run the tests again, edit the
configuration again, and so on. Ideally, you should avoid running the
testing tool on the same computer that is used to run Nginx as it may
cause the results to be biased.
One could question the pertinence of running
performance tests at this stage. On one hand, virtual hosts and modules
are not fully configured yet and your website might use FastCGI
applications (PHP, Python, and so on). On the other hand, we are testing
the raw performance of the server without additional components, for
example, to make sure that it fully makes use of all CPU cores. Besides,
it's always better to come up with a polished configuration before the
server is put into production.
We have retained three tools to evaluate the server
performance here. All three applications were specifically designed for
load tests on web servers and have different approaches due to their
origin:
httperf: A relatively well-known open source utility developed by HP, for Linux operating systems only
Autobench: Perl wrapper for httperf improving the testing mechanisms and generating detailed reports
The principle behind each of these tools is to
generate a massive amount of HTTP requests in order to clutter the
server and study the results.
Httperf
Httperf is a simple command-line tool that can be downloaded from its official website: http://www.hpl.hp.com/research/linux/httperf/. The source comes as a tar.gz archive and needs to be compiled using the standard method: ./configure, make and make install. Once installed, you may execute the following command:
[alex@example ~]$ httperf --server 192.168.1.10 --port 80 --uri /index.html --rate 300 --num-conn 30000 --num-call 1 --timeout 5
Replace the values in the command above with your own:
--server: The website hostname you wish to test
--uri: The path of the file that will be downloaded
--rate: How many requests should be sent every second
--num-conn: The total amount of connections
--num-call: How many requests should be sent per connection
In this example, httperf will download http://192.168.1.10/index.html repeatedly, 300 times per second, resulting in a total of 30,000 requests.
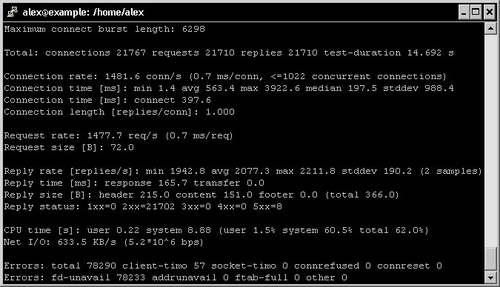
The results indicate the response times and the
amount of successful requests. If the success ratio is 100 percent or
the response time near 0 ms, increase the request rate and run the test
again until the server shows signs of weakness. Once the results begin
to look a little less perfect, tweak the appropriate configuration
directives and run the test again.
Autobench
Autobench is a Perl script that makes use of httperf
more efficiently it runs continuous tests and automatically increases
request rates until your server gets saturated. One of the interesting
features of Autobench is that it generates a .tsv report that
you can open with various applications to generate graphs. You may
download the source code from the author's personal website: http://www.xenoclast.org/autobench/. Once again, extract the files from the archive, run make then make install.
Although it supports testing of multiple hosts at
once, we will only be using the single host test for more simplicity.
The command we will execute resembles the httperf one:
[alex@example ~]$ autobench --single_host --host1 192.168.1.10 --uri1 /index.html --quiet --low_rate 20 --high_rate 200 --rate_step 20 --num_call 10 --num_conn 5000 --timeout 5 --file results.tsv
The switches can be configured as follows:
--host1: The website host name you wish to test.
--uri1: The path of the file that will be downloaded.
--quiet: Does not display httperf information on the screen.
--low_rate: Connections per second at the beginning of the test.
--high_rate: Connections per second at the end of the test.
--rate_step: The number of connections to increase the rate by after each test.
--num_call: How many requests should be sent per connection.
--num_conn: Total amount of connections.
--timeout: The number of seconds elapsed before a request is considered lost.
Once the test terminates, you end up with a .tsv
file that you can import in applications such as Microsoft Excel. Here
is a graph generated from results on a test server (note that the report
file contains up to 10 series of statistics):
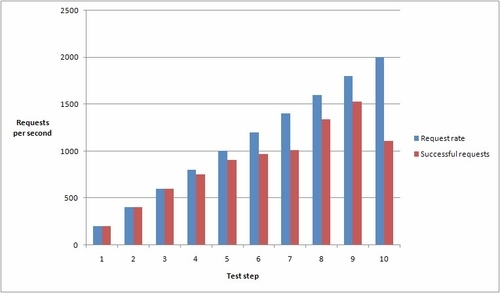
As you can tell from the graph, this test server
supports up to 600 requests per second without a loss. Past this limit,
some connections get dropped as Nginx cannot handle the load. It stills
gets up to over 1,500 successful requests per second at step 9.
Warning: These tests were carried out
on a virtual machine and do not reflect the actual capabilities of
Nginx running on a production server.
OpenWebLoad
OpenWebLoad is a free open source application. It
is available for both Linux and Windows platforms and was developed in
the early 2000s, back in the days of Web 1.0.
A different approach is offered here instead of throwing loads of
requests at the server and seeing how many are handled correctly, it
will simply send as many requests as possible using a variable amount of
connections and report to you every second.
You may download it from its official website: http://openwebload.sourceforge.net. Extract the source from the .tar.gz archive, run ./configure, make and make install.
Its usage is simpler than the previous two utilities:
[alex@example ~]$ openload example.com/index.html 10
The first argument is the URL of the website you want
to test. The second one is the amount of connections that should be
opened.
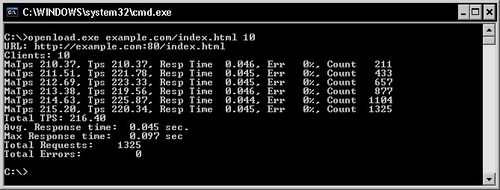
A new result line is produced every second. Requests are sent continuously until you press the Enter key, following which, a result summary is displayed. Here is how to decipher the output:
Tps (transactions per second): A transaction corresponds to a completed request (back and forth)
MaTps: Average Tps over the last 20 seconds
Resp Time: Average response time for the elapsed second
Err (error rate): Errors occur when the server returns a response that is not the expected HTTP 200 OK
You can fiddle with the amount of simultaneous
connections and see how your server performs in order to establish a
balanced configuration for your setup. Three tests were run here with a
different amount of connections. The results speak for themselves:
| |
Test 1
|
Test 2
|
Test 3
|
|
Simultaneous connections
|
1
|
20
|
1000
|
|
Transactions per second (Tps)
|
67.54
|
205.87
|
185.07
|
|
Average response time
|
14 ms
|
91 ms
|
596 ms
|
Too few connections result in a low Tps rate;
however, the response times are optimal. Too many connections produce a
relatively high Tps, but the response times are critically high. You
thus need to find a happy medium.
Upgrading Nginx gracefully
There are many situations where you need to replace
the Nginx binary, for example, when you compile a new version and wish
to put it in production or simply after having enabled new modules and
rebuilt the application. What most administrators would do in this
situation is stop the server, copy the new binary over the old one, and
start Nginx again. While this is not considered to be a problem for most
websites, there may be some cases where uptime is critical and
connection losses should be avoided at all costs. Fortunately, Nginx
embeds a mechanism allowing you to switch binaries with uninterrupted
uptime zero percent request loss is guaranteed if you follow these steps
carefully:
Replace the old Nginx binary (by default, /usr/local/nginx/sbin/nginx) with the new one.
Find the pid of the Nginx master process, for example, with ps x | grep nginx | grep master or by looking at the value found in the pid file.
Send a USR2 (12) signal to the master process kill USR2 ***, replacing *** with the pid found in step 2. This will initiate the upgrade by renaming the old .pid file and running the new binary.
Send a WINCH (28) signal to the old master process kill WINCH ***, replacing *** with the pid found in step 2. This will engage a graceful shutdown of the old worker processes.
Make sure that all the old worker processes are terminated, and then send a QUIT signal to the old master process kill QUIT ***, replacing *** with the pid found in step 2.
Congratulations! You have successfully upgraded Nginx and have not lost a single connection.
