Read-only domain controllers (RODC) are an
important addition to Windows Server 2008. An organization can increase
security in a branch office by installing an RODC in the branch office.
Note
The RODC does not store administrator passwords on
the server by default, so even if the RODC is stolen, the thief will not
have access to critical data.
You can pre-create an RODC account from within Active
Directory Users and Computers (ADUC). This enables a user at the remote
office to promote the server to an RODC, without requiring the user to
have elevated permissions.
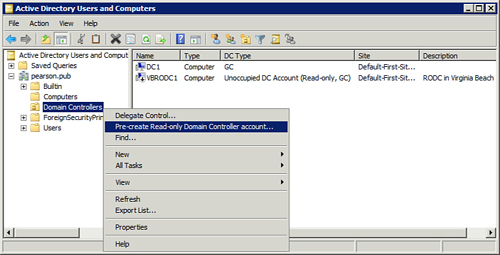
Figure 1
shows the Domain Controllers OU with an RODC named VBRODC1 pre-created.
Also, the context menu accessed by right-clicking the mouse shows the
selection to pre-create an RODC account.

The following steps show how to pre-create the account.
| Step | Action |
|---|
| 1. | Launch Active Directory Users and Computers (ADUC) by clicking Start, Administrative Tools, Active Directory Users and Computers. |
| 2. | Expand the domain and right-click the Domain Controllers OU. Your display should look similar to Figure 1. |
| 3. | Review the information on the Welcome page and click Next. |
| 4. | Review the information on the Operating System Compatibility page and click Next. |
| 5. | On the Network Credentials page, select Alternate Credentials and click Set. Type the account credentials of a user that has permissions to run dcpromo. Click OK. Click Next.
You can use the same account that you launched ADUC with as long as the account has sufficient privileges to run dcpromo. |
| 6. | Type the name of the computer and click Next.
Note
This is the name of the server at the remote location that will be
promoted to an RODC. The computer can’t be joined to the domain yet.
|
| 7. | Select the appropriate site for the remote office and click Next. |
| 8. | The
DNS server and Global Catalog server are selected by default. You can
change these based on the needs of the remote office. Click Next.
Note
Unless you have a DNS server in the remote office, you should leave the
DNS server selected. If it’s only a single domain forest, you should
also leave the Global Catalog selected.
|
| 9. | On the Delegation of RODC Installation and Administration page, click Set. Type the name of the user and click Check Names. Your display should look similar to Figure 2. Click OK. Click Next. |
| 10. | On the Summary page, click Next. Click Finish. |
At this point, the account is created. The user at the remote office, which you designated in the wizard, can run dcpromo to promote the server at the remote office to an RODC.