After having prepared a service account and installed
the Windows components required by Exchange Server 2003, the next step
is to prepare Active Directory for the Exchange installation. Preparing
Active Directory involves running ForestPrep and DomainPrep, two
utilities that prepare the forest and domains, respectively.
ForestPrep
Active Directory
consists of three partitions that store data: the schema partition, the
configuration partition, and the domain partition. Prior to installing
Exchange Server 2003, you need to use ForestPrep and DomainPrep to
prepare these Active Directory partitions.
Off the Record
You
can install Exchange Server 2003 and have it go through ForestPrep and
DomainPrep at the time of installation, but it is important to note that
these two functions can take a significant amount of time to complete
(an hour or more depending on your hardware and network). In addition,
you may not even run ForestPrep and DomainPrep on the same servers on
which you will actually be installing Exchange Server 2003. You may also
be in a multidomain situation where different levels of administrative
permissions are held by different people, so one administrator might run
ForestPrep while a second administrator runs DomainPrep in one domain
and a third administrator runs DomainPrep in another domain. Therefore,
you will want to complete the preparation of Active Directory prior to
installing the Exchange Server 2003 application to ensure the smoothest
possible installation process. |
ForestPrep
updates the schema and configuration partitions in Active Directory.
Therefore, the account used to run ForestPrep must be a member of the
Schema Admins and Enterprise Admins security groups. Specifically,
ForestPrep is a setup switch for Exchange that, when run, extends the
Active Directory schema to include Exchange Server 2003–specific classes
and attributes. With Exchange 2000 Server, ForestPrep also created the
Exchange organization container, but this has changed with Exchange
Server 2003. As a result, you no longer have to specify an organization
name until you actually install Exchange Server 2003.
Exam Tip
It
is required that you run ForestPrep in the forest root domain because
Forest-Prep must be able to contact the server with the Schema Master
operations master role, which is the first domain controller installed
in a forest (unless you’ve transferred the role to another domain
controller). When you run ForestPrep, it checks whether it is being run
in the Correct domain. If it isn’t, it tells you which domain contains
the Schema Master, and Forest-Prep ends. |
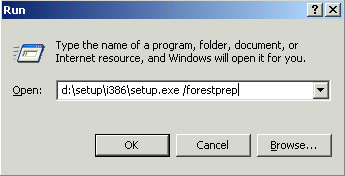
To run ForestPrep, insert the Exchange Server 2003 installation CD, and from the Run command line, type the command shown in Figure 1,
substituting the drive letter for your CD-ROM drive if it isn’t D.
You’ll be doing this in the practice at the end of the lesson.

Once you start Setup with
the /forestprep switch, Setup will copy temporary files to your hard
drive and then open the Microsoft Exchange Installation Wizard. After
reading the Welcome page, click Next.
Next, you are presented
with the End User License Agreement (EULA). Take the time to read it;
there is important information regarding the product’s licensing. Once
you’ve read the agreement, click the I Agree option, and then click
Next.
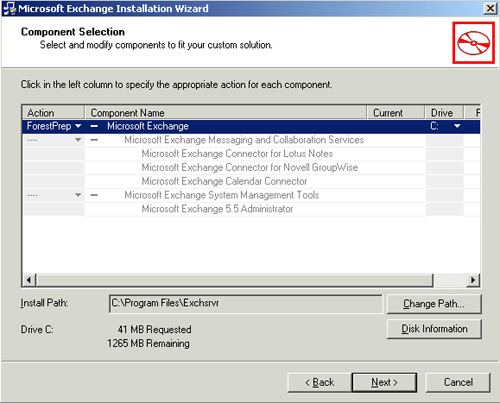
At this point,
the wizard brings you to the component selection portion of Setup. Since
you ran Setup with the /forestprep switch, the component selection will
be filled in automatically and you will not be able to make any other
selections. However, you can choose to change the installation directory
if the default doesn’t suit your needs. This is shown in Figure 2.

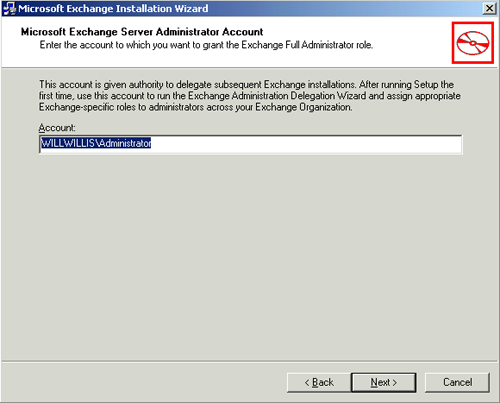
After
confirming the component selection and installation directory, enter
the account that you will use to install Exchange Server 2003. The
account will be granted the Exchange Full Administrator role and will be
given the authority to delegate other Exchange administrator roles. As
shown in Figure 3, by default, Setup will try to use the account that you are currently logged on with.

Click Next, and
ForestPrep begins. Because it is modifying the Active Directory schema,
there is no way to cancel the ForestPrep process once it begins. You’ll
see the progress being made, but remember that it is not unusual for
ForestPrep to take an hour or more to complete. When it does finish, you
will see the completion dialog box. Simply click Finish, and the
ForestPrep portion of Setup is done.
DomainPrep
Running
DomainPrep is much the same as running ForestPrep, except that you use
the /domainprep switch instead (you’ll do this in the practice at the
end of the lesson). The only difference you will see in the wizard is in
the component selection screen, which now has DomainPrep selected for
the action. Again, you cannot select any other components. If you
changed your installation directory during ForestPrep and the change
isn’t updated here, simply change the installation directory to match
what you chose earlier.
While the DomainPrep
Setup switch may seem to do the same thing as ForestPrep on the surface,
its purpose is different. Whereas ForestPrep prepared the schema and
configuration partitions of Active Directory, DomainPrep prepares the
domain partition. Another key difference is that while ForestPrep is run
once (in the forest root domain) for the entire forest, DomainPrep must
be run in each of the following domains:
The forest root domain
All domains that will contain Exchange Server 2003
All
domains that will contain Exchange mailbox-enabled objects (users and
groups), even if the domain does not have its own Exchange Server 2003
server
The DomainPrep switch
creates the groups and permissions required by Exchange Server 2003. Two
security groups are created by DomainPrep:
Exchange Enterprise Servers A domain local group that contains all Exchange servers running in the forest
Exchange Domain Servers A global group that contains all Exchange servers running in the domain you have selected
To run DomainPrep, you must use a user account that is a member of the Domain Admins group in the local domain.
Practice: Preparing Forests and Domains
In this practice,
you will prepare Active Directory for the Exchange Server 2003
installation by running ForestPrep and DomainPrep.
Exercise 1: Run ForestPrep
1. | Log
on to your Windows Server 2003 server with an Administrator account
that belongs to the Schema Admins and Enterprise Admins security groups.
|
2. | Insert the Exchange Server 2003 installation CD into the CD-ROM drive.
|
3. | From the Run command line, execute the command D:\setup\i386\setup.exe/forestprep. (Substitute your CD-ROM drive letter for D if it is different.)
|
4. | When the Welcome page of the Microsoft Exchange Installation Wizard appears, click Next to continue.
|
5. | Read the EULA and click I Agree, and then click Next.
|
6. | On
the Component Selection page, verify that ForestPrep is selected for
the action. Change the installation path if necessary and click Next.
|
7. | When
prompted for the account to be used to install Exchange Server 2003,
enter the account you want to use if it isn’t the default, and click
Next to continue.
|
8. | Once
the ForestPrep process finishes and you see the completion dialog box,
click Finish to end the wizard. If a screen still appears prompting you
to click Next when the installation is done, do so, and then click
Finish.
|
Exercise 2: Run DomainPrep
1. | Log
on to your Windows Server 2003 server with an Administrator account
that belongs to the Domain Admins group (if you logged off after the
ForestPrep exercise).
|
2. | With the Exchange Server 2003 installation CD in the CD-ROM drive, from the Start menu, click Run, and then type D:\setup\i386\setup.exe/domainprep
(substitute D with the drive letter for your CD-ROM drive, if different).
|
3. | When the Welcome page of the Microsoft Exchange Installation Wizard appears, click Next to continue.
|
4. | Read the EULA and click I Agree, and then click Next.
|
5. | On
the Component Selection page, verify that DomainPrep is selected for
the action. Change the installation path if necessary and click Next.
|
6. | When
prompted for the user account to be used for installing Exchange Server
2003, enter the account you want to use if it isn’t the default, and
click Next to continue.
|
7. | Once
the DomainPrep process finishes and you see the completion dialog box,
click Finish to end the wizard. If a screen still appears prompting you
to click Next when the installation is done, do so, and then click
Finish. |