When questioned, most administrators indicate that
they perform some type of server backup on a regular basis. When that
same group of administrators is asked if they frequently test their
recovery operations for the systems being backed up, the percentage of
those responding “yes” tends to drop to an alarmingly low level.
Simply put, it is not enough
to execute backups and hope that recovery proceeds without issue in the
event of a disaster. The time to discover that recovery is not possible
or that a backup strategy is insufficient is not when you need
recovery. Test recovery operations regularly to ensure that they work
when needed.
Full Server Recovery
This exercise assumes
the catastrophic loss of the server that was fully backed up in the
previous “Full
Server Backup” section. This section
walks you through the recovery of that server using the backup that was
created.
First, a word of caution:
the Windows RE greatly simplifies the process of bringing back a server
following catastrophic failure, but full server recovery is an inexact
science. Oftentimes there are hardware differences between the server
that was backed up and the server upon which recovery is being
attempted. For example, hard drive counts and capacities may vary, RAID
controllers may differ, network cards may be different, and more.
Potential hardware differences and other variations may require you to
adapt the full recovery process described next. At a minimum, be sure to
practice the recovery of your servers at regular intervals and
accurately document the details of the restoration process.
Before you attempt any sort of
full server recovery, you must address a number of prerequisites:
You must have a test server with characteristics
that are “very similar” to the server that was fully backed up. Ideally,
the test server should have hardware that is identical to the server
that was backed up. Some differences can be tolerated fairly well, such
as the test server possessing hard drives of greater capacity than those
in the source (backup) server. Other differences are not tolerated at
all, such as trying to restore an x64-based backup to x86-only hardware.
As a rule of thumb, the greater the number and type of differences
between the source server and the backup server, the greater the
likelihood of encountering problems during recovery. Tip
Virtual machines can be used to
great effect when testing recovery plans. Windows Server 2008 includes
Hyper-V for virtualization. If you are not familiar with Hyper-V,
consider checking it out.
You must possess account
credentials that can be used to access the remote shared folder where
the target server backup is stored. You
must have access to a Windows Server 2008 installation DVD, a bootable
installation thumb drive, or some other bootable mechanism that affords
you access to the Windows RE. If you are attempting to recover an x64
environment, you must use the x64 version of the Windows RE. By the same
token, x86 recoveries require the x86 Windows RE. Ensure
that clustered shared volumes are neither the source nor the
destination for any backup data.
If you have addressed
these concerns, you are ready to proceed with recovery.
Start
your server and boot from the media containing the Windows RE. Your
server should automatically go into the Windows Is Loading Files screen
with a progress bar at the bottom shortly after booting. If this does
not occur, or the server attempts to boot from another source (such as a
residual hard drive image), you may need to access the one-time boot
menu option that is commonly available on servers. Using such a boot
menu allows you to specify the server’s boot location, be it a DVD, a
USB location, or something else. After
the server has booted from the desired media, you are presented with
the Install Windows screen. Ensure that you select the desired
installation language, time and currency formats, and input method
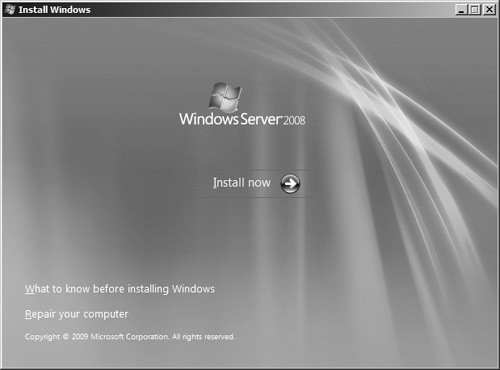
before clicking the Next button to continue. You
are presented with the window shown in Figure 1. Although the Install Now option is front and center in the
window, the area of interest is in the lower-left portion of the window.
Click on the Repair Your Computer link to continue.
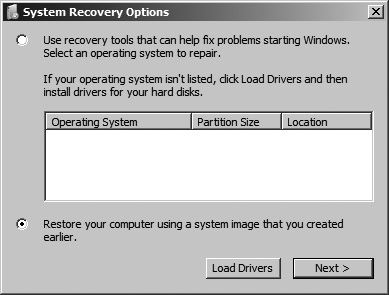
You are presented with
the System Recovery Options dialog box shown in Figure 2. Ensure that the Restore Your Computer Using a System Image
That You Created Earlier option is selected, and click the Next button
to continue.
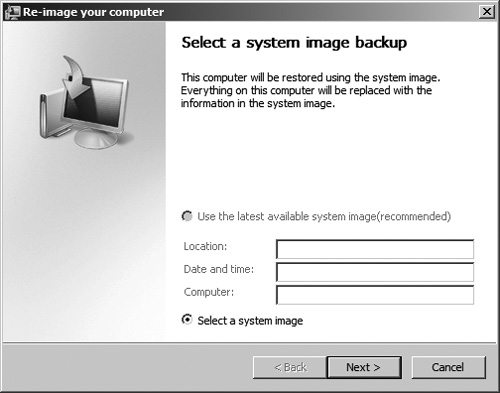
Neither an internal nor external hard drive
containing a system image is attached to the server, so you are warned
that a system image cannot be found on the computer. Click the Cancel
button to dismiss the dialog box. Because
a system image isn’t available locally, the only option that is
available on the Re-Image Your Computer dialog box (shown in Figure 3) is Select a System Image. Click the Next button
to continue.
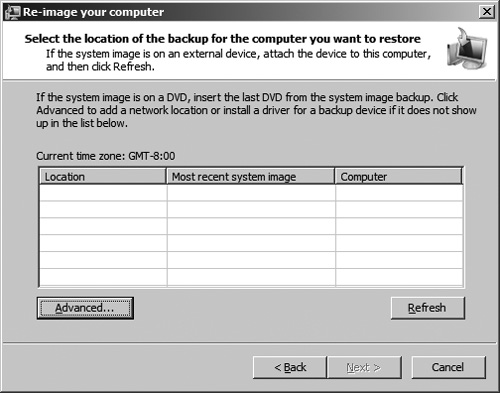
You are prompted to select the
location of the backup you want to restore, as shown in Figure 4. Because you need to point the Windows RE at the
remote share housing your system image, you need to click the Advanced
button in the lower-left portion of the screen to guide the tool to a
network-based image.
The dialog box shown in Figure 5 appears. Select the Search for a System Image
on the Network option to continue.
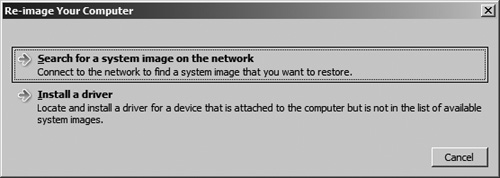
Note
Although the Windows RE
contains drivers for a significant number of network adapters, you may
discover that you are unable to browse or specify a network location
without first loading drivers for your server’s specific adapter or
adapters. If this is the case, select the Install a Driver option and
follow the instructions to load drivers for your network adapter or
adapters before attempting to proceed.
You
are warned that connecting to a network may leave your server
vulnerable, and you are asked to confirm the connection. Click the Yes
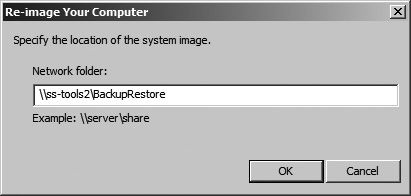
button to confirm and continue. You
are prompted to specify the network location where the system image
that is used for restoration resides. As shown in Figure 6, specify the UNC path to the image that was previously created
during the full server backup process, and click the OK button to
continue.
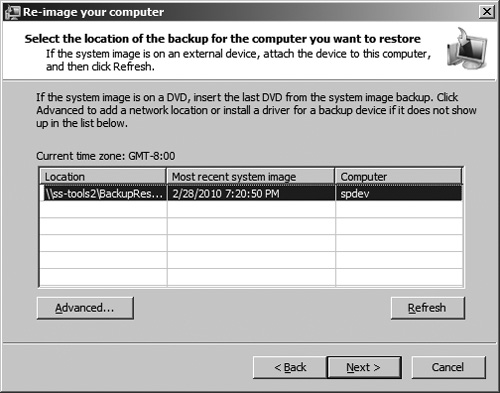
You are prompted to supply the
credentials of the account you want to use when accessing the remote
share specified in the previous step. Supply the username and password
desired, ensuring that you include a domain qualifier (in the form of domain\username or username@domain) for the username if needed. Once you have
supplied the credentials, click the OK button to continue. The
backup location dialog box reappears, as shown in Figure 7. Provided the network location specified previously in step 10
contained a recognizable system image, the grid in the dialog box now
contains a populated row. Ensure that the row is selected, and click the
Next button to continue.
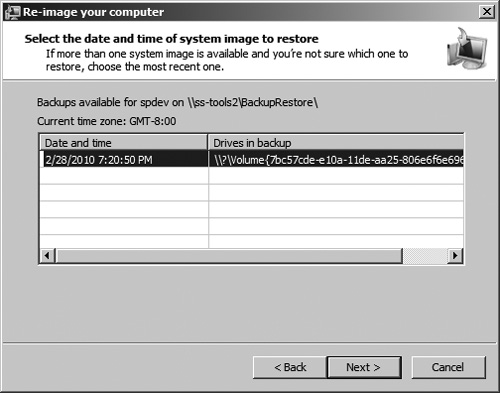
You are prompted to select
the date and time of the system image you want to restore. Because a
remote shared folder can house only a single image per server, just one
entry is available for selection, as shown in Figure 8. Select it and click the Next button to continue.
The restore options dialog appears, as shown in Figure 9. For a server with unformatted hard disks or with
hard disks that do not have system volume information matching the
system image that is being restored, the Format and Repartition Disks
option is selected and grayed out as shown. Because a full recovery is
being performed and it is desirable to restore all data volumes in
addition to the system drives, ensure that the Only Restore System
Drives check box remains unchecked. Click the Next button to continue.
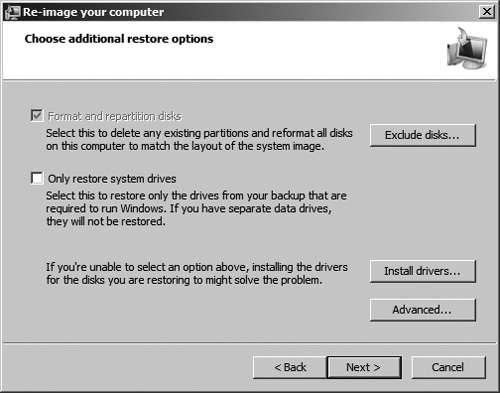
Note
Similar
to step 8, there is a possibility that you may have to load additional
drivers for Windows RE to see all the hard drives attached to your
system. If this is the case, click the Install Drivers button, and
follow the instructions presented before attempting to advance from the
Choose Additional Restore Options dialog box.
A basic confirmation dialog box
appears so that you can verify your recovery selections. Click the
Finish button to continue with the recovery. A
message box pops up to warn you of the impending hard drive
reformatting. Click the Yes button to acknowledge the warning and
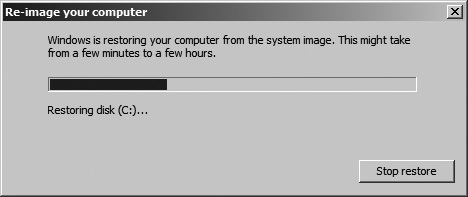
continue. The recovery process begins, and
a message box tracking the progress of the restoration appears, as
shown in Figure 10. As stated in the message box, the
recovery operation may take anywhere from a few minutes to a few hours.
The amount of time taken depends on the amount of data to be restored,
the speed of your network connection, the speed of your server’s hard
drives, and a number of other factors.
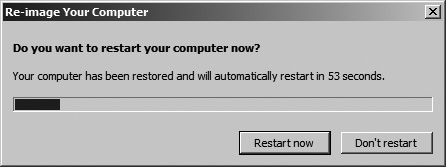
Once the recovery operation
has completed, the restart dialog box appears, as shown in Figure 11. If you take no action, the server automatically
restarts after a minute and boots into the restored operating system.
As stated earlier, full
server recovery is an inexact science. If the recovery operation fails
the first time for unforeseen reasons, consider trying it again with
slightly different recovery parameters. Sometimes
reformatting hard drives, restoring only the system drive on the first
pass, or perhaps excluding an extra disk from within the restore options
dialog box can make the difference between a restoration error and a
successful recovery operation.
|
