The GUI-based, Back Up Database dialog is the best
place to review all of the backup choices because they are grouped
logically and broken out into two pages: General and Options, as shown
in Figures 1 and 2.
If you are unsure how certain configuration changes affect the BACKUP
command, you can generate a script with the selected configuration and
analyze the output. Using the GUI interface will also prevent you from
creating a BACKUP command that
contains certain logical errors. For example, you are not given the
option to create a transaction log backup on a database that is using
the simple recovery model.
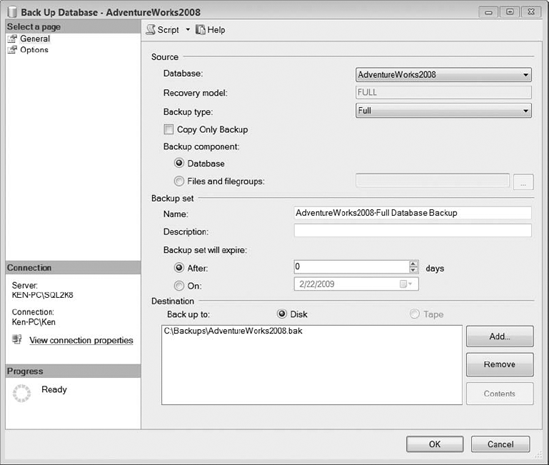
The General page, shown in Figure 1,
consists of three areas: Source, Backup Set, and Destination. Let's
take a look at the specific configurations available in each:
Database: Drop-down list containing the databases available to back up.
Recovery Model:
Read-only text box that displays the recovery model for the selected
database. This will affect the type of backups that can be performed.
Backup Type: Drop-down that lists the available backup types based on the recovery model for the selected database.
Copy Only Backup: Check box used to create a copy-only backup. Selecting this option will add the WITH COPY_ONLY clause to the BACKUP command.
Backup Component: Option buttons that determine whether you will back up the entire database or only a specific file or filegroup.
Name:
The logical name given to the backup set. SQL Server will automatically
suggest a name based on the options selected in the Source area.
Description: Logical description that can be given to the backup set.
Backup Set Will Expire: Option that determines when the backup set can be overwritten using the INIT
option. You can specify a date the backup set will expire or enter a
number of days to retain the backup set. A backup set will never expire
if you enter a value of 0 in the number of days.
Back Up To: Option that determines if you will back up to disk or tape.
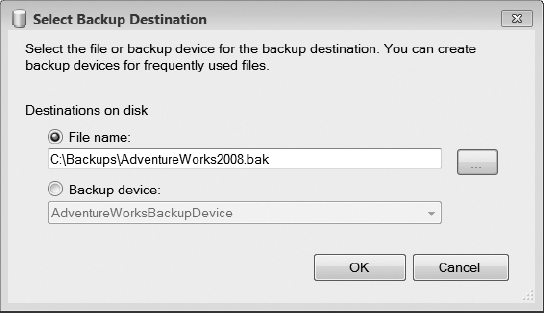
Add button: Displays the Select Backup Destination dialog box shown in Figure 3 that allows you to add a backup file or device to the backup set. You can add up to 64 devices for a single backup set.
Remove button: Removes the highlighted backup device from the backup set.
Contents button: Displays the Device Contents dialog box shown in Figure 4, which contains information about the media content for the highlighted backup device.

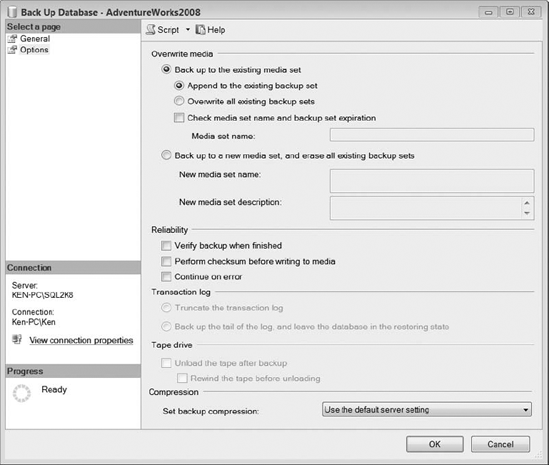
The Options page (shown earlier in Figure 2)
consists of five areas: Overwrite Media, Reliability, Transaction Log,
Tape Drive, and Compression. Let's take a look at the specific
configurations available in each:
Back Up to the Existing Media Set: This option adds the NOFORMAT clause to the BACKUP statement to ensure that the media header is not overwritten.
Append to the Existing Backup Set: This option adds the NOINIT clause to the BACKUP statement to instruct the backup to append the backup set to the existing media set.
Overwrite All Existing Backup Sets: This option adds the INIT clause to the BACKUP statement that instructs the backup to overwrite the existing backup sets.
Check Media Set Name and Backup Set Expiration: This option adds the NOSKIP clause to the BACKUP
statement that forces the backup to check the expiration date for the
backup set before it is allowed to be overwritten. You can optionally
add a media set name when this option is checked. This will add the MEDIANAME clause to the BACKUP
statement that forces the existing media set name to match the entered
media set name before the backup will successfully complete.
Back Up to a New Media Set, and Erase All Existing Backup Sets: This option adds the FORMAT clause to the BACKUP statement in order to overwrite the media header and the INIT clause to overwrite the backup sets. The SKIP option will also be added to the BACKUP statement when this option is selected to bypass the validation checks for media name and expiration. The SKIP option is not required because it is always the default behavior whenever the FORMAT clause is used.
New Media Set Name: This option adds the MEDIANAME clause to the BACKUP statement that will be used for the new media set.
New Media Set Description: This option adds the MEDIADESCRIPTION clause to the BACKUP statement to provide a description for the media set.
Verify Backup When Finished: This option will actually create a RESTORE VERIFYONLY statement following the BACKUP command that verifies the backup contents are readable.
Perform Checksum Before Writing to Media: This option adds the CHECKSUM clause to the BACKUP
statement that will verify the checksum and torn page information
before writing each page to disk. A checksum will also be created for
the entire backup. This option will add additional overhead to the
backup operation.
Continue on Error: This option adds the CONTINUE_AFTER_ERROR clause to the BACKUP statement that instructs the backup to continue if checksum or torn page errors are detected. The default option is STOP_ON_ERROR.
Truncate the Transaction Log:
This option is only available for transaction log backups. This
instructs the backup to truncate the transaction log after the backup
has completed. Selecting this option does not add anything to the BACKUP statement because this is the default behavior for transaction log backups.
Backup the Tail of the Log, and Leave the Database in the Restoring State: This option is only available for transaction log backups. This option will add the NO_TRUNCATE clause to the BACKUP statement that causes the BACKUP statement to back up the log regardless of the state of the database and does not truncate the log. This will also add the NORECOVERY clause to the BACKUP
statement that leaves the database in a restoring state after the
backup has completed. This option is generally used to back up the tail
of the transaction log on a damaged database before performing a
restore.
Unload the Tape After Backup: This option adds the UNLOAD clause to the BACKUP statement that is used automatically to unload a tape after a backup completes.
Rewind the Tape Before Unloading: This option adds the REWIND clause to the BACKUP statement that is used automatically to rewind a tape before unloading after a backup completes.
Set Backup Compression:
This option allows you to accept the default server setting for
compressed backups or to override the default setting by specifically
choosing to compress or not compress the backup. If the default setting
is chosen, nothing will be added to the BACKUP statement. If you choose the Compress Backup option, the COMPRESSION clause will be added to the BACKUP statement. If you choose the Do Not Compress Backup option, the NO_COMPRESSION clause will be added to the BACKUP statement.
Another option that is always added by default when using the GUI is the STATS option. The STATS option is used to show backup progress. You can specify a percentage to report. For example STATS = 20 will display a message for roughly every 20% of the backup that has completed. If you specify the STATS option without an assigned percentage, you will receive messages at 10% intervals.
