4. Creating Search Applications
A single SharePoint 2010 farm can provide multiple instances of search
services and applications. Because each of the services can crawl both
SharePoint and other repositories and could be configured to federate
queries to each other, you could design such a configuration for
performance or to isolate information.
Because the search service
can be consumed both by applications within the farm and from other
farms, topology designs could include both farm search topology and
enterprise search topology. Within a single farm, the concerns are the
number of search services required; enterprise considerations can
include having one or more SharePoint 2010 farms dedicated to search.
If you run the Farm
Configuration Wizard after the SharePoint Configuration Wizard and do
not clear the Search check box, a search service application is created
called Search Service Application, along with the Search Service
Application Proxy and the Search Administration Web Service, as shown in
Figure 3.

To manually create a search service application, perform the following steps.
Open a browser and go to the SharePoint Central Administration website.
Under Application Management, click Manage Service Applications.
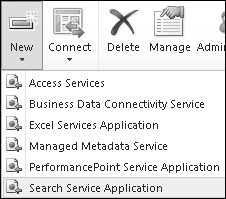
From the New menu, select Search Service Application, as shown in Figure 4, to open the Create New Search Service Application page.
In the Name section, type a unique name for the new search service application.
If
you have not installed the FAST Search for SharePoint, you should only
select None in the FAST Service Application section. If you have
installed FAST, select which FAST role you want this search service
application to provide.
In
the Search Service Account section, expand the Search Service Account
menu and then select the managed account that will run this search
service application. This account must be a managed account, so only
current managed accounts are listed.
Note:
All dialog boxes where
managed accounts are required will provide a Register new managed
account link to use should you need to designate an account as a managed
account.
In
the two Application Pool sections, you can select an existing
application pool for the new search service application. To create a new
application pool, click Create A New Application Pool and then complete
the following steps.
Enter a unique application pool name.
Either
use the Predefined built-in account security account or select
Configurable to use an existing managed account. SharePoint application
pools require a managed account, so only managed accounts are listed.
This process creates a new set of
Search Administration Web Service, Search Service Application, and
Search Service Application Proxy. This new search application will
appear as an association option in the Service Connections
configurations for each Web application in the farm.
5. Configuring the Search Application
The Ribbon of the Manage Service Applications page (refer back to Figure 3) presents several service configuration options for configuring search settings.
5.1. Publishing the Service
If you want other farms
to consume services from the search service application, the service
must be published. To publish the search service, follow these steps.
Highlight the service on the Manage Service Applications page (refer back to Figure 3) and click Publish on the activated Ribbon.
In the Publish Service Application dialog box, select http or https.
Select
the Publish This Service Application To Other Farms check box. The URL
of the service application appears in the Published URL section after it
is published.
In the Description box, type a description that will display with the link to the published service application.
In the Information URL box, type a URL that provides Help information for this service application.
Click OK to publish the service application.
You need to
establish a trust relationship between the farms to provide or consume
services. This trust is based on certificates, not domain trusts. You
also need to give the accounts or other principals that have access
permission to invoke this service application. You add these in the
dialog box that displays when you click the Permissions icon on the
Ribbon. Permissions are given via claims from organizations, the local
system, Active Directory, or Forms Authentication providers.
5.2. Delegating Administration
Members of the Farm
Administrators group always have rights to manage all service
applications. For the search applications, a team of search specialists
generally administrate the Search configurations. Click the
Administrators icon on the Ribbon (refer back to Figure 3)
to specify the users to whom you will delegate the rights to manage
this service application. These users will be given access to the
Central Administration site but will only be able to manage settings
related to this service application.
5.3. Modifying Properties
Click the Properties icon on
the Ribbon to open a dialog box where you can configure the service
account and the application pools used by search Web services.
