In larger organizations it is common for users to
only work with a subset of the chart of accounts. Often these accounts
are limited to a certain division or department. To find a set of
accounts fast, Dynamics GP provides a mechanism to look up a more
limited set of accounts and save these as Favorites. This provides
faster access when selecting accounts in transactions. In this recipe,
we'll look at using Favorites in Lookups.
This recipe showcases the
power of integrating SmartLists into the application interface. It
provides an unlimited number of ways to target account selection
including selection based on department, company, account type,
financial statement type, and more, all with just a few clicks.
Getting ready
To begin this recipe we are
required to set up a simple SmartList to set up the account limits. To
do so, complete the following steps:
1. Select the Microsoft Dynamics GP menu and click on SmartList to open the SmartList window.
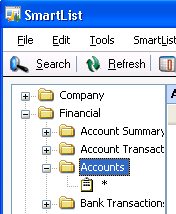
2. Click on the plus sign (+) next to Financial and select Accounts:

3. Now, click on the Search button. In the Column Name field, click on the lookup button (it looks like a magnifying glass) and select Account Number.
4. Set Filter to begins with and enter the Value as 000. Click on OK to close the window:

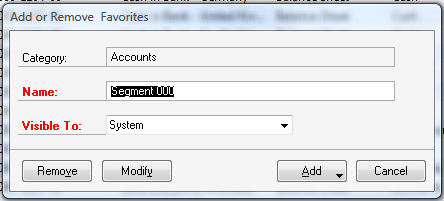
5. Click on the Favorites button. In the Name field, enter Segment 000 and click on Add. Then select Add Favorite:

This process creates a
specialized list based on a segment in the chart of accounts, and then
saves it to make it available for account selection.
How to do it...
The Favorites list only needs to be built once. After that, the real fun starts. Complete the following steps:
1. First, select Financial from the Navigation Pane on the left and select General from the Transactions section of the Financial Area Page.
2. Click on the Accounts field and then click on the lookup button.
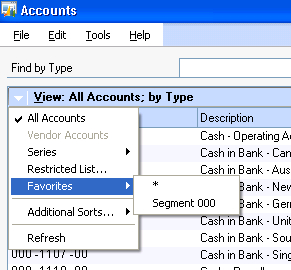
3. Click on the arrow next to View and hover over Favorites.
4. Select Segment 000, the Favorite created previously:

This presents a specialized
list to users giving them a more targeted list of accounts to select
from when creating a transaction.
There's more...
There are more options than just this recipe for limiting the selections from the chart of accounts.
Set as Default View
The new feature in Dynamics
GP 2010 is the ability to save a Favorite as the default view. Once a
Favorite has been selected in the view, simply click on Set as Default View from the View menu. Default views are per user and only available for master record lookup, not transactions.
Restricted List
If users only need to
restrict the available accounts occasionally, there is a temporary
option. After clicking on the lookup button and then on the arrow next
to View, users should select Restricted List instead of Favorites. The Restricted List
option provides similar functionality to Favorites, but the search is
not saved and Restricted lists cannot be set as the default view.
If users only
need to restrict the available accounts occasionally, there is a
temporary option. After clicking on the lookup button and then on the
arrow next to View, users should select Restricted List instead of Favorites. The Restricted List
option provides similar functionality to Favorites, but the search is
not saved and Restricted lists cannot be set as the default view.
Resetting
Selecting All Accounts resets the list, removing all restrictions.
Account Security
Account Security is a
feature in Dynamics GP that limits a user's access to certain accounts
in the chart. A user cannot even see an account that they don't have
access to. This is another option to limit the selection of accounts
available to a user. However, it requires an administrator and quite a
bit of thought to set up correctly. Setting up Account Security is less
like a recipe and more like a seven-course meal, so it's not covered
here.
Activating Account Security
without proper setup makes it appear as if the chart of accounts has
been deleted. Deactivating Account Security returns users' access to the
chart but not before triggering a gut-wrenching fear that it's time to
find a new job.