3. Turn On BitLocker
BitLocker sounds like a good idea, but how exactly do you turn it on?
First you will need to turn on
the TPM chip in your system BIOS. This is required for use of BitLocker
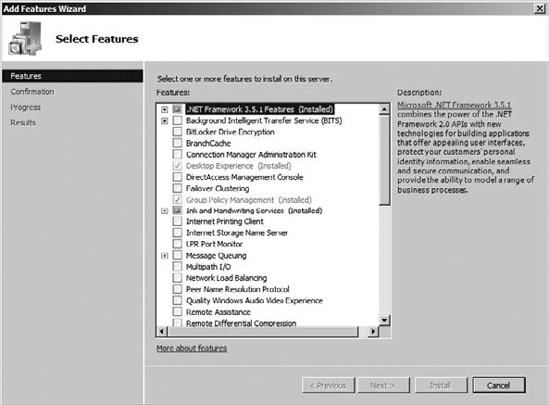
in Windows Server 2008 R2. Next you will need to add the BitLocker
feature through Server Manager and install it:
Select BitLocker Drive Encryption, as shown in Figure 2.
Close the Server Manager window.
Type BitLocker in the search box.
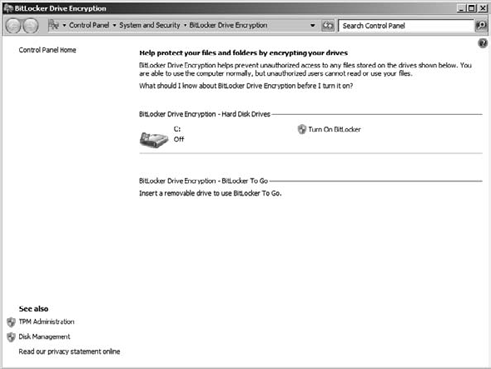
Hit Enter to open the BitLocker Drive Encryption tool, as shown in Figure 3.
Figure 3
shows the BitLocker Drive Encryption tool. It is not a bad idea to
click What Should I Know About BitLocker Drive Encryption Before I Turn
It On? to read more about it. There is some very good information there.
Once you are comfortable with the fact that you will be encrypting your
drive, you can continue.
Click Turn On BitLocker.
Just
after adding the BitLocker feature, although you may have multiple
drives and partitions on your system, only the system partition is
available for BitLocker. After you turn on BitLocker and encrypt the
system partition, the other drives and partitions will then show up in
the list as available for BitLocker encryption.
Click Yes to start the BitLocker setup.
If
you haven't turned on TPM in the BIOS, you will be prompted to do so
now, and the process will actually be automated for you. Click Yes.
(This is kind of cool.)
Log back on to your computer.
BitLocker will prompt you to encrypt the drive.
Click Next.
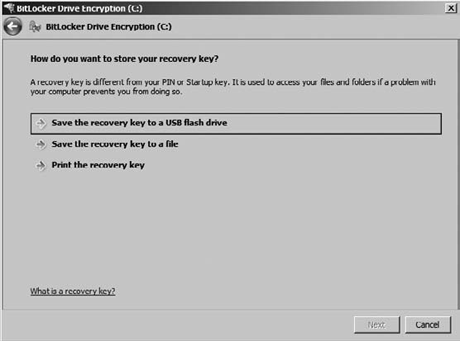
At this point, BitLocker asks how you want to store your recovery key (Figure 4). This is important! If your BitLocker drive becomes inaccessible, you are going to need this key.
Pick the option that works best for you, and click Next.
Select the box to run the BitLocker system check.


At this point, the drive
will begin its encryption process. Some words to the wise: do not do the
initial BitLocker drive encryption on your key servers during peak
operating hours. The initial encryption takes some time and will slow
down your performance. Find a time when the servers are less busy and
initialize BitLocker on them then.
BitLocker can now be configured for other drives and partitions on your system using the same BitLocker Drive Encryption tool.
4. Recover BitLocker
We don't need to tell
you that sometimes things can go wrong with servers. What do you do if
things go wrong with a server that is running BitLocker?
What if the TPM module that
contains the keys necessary to start the operating system is
unavailable? What if your user forgets their PIN? What if the hardware
crashes on the box and you are trying to salvage the hard disk?
Luckily, there is a
system for recovering BitLocker. The process relies on one very
important component, the recovery key. When you turned on BitLocker, you
were prompted for a location in which to store the BitLocker recovery
key. If you have access to this key, you are well on your way to
recovering the BitLocker drive. The process is simple and
straightforward:
The
computer will present a message indicating that it cannot locate the
keys necessary to start decrypting the operating system. One of your
options will be to recover BitLocker.
Type in the 48-digit (yes, 48 digits) recovery key.
The system will decrypt and start the operating system as normal.
At this point, you will need
to make some decisions. If you still have the original key, you can
reestablish connectivity to that key. If you do not have the original
key, you will need to generate a new one by turning off BitLocker, which
will decrypt the drive, and then turn BitLocker back on to create a new
set of keys for the system.
5. Use the BitLocker To Go Tool
BitLocker To Go introduces
the benefits of an encrypted partition to a removable drive. Instead of
using a file encryption tool, you can use BitLocker to encrypt the
contents of a removable drive. This drive could be a USB device, a
memory stick, an SD card, or some other type of removable storage. The
benefit of using BitLocker To Go is that you can enjoy the ease and
portability of a USB storage device without worrying about the data on
that device falling into the wrong hands. If someone were to steal the
device, the data would be encrypted and therefore inaccessible.
Once you have added and
enabled the BitLocker feature on your Windows Server 2008 R2 machine,
you will notice that there is an option in the BitLocker Drive
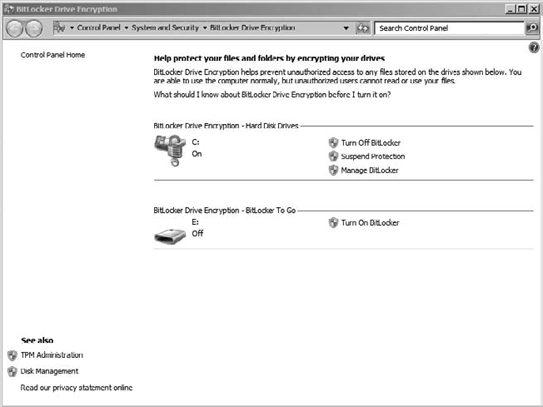
Encryption tool called BitLocker To Go. If you insert a removable
storage device, that device will be added to the tool as an additional
drive under the BitLocker To Go section, shown in Figure 5.

At this point, you can simply
click the link to turn on BitLocker for the removable drive. The setup
tool will prompt you to start BitLocker setup for this drive.
BitLocker To Go is a
little bit different from the traditional BitLocker tool in that there
is no TPM chip to hold keys for BitLocker To Go. You will need to make a
choice about how you want to unlock the drive. It can be unlocked
through the use of a password that you supply during setup or through
the use of a smart card and PIN.
Just like traditional
BitLocker, there is also a recovery key associated with BitLocker To Go.
Save this file carefully to a location where you will not lose it, or
better yet, print it and add it to your network log book. Remember, if
the drive becomes inaccessible for whatever reason, the recovery key is
your only ticket back to that data.
The drive will be
encrypted in much the same way as your system drive was encrypted,
albeit probably a little quicker since the size of the removable device
is likely much smaller than your system drive.
Once the drive is encrypted,
when the user plugs the drive into a physical machine, they will be
prompted for the password or smartcard PIN in order to unlock the drive.
Any files that are copied or moved to the drive will be encrypted.
BitLocker To Go provides excellent security to files and folders stored on a removable drive.
One of the cool things
about BitLocker To Go is that you can use Group Policy to require
BitLocker To Go in order to use thumb drives and require that the keys
are stored in Active Directory.