Just imagine it: a new systems administrator begins
working in your environment. You show him where the bathrooms are and
where the break room is, you give him a run-down of the AD environment,
and finally equip him with a shiny new laptop and matching
administrative account. He works in your environment for a while, and
seems to be adjusting well, and within no time, he does have a good
understanding of what is required to keep the place running smoothly.
After a time, you decide it is probably safe to take a short vacation,
and to allow him to completely manage all systems while you are gone,
you grant his administrative account membership in the Domain Admins
group. Effectively, you have just handed over keys to the castle,
displaying your trust and belief in this new member of the team.
Then, the inevitable occurs. You
are 2 days into your relaxing vacation, having a drink on the beach, and
your cell phone rings. On the other end is a very panicky admin, who is
none other than the new member of the team. He explains to you how he
created a new user account, but spelled the user’s name wrong. In his
attempt to delete the misspelled account, he inadvertently deleted a
handful of active user accounts, and now he is calling you to resolve
the crisis and determine what to do.
In the not so distant old
school days of AD, your instructions to the distressed administrator
would have involved digging out backups and performing authoritative
restores of the deleted directory objects. Problems with this included
the fact that your restoration potential was only as good as the time of
your last backup. So, if by some chance, backups had not been performed
for quite some time, you stood the chance of restoring the directory to
a much older copy in order to recover the deleted items.
On the other hand, if
backups are too cumbersome to attempt to utilize or if backups are not
available for use, another possible recovery option may include
performing a reanimation of newly formed Tombstone objects. Tombstone
objects are created as a part of the normal deletion process in AD. In
order to allow other DCs to be notified that an object has been deleted
from the directory, the fact that the object deletion has occurred must
somehow be replicated to all AD DCs. Since the absence of an object cannot
be propagated, a Tombstone is created that represents the deleted item
and it is assigned lifetime value. By default, Tombstone objects in
Windows 2003 and Windows 2008 domains are assigned a lifetime value that
allows them to remain in the directory structure for 180 days. Once the
lifetime threshold is reached, the physical Tombstone object is removed
from the DCs completely.
The process of reinstating
the Tombstone object before the lifetime of an object has expired is
referred to as Tombstone reanimation. When a Tombstone object is
reanimated, unfortunately it only brings with it a shell of its original
state. This is because when an object is deleted and a Tombstone object
is created, the original object will have the majority of its
attributes stripped to form the Tombstone. Therefore, the resulting
Tombstone is only a shell of the former object, and attributes such as
user group memberships would not be restored if a reanimation were to
take place.
With the introduction of
Windows Server 2008 R2, you now have the ability to enable a new feature
called the Active Directory Recycle Bin. And yes, it is what it sounds
like. Similar to the desktop Recycle Bin concept, once the feature has
been enabled in AD, the administrators are given a second chance to
restore an object that has been deleted from the AD. This allows you the
ability to still save the day and recover from common administrative
mistakes and blunders without as much effort. Utilizing the Active
Directory Recycle Bin yields results faster than an authoritative
restore and flaunts better end results than can be achieved with a
Tombstone reanimation.
Enabling the Active Directory Recycle Bin
By utilizing the new
Windows Server 2008 R2 Active Directory Recycle Bin feature, you can
quickly and painlessly recover the deleted accounts with just a few
clicks. In order to enable the capability, a few steps are required.
First, the environment must be prepared for new Windows Server 2008 R2
DCs. The following commands must be executed:
Once you have completed the
preparation tasks, you must ensure that all DCs are running Windows
Server 2008 R2. Only if all legacy DCs have been removed are you able to
make the final change required to enable the Active Directory Recycle
Bin. The final task that must be performed is to raise the forest functional level to Windows Server 2008 R2. This change cannot be retracted.
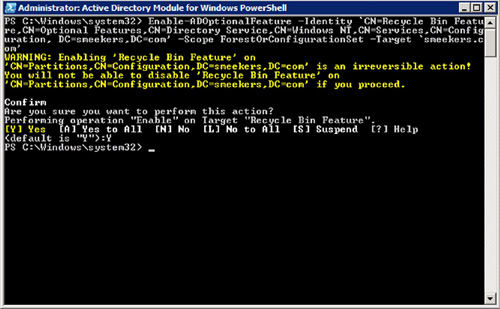
As soon as all the prerequisites are in place, the AD PowerShell cmdlet Enable-ADOptionalFeature is utilized to enable the Active Directory Recycle Bin feature. Figure 1 is an example of the cmdlet in use:

Once you have enabled the
Active Directory Recycle Bin, new object states and deletion behaviors
are introduced. Now, when an object is deleted, instead of becoming a
Tombstone object, it moves into a logically delete
state and is placed into the Deleted Objects container. During the
objects time as a logically deleted item, all of its attributes are
retained and it can be completely recovered intact to its original
state. By default, the logically deleted state will last for 180 days.
Once the lifetime of the
logically deleted state object has expired, the object then moves to
become a recycled object. Recycled objects behave very much like the
original Tombstone objects in the iterations of Windows
Server 2003 and 2008. The objects are stripped of the majority of their
attributes and a default lifetime timer of 180 days is applied. Once
this timer counts down, the object is then physically removed from the
directory.
Restoring Deleted Active Directory Objects
So, someone has executed AD
administrative hari-kari and accidently deleted a chunk of the live AD.
So, how do you fix this? If you had the Active Directory Recycle Bin
enabled, help is just a few AD PowerShell cmdlets away.
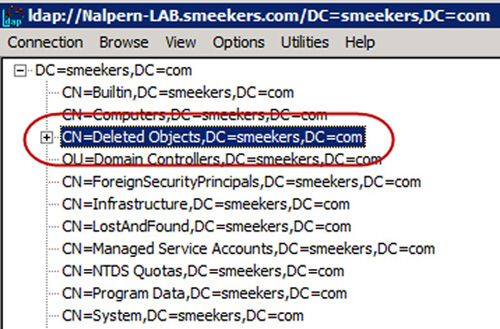
The Recycle Bin will not
display in your standard Active Directory the Users and Computers
interface. If you want to take a peek at it and what is in it, one easy
access mechanism is through ldap.exe. Ldap.exe allows you to bind to the
AD and visually be able to see the Recycle Bin. See Figure 2 for what this looks like.

One way to restore an object
from the Active Directory Recycle Bin is from within ldap.exe. By
expanding the Recycle Bin and selecting an object listed, you can
manually initiate a restore; however, a much easier method that we will
explore here is to initiate a restore utilizing Active Directory
PowerShell cmdlets.
The two key PowerShell cmdlets that you will use to restore objects from the Active Directory Recycle Bin are Get-ADObject and Restore-ADObject. The first command allows you to select or Get the object or objects you wish to restore, and the second command instructs the restore to occur. Let us start by looking at Get-ADObject.
This cmdlet is used with PowerShell to search and select any AD object.
By default, the command will not include deleted items and must be
specifically told to also search the Active Directory Recycle Bin with
the use of switch. The command to search AD for a particular item and
include the Recycle Bin in the search scope may look like this:
Get-ADObject -Filter {String} –IncludeDeletedObjects
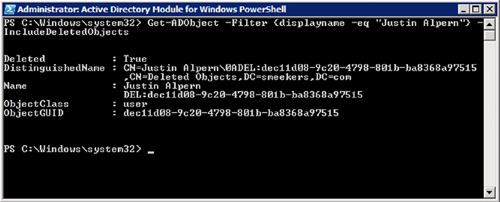
The filter string can include anything that you know about the object, such as the display name. To execute the Get-ADObject cmdlet utilizing the display name of the object, you could execute the following:
Get-ADObject -Filter {displayname -eq “Justin Alpern”} -IncludeDeletedObjects
See Figure 3 to see the returned results.

In this case, since you
already know that the object you are looking for exists within the
Recycle Bin, you can choose to scope the AD search to the Recycle Bin
hierarchy. For example:
Get-ADObject –SearchBase “CN = Deleted Objects, DC = smeekers, DC = com” –ldapFilter “(objectClass = *)” -IncludeDeletedObjects
In
this example, we have added an LDAP filter for objectClass. By
supplying an * all object classes will be returned. Always remember that
if you want the search to return items contained in the Recycle Bin,
you must specify the –IncludeDeletedObjects switch.
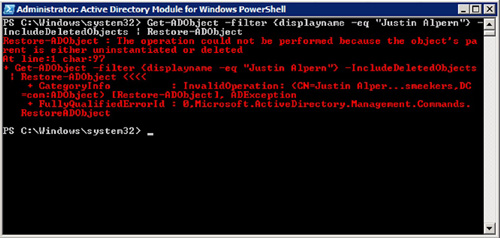
So, once you have composed the Get-ADObject command syntax that returns the object, you wish to restore you can then pipe the results straight into a Restore-ADObject, for example:
Get-ADObject -Filter {displayname -eq “Justin Alpern”} –IncludeDeletedObjects | Restore-ADObject
Notice in Figure 4
that this command has resulted in an error. If you examine the error,
you will see that the error is generated because the parent object of
the user object of “Justin Alpern” no longer exists in AD. You must
validate that the target restore location for the object still exists in
AD before attempting a restore. If the parent object of the deleted
object no longer exists in AD, you cannot recover the object. However,
if the original parent object still resides in the Recycle Bin, then it
can also be restored, which would in turn allow for the child object to
be restored as well.
