NPS
The principal change in
NPS with the release of Windows Server 2008 R2 is the introduction of
templates. When configuring an NPS system that may house many RADIUS
configuration settings, administration and management of the multiple
settings and shared secrets can become an administrative
challenge. With the addition of templates in Windows 2008 R2,
administrators can now configure settings and then save them to template
form to be exported for use on other NPS services, or even to be used
locally as base templates in the creation and configuration of new
RADIUS settings.
The templates are available in three distinct flavors:
Shared secret
RADIUS Clients
Remote RADIUS Servers
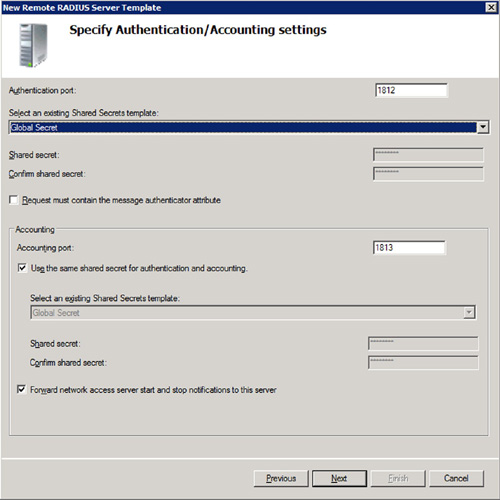
Shared secret templates can be
used in conjunction with the other two templates. So, for instance,
while creating a Remote RADIUS Server Template, you can select to
utilize a previously created Shared Secret template, as depicted in Figure 1.

Additionally, when you
are ready to utilize the Remote Server template, you can do so locally,
or you can choose to export the settings and import them into another
server for use. Ideally, you should only ever have to configure RADIUS
Proxy targets a single time.
In addition to the new
NPS templates, Microsoft has also taken measures to enhance accounting
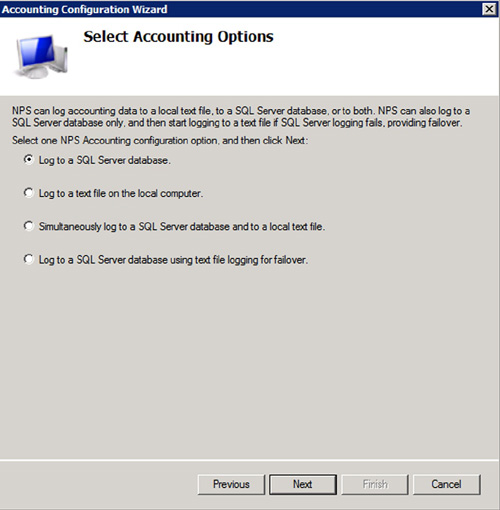
with NPS in Windows 2008 R2. With the introduction of a new accounting
configuration wizard, you can now easily set up and configure NPS
logging. You can choose between Microsoft SQL logging, text logging, or
even run both, as shown in Figure 2.

NAP
Deploying a NAP
infrastructure requires multiple critical design decisions to be made.
These decisions include both policy settings for enforcement scenarios
which will indicate how and when clients are checked for compliance
status, and also the selection of functioning mode the policies will
enact once a machine is deemed out of compliance.
There are five different policy enforcement scenarios available:
IPsec
enforcement—utilizes health certificates to control host access on a
per-connection level, so machines that are out of compliance are denied
connectivity to requested resources
802.1X
enforcement—works with supported wireless access points to place
noncompliant machines into an isolated network environment
VPN
enforcement—does not allow access into the internal network
environment, or only provides for limited access for noncompliant
machines
DHCP
enforcement—enforces limited access by issuing restricted network IP
addresses to machines that are noncompliant, does not function on
machines with static IP addresses
No enforcement—remediation actions can be taken on noncompliance machines, but limited access is not enforced
Deciding
which method to use is primarily based on your NAP deployment goals.
For instance, if it is your goal to protect your internal network from
remote access users, then selecting VPN enforcement is a logical choice,
whereas attempting to accomplish the same goal with DHCP enforcement is
not possible. On the other hand, if restricting your users is out of
the question, then going with the No enforcement option still allows
you to identify machines that do not match your configured health
policies and perform remediation without negatively impacting the user’s
working day.
To begin the deployment of
NAP, you must install the NAP role on a Windows 2008 R2 server by
utilizing Server Manager. Once the role has been successfully installed,
the server is effectively functioning as a NAP Health Policy Server
(HPS). The NAP HPS is a server running the NAP role that has been
configured with your selected enforcement scenarios. All of your
policies and compliance configuration information will be housed on this
server role in the environment.
Assuming you have taken
the time to execute planning steps, you should be aware of the
enforcement mode of choice for your enterprise. Once you have installed
the NAP HPS, the next step is to configure the policies for your
selected enforcement mode. To do this, follow these steps:
1. | Open Server Manager | Roles | Network Policy and Access Services | NPS (Local).
|
2. | In the details pane, select NAP from the dropdown menu and then select Configure NAP.
|
This will launch a wizard that
will guide you through policy creation for your enforcement method of
choice. By default, the wizard will create multiple policy types,
including: Health Policies, Network Policies, and Connection Request
Policies. These three policy types work together to create the policy
structure used to deem a client connection worthy or not. Wizard-created
noncompliant and compliant Health Policies are configured with the
default Windows Security Health Validator and are automatically utilized
by the wizard-created Network Policies.
Three NAP enforcement modes exist within Network Policies:
Reporting Mode—allows
for data collection to occur, however, users are not impacted, no
restrictions are enforced; configured as “Allow full network access”
from within the Network Policy.
Deferred
Enforcement—grants noncompliant machines network access for a limited
time; configured as “Allow full network access for a limited time” from
within the Network Policy.
Full Enforcement—restricts
noncompliance computers to access a restricted network to obtain
remediation through updates; configured as “Allow limited access” from
within the Network Policy.
The Network Policies created through the Configure NAP wizard include a noncompliant network policy that is configured to allow for limited access,
and a compliant network policy that allows for full network access.
Additionally, Connection Request Policies are created to allow the
traffic type to connect to the system and be validated.
Since the wizard is not aware
of what compliance or noncompliance configurations should be set to in
your organization, once the wizard has created the policies, you may
find it necessary to go back and adjust some of the settings,
particularly on the Health Policy-selected SHV. To do this, open Server Manager, navigate to Roles
| Network Policy and Access Services | NPS (Local) | Network Access
Protection | System Health Validators | Windows Security Health
Validator | Settings and either select the configuration you wish to modify or select New to create an additional configuration.
The Windows 2008 release of NAP
SHVs was limited and constituted a one-stop shop per server for SHV
configuration settings. So, for an installed instance of NAP, you could
only have a single corresponding instance of a particular SHV on the
server. So, essentially for each of the different health scenarios that
you were required to support, you needed to have a separate NAP server
to allow for the different SHV configurations. This created a situation
where even in small environments, the deployment footprint for NAP could
be very high.
To address the total cost of
ownership and deployment concerns that existed with the Windows 2008
iteration of NAP, Microsoft adjusted NAP in Windows 2008 R2 to allow for
the creation of multiple SHVs on a single NAP server instance. Any
third-party vendor SHVs would need to be created by the vendor to
support the new multiple SHV functionality before they can be used in
this fashion. So, by being able to establish different health
requirements, administrators are now able to set up different
configuration models for different types of clients, reduce their NAP
footprint and still retain central access control to their networks.
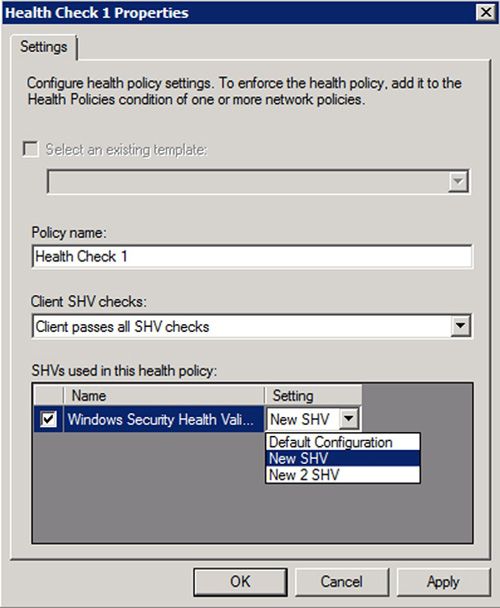
The manual high-level steps to multiple configurations within a single NAP deployment are as follows:
1. | Configure the appropriate SHVs.
|
2. | Configure multiple health policies and select the appropriate SHV (displayed in Figure 3).

|
3. | Configure multiple network policies and select the appropriate health policy for each.
|
Utilizing the Configure NAP,
wizard performs policy creation steps automatically based on your
responses in the wizard; however, adjustments to the SHVs may still be a
required postwizard task, depending on the complexity of your
deployment.
Once
the NAP HPS configuration is completed, the next step in the NAP
deployment is to you must ensure to identify and configure NAP
Enforcement Points. NAP Enforcement Points are the connectivity points
into your network that must be configured to utilize the NAP HPS
settings, such as DHCP Servers, VPN solutions, including Microsoft NPS,
and Wireless Access Points.
For instance, if you have
chosen to utilize your VPN access mechanism as a validate check point
for client health, you must configure that VPN solution to integrate
with NAP. This allows the VPN solution to collect information about the
connecting client and transmit it to the NAP HPS for policy
processing. Once a response is received from the NAP HPS server, the
VPN system will have the information it needs to properly respond to the
client. If the client is considered compliant, access will be granted,
and if the client is noncompliant, either limited network access or full
network access for a limited time will be granted.