Social tagging is a feature of SharePoint 2010 that
brings immediate business value. As your users traverse sites, they have
the ability to tag pages with the help of the I Like It button, found in the upper right corner of a page. At the same time, other users of the same sites can tag pages.
SharePoint uses tags as a way to
help users describe content. As users of a site tag information, these
tags accrue as metadata. A database of this metadata is kept within
SharePoint. With the new managed metadata service, a user can begin
typing in a new tag and a list of suggestions will appear. Users can
then either use a suggested tag or create one of their own.
Using a tag cloud, the web
part allows the user to see all their tags, and each tag is presented as
a link to the associated content. This becomes a navigational
component.
In this recipe, we will see how
to set up a tag cloud and the associated Term Store it consumes. This
will give you, as an administrator, knowledge about how managed metadata
interfaces with the tag cloud.
Getting ready
You must have a team site
set up and should be the owner. The managed metadata service should be
set up and functional. You must have farm-level administrative
permissions to the Central Administration site.
How to do it...
1. Navigate to your team site homepage.
2. Click the Page option above the ribbon (to the right of the Browse button).
3. Position the cursor on the page where the tag cloud will be placed. Click Edit on the ribbon.
4. Click Insert. Then click Web Part on the ribbon.
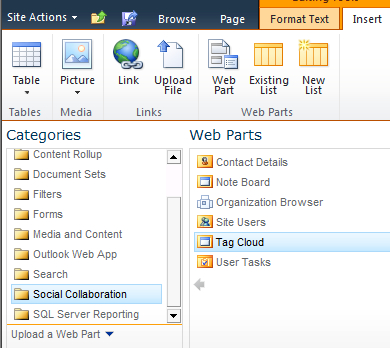
5. Select Social Collaboration under Categories and select Tag Cloud under Web Parts, as shown in the following screenshot:

7. Click Page and then click Save on the ribbon.
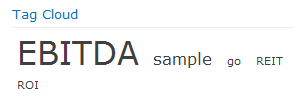
8. The tag cloud appears on the page and should look similar to the following screenshot:

9. Open the Central Administration screen and click Application Management.
10. The third section is Service Applications. Under this section, click Manage service applications.
11. Find the Managed Metadata Service application and left-click to the right of the name—the line will be highlighted.
12. Click Manage on the ribbon. The Taxonomy Term Store is presented.
13. Add a user under the Term Store Administrators. Do this by typing in the domain/username and clicking the Check User control. You can also use the Address Book Search control to the right of the Check User control.
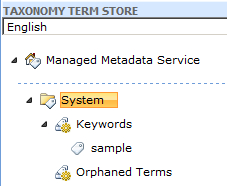
15. Click the drop-down list to the left of System and then to the left of Keywords. There should be a screen similar to the following screenshot:

How it works...
The tag cloud social feature
relies upon two architectural components being set up within
SharePoint—the user profile service and the managed metadata service.
The first part of the recipe
(steps 1 8) adds the tag cloud to a page. As we can see in the
screenshot of step 8, several terms immediately show up.
Steps 9 15 show us how to navigate back to the Term Store to see from where they originate. In particular, the sample term is shown in the managed metadata taxonomy. This is the term that is surfaced in the tag cloud.
The result of these two
halves builds a complete picture, showing the full life-cycle of a term,
from the store to the tag cloud.
There's more...
The I Like It button at the top of the page allows a user to automatically tag a page. When this is done, I Like It is added to the System Term Store as part of the folksonomy.

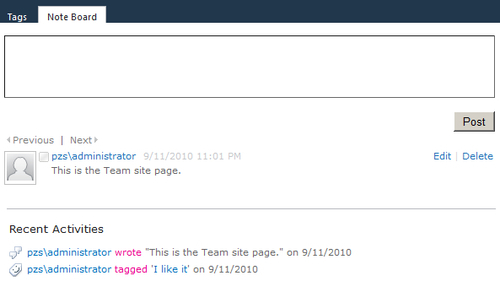
The button to the right, Tags & Notes, allows a user to tag a page with their own tag and create a public note. This is shown in the following screenshot:
