Imagine opening a door within your company’s
workspace and seeing a room of pile upon pile of file folders stacked
ceiling high and stuffed full with loose pages of information. Some of
the file folders may contain related data files while others contain
disparate information. Some data is considered pertinent to the company
and needs to be kept for many years. Other data may be outdated or stale
and in need of purging.
The ceiling-stacked piles
stretch the length of the room, and as you continue down the hallway,
you notice that the files are distributed ceiling high throughout many
rooms. This seems like fiction, but in most IT environments, dealing
with file servers in the environment depicts a daily task in an
administrator’s reality.
Electronic data has
evolved over time to allow users to store all data sensitivity types.
Data is most useful to users if it is available when needed. By stacking
company data into disorganized piles within a File server
infrastructure, data may be hard to come by when it is needed most. This
is a problem that has existed since electronic data storage began, but
the problem has become exacerbated as the amount of data that needs to
be retained in the corporate world has grown. Another challenge that is
occurring in most environments is the need to comply with stringent
regulatory compliance requirements, which calls for data to be readily
available and easily discoverable.
With Windows 2008 R2,
Microsoft has introduced a new feature functionality that will begin to
help administrators tackle this ever-growing problem. It is called File
Classification Infrastructure (FCI) and its purpose is to assist in
automatically classifying files in your environment to make them easier
to manage and discover. Three methods exist to classify files:
Automatic classification—This is rule driven and files are classified based on content or folder location
Manual classification—Users can configure file properties that influence their classification
Line
of Business applications and IT scripts—by utilizing the FCI, API files
can have their file properties configured automatically via
applications and scripts
By creating file management
policies, you can control the way files are classified and then, based
on their classifications, tasks can be performed against the files. A
good example of this occurs when data is considered stale. In many
environments, data purge does not occur on a regular basis. As a result,
stale data can accumulate and create unneeded file content that must be
maintained. By utilizing policies, you can classify data, and then
perform data management tasks such as expiring files on a routine basis.
In the next sections, we will explore the concept of FCI in more depth
and discuss what you need to do to deploy it successfully.
Planning for FCI
Like many things in IT, FCI is a
technology better deployed with a good plan behind it. So before jumping
in with both feet, it is a really good idea to come to an agreement as
an organization as to what the FCI classification structure will look
like. Group files into like categories sound easy, until you start to
discuss within the organization what those classifications actually are.
Within a corporation, often
times, a Document or Records Management policy already exists. These
existing policies can form wonderful springboards when planning for an
FCI deployment. Often, the policy will have each distinct file or record
type called out along with the named classification and associated
retention information document for each type. If you are lucky enough to
work in an environment with a formalized and well-documented records
management policy, your journey in deploying FCI will have a much more
clearly laid-out path.
For those of you not quite as
lucky, it is in your best interest to plan and design for the
classifications infrastructure before you attempt to build it.
Additionally, you will not only want to know how the files will be
classified, but what types of actions are to be performed on the various
classifications. It may be useful to create a matrix documenting the
automated file classifications and the actions for each. Table 1
describes a fictional example. The next step is to map your plan to the
functionality within FCI. We will discuss deploying FCI in the next
section.
Table 1. File Classification Matrix Example
| File Classification Information | Property Value | Associated Actions |
|---|
| Sensitivity Ratings Confidential | Yes or No | Backup and retain for 12 years
Discoverable within 2 days
Expires on disk after 1 year |
| Internal Only | Yes or No | Backup and retain for 3 years
Discoverable within 2 days
Expires on disk after 1 year |
| Public | Yes or No | Backup and retain for 3 years
Discoverable within 1 day
Expires on disk after 180 days |
| Personnel Content | Contains SS#, phone, or home address Does not contain personal info | Move to Personnel file share No action |
| Business Impact | High | Discoverable within 1 day
Expires on disk after 1 year |
| | Medium | Discoverable within 2 days
Expires on disk after 1 year |
| | Low | Discoverable within 10 days
Expires on disk after 180 days |
Configuring FCI
To utilize FCI, the
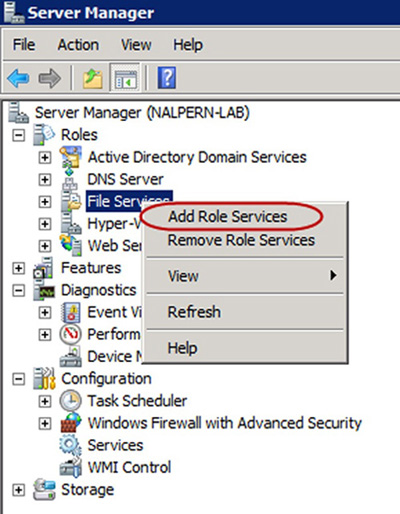
server must hold the File Services role. To install FCI open Server
Manager, right-click the File Services role and select Add Role Services, as displayed in Figure 1. This will launch the Add Role Services wizard and allow you to select File Server Resource Manager from the list.
Once you have completed the
installation wizard, you will then have the File Server Resource Manager
console available to you on the Administrative Tools menu (see Figure 2).
We will be reviewing Automatic Classification, and the configuration
for each of the different components takes place from within this
console.
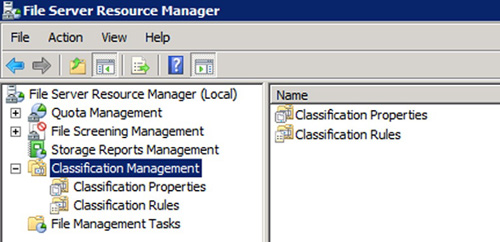
The console
contains a section called Classification Management. Within
Classification Management, you have two subnodes: Classification
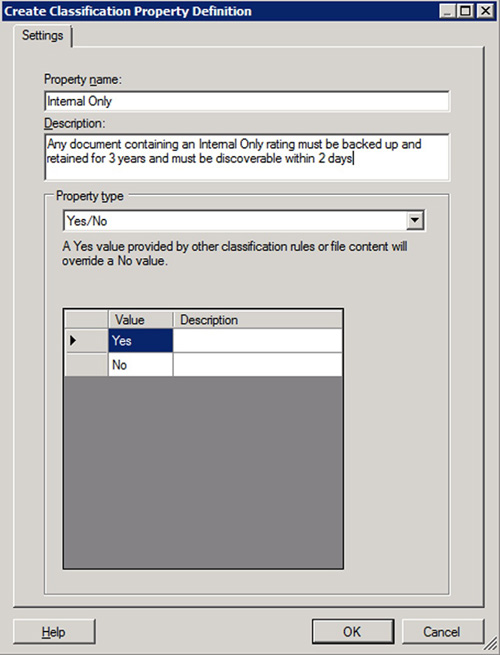
Properties and Classification Rules. The Classification Properties
section is where you will build out your classifications plan into
Classification Property Definitions (see Figure 3). The Create Classification Property Definition screen will require you to name your property definition and then
identify the property type. You have quite a variety of choices to
select from and will want to stick to your originally laid-out plan.
Also, keep in mind that simplification of the classification structure
you build will help to ease administrative burden down the road.
Once you have completed
building your classification structure, the next step is to create
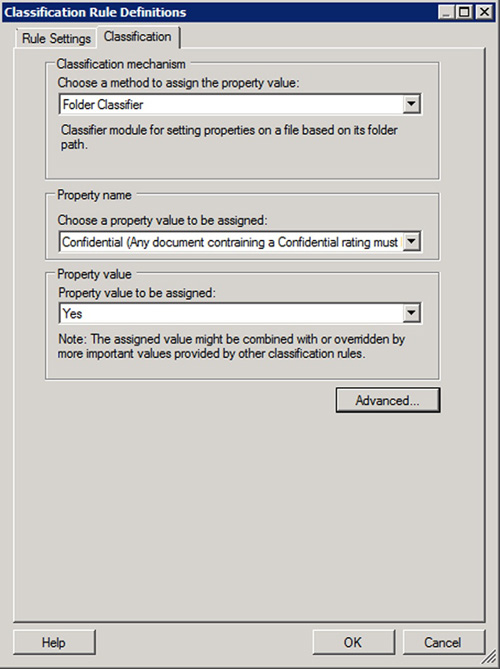
rules. Classification Rules Definitions, displayed in Figure 4, are what will be used by the system to judge when to assign which property definitions to the various files you scan.
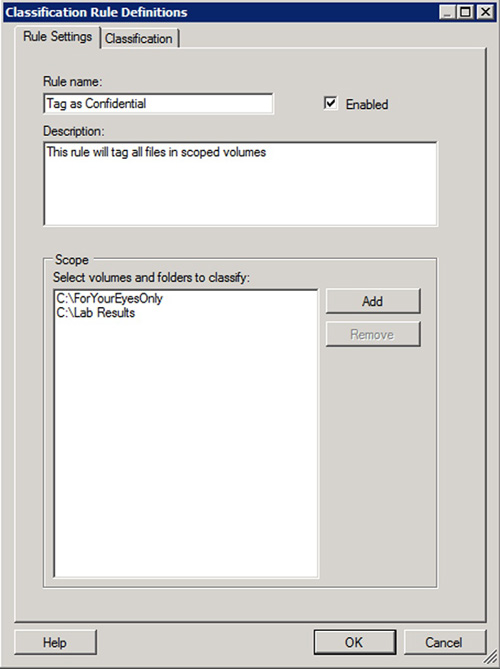
Each
rule must contain the directories which are to be classified, and the
classification mechanism. The choices for classification mechanism are
Folder Classification and Content Classifier. The Folder Classification
allows you to specify folder information to be used as the match
criteria to tag a file with a particular property. The Content
Classifier allows for a more detailed match and can search file content
in order to match. Regardless of the selected classification mechanism,
you utilize the Advanced option on the Classifications tab to specify
the parameters or values used to match (see Figure 5).
Managing FCI
Ok,
now that you have built your Classification Properties and
Classification Rules, do not sit back and wait for magic to happen. We
have a few more steps to go before the system will start to work for
you. First, we must send the rules you have just created out into your
file structure to start scanning and tagging documents. You have two
choices of how to accomplish this: One method is to run a manual scan
for all rules on demand and the second method and preferred choice is to
schedule scans to
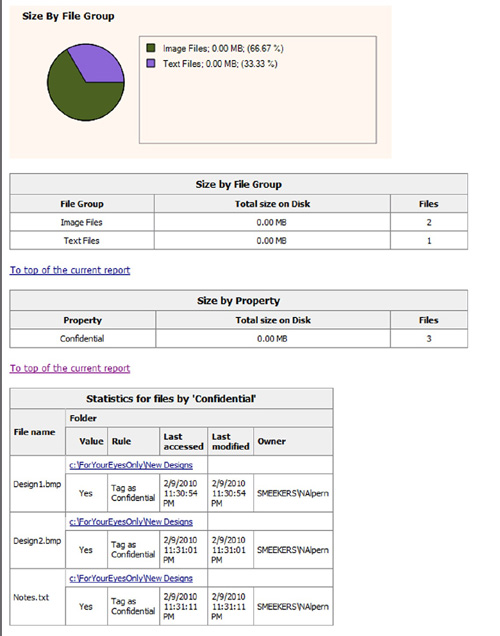
run on a recurring basis. After performing an on-demand scan, a
statistical report of the results will be displayed. A portion of a
sample report is displayed in Figure 6.
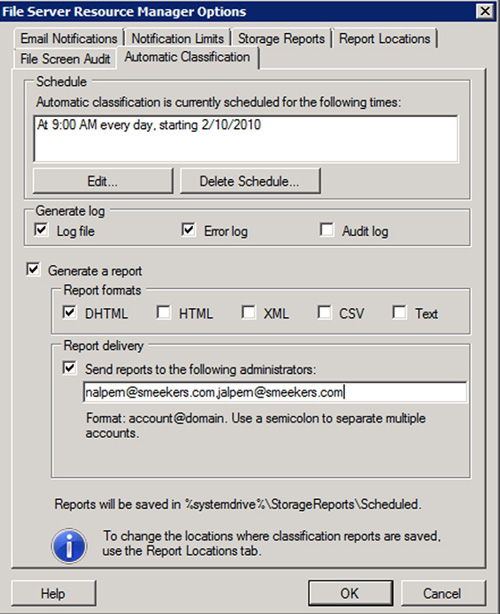
If you choose to schedule
the scan, you will be asked to configure a standard scheduling window
with your desired parameters for the scheduled execution. The schedule
screen is part of the File Server Resource Manager options and is
displayed in Figure 7. Scheduled scan reports are stored in the %systemdrive%\StorageReports\Scheduled directory by default.
Now you have effectively sent
rules out into the file system to tag files with different
classifications. Congratz! But ask yourself, what have you really
accomplished? At this point, you have a whole pile of tagged files, but
you have not really performed any actions on them besides
categorization. So, the next step in working with FCI is to decide what
to do with these classified files. In the File Server Resource Manager
console, there is a section labeled File Management Tasks.
File Expiration and Custom are the two file management tasks actions
available. File Expiration allows you to configure a directory as a
destination for any files that are deemed expired. Custom allows you, as
the administrator, to create your own file management tasks which fit
the needs of your organization.