If the user connects to an Internet e-mail server, an
advantage of POP3 is that it lets the user leave mail on the server. By
doing this, the user can check mail on a home computer and still
download it to an office computer later.
1. Leaving Mail on the Server: Outlook
With Outlook, you can configure POP3 accounts to leave mail on the server by completing the following steps:
Start
Outlook. In Outlook 2007, on the Tools menu, click Account Settings. In
Outlook 2010, click the Office button, click the Account Settings
button, and then select the Account Settings option.
In the Account Settings dialog box, select the POP3 mail account you want to modify and then click Change.
Click More Settings to display the Internet E-Mail Settings dialog box.
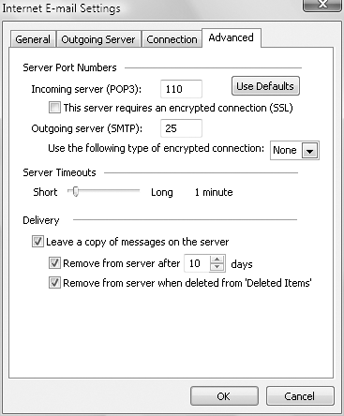
In the Internet E-Mail Settings dialog box, click the Advanced tab, as shown in Figure 1.

Use
the options below Delivery to configure how and when mail should be
left on the server. To enable this option, select the Leave A Copy Of
Messages On The Server check box. The additional options depend on the
client configuration. Options you might see include the following:
Remove From Server After N Days
Select this option if you're connecting to an Internet service provider
(ISP) and want to delete messages from the server after a specified
number of days. By deleting ISP mail periodically, you ensure that your mailbox size doesn't exceed your limit.
Remove From Server When Deleted >From "Deleted Items"
Select this option to delete messages from the server when you delete
them from the Deleted Items folder. You'll see this option with
Internet-only Outlook configurations.
Click OK when you've finished changing the account settings.
Click Next, and then click Finish. Click Close to close the Account Settings dialog box.
2. Leaving Mail on the Server: Windows Live Mail
With Windows Live Mail, you can configure POP3 accounts to leave mail on the server by completing the following steps:
Start Windows Live Mail. Then, on the Tools menu, click Accounts.
Select the POP3 mail account you want to modify, and then click Properties.
In the Properties dialog box, click the Advanced tab.
Use
the options below Delivery to configure how and when mail should be
left on the server. To enable this option, select Leave A Copy Of
Messages On The Server. The additional options depend on the client
configuration. Options you might see include the following:
Remove From Server After N Days
Select this option if you're connecting to an ISP and want to delete
messages from the server after a specified number of days. By deleting ISP mail periodically, you ensure that your mailbox size doesn't exceed your limit.
Remove From Server When Deleted >From "Deleted Items"
Select this option to delete messages from the server when you delete
them from the Deleted Items folder. You'll see this option with
Internet-only Outlook configurations.
Click OK, and then click Close.