Disabling social features for a user
One of the key features of
SharePoint 2010 is social components. These components are enabled by
default. However, we do not always want users adding tags, using the
Note Board and other social features. Organizations might need to turn
them off for a particular user or even a group.
Take the case where an
organization has a site set up for their vendors to use and exchange
information. It may not make sense, from a business perspective, for the
users of this site to be tagging items and using the I Like It
feature. They are providing information to an organization through the
extranet site. They are not looking to do things like rate the
information on the site.
In a case like this, the social features can be disabled for that group. In this recipe, we will see how to accomplish this.
Getting ready
You must have farm-level administrative permissions to the Central Administration site.
How to do it...
1. Open the Central Administration screen and click Application Management.
2. The third section is Service Applications. Under this section, click Manage service applications.
3. Find User Profile Service Application and left-click to the right of the name— the line will be highlighted.
4. Click the Manage option on the ribbon.
5. In the People section, click Manage User Permissions.
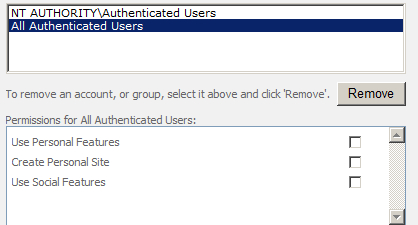
6. Click on the line that says All Authenticated Users.
7. Uncheck the Use Personal Features, Create Personal Site, and Use Social Features checkboxes. The screen should look similar to the following screenshot:

How it works...
Using Central
Administration, the recipe shows how to navigate to the User Profile
Service management page. There is no direct way to get to the page; it
must be done with the help of the service application as shown in steps 1
to 4.
Once there, the section People contains the link to permissions, where the social features can be disabled.
Step 7 shows the screen that contains three items per user/group:
Use Personal Features: These are items such as My Profile.
Create Personal Site: When unchecked, the user will also not be able to provision a personal site—commonly known as My Site.
Use Social Features: The user cannot use the social features that are part of the SharePoint 2010 project. Items such as the I Like It and Notes button are removed.
Now groups can be created
that do not need to have these types of services, for instance, auditors
that need access to the system but are not part of the ecosystem of a
company. These types of resources are typically only onsite for a short
duration with a focus on controls.
An administrator must
be careful and cognizant to understand that a user may belong to several
groups. Therefore, if the permission is deleted from one group, users
may still have access via another group.
In this recipe, all of the features were removed; you could pick and choose specific features for the groups that exist.
There's more...
There is a way to disable the I Like It and Notes at the farm level. This is done through a feature called SocialRibbonControl.
Be aware that doing this will also disable other social features such
as ratings. While this can be done through the UI, the simplest way to
disable these social features is through PowerShell. This can be
achieved using the following command:
Disable SPFeature Identity <SocialRibbonControl>
Deleting a note associated with a page
Notes associated with
tags are powerful as they expose comments of other users to the user
community of that portal. The implication of this capability is that
users can give information about a page or object and have others view
it.
A possible shortcoming of this
capability is that company information can possibly be exposed to the
people who are not supposed to access it.
Consider the example of
product pages. Product pages can be viewed by the whole company and may
be rated as new products are developed. This is a powerful feature of
SharePoint's new social features.
However, in rating the
product, a person may mistakenly put financial information on the Note
Board that is exposed publicly within the company. In an enterprise with
hundreds or even thousands of products, this information could possibly
be exposed for a while.
SharePoint 2010 has a feature
where the Farm Administrator can search all the Note Boards for
particular information. This recipe shows how that is achieved.
Getting ready
You must have a team site
set up and should be the owner. The managed metadata service should be
set up and functional. You must have farm-level administrative
permissions to the Central Administration site.
How to do it...
1. Navigate to your team site homepage.
2. Click Tags & Notes in the upper right-hand corner of the site.
3. In the dialog that appears, click the Note Board tab.
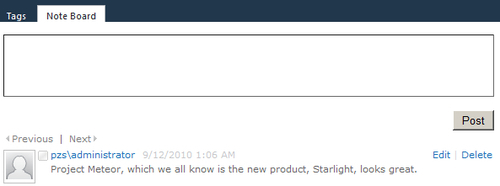
4. Enter the following into the text box: Project Meteor, which we all know is the new product, Starlight, looks great.
5. Click Post. The screen should look like the following screenshot:

Close the dialog box.
6. Open the Central Administration screen and click Application Management.
7. The third section is Service Applications. Under this section, click Manages service applications.
8. Find User Profile Service Application and left-click to the right of the name— the line will be highlighted.
9. Under the My Site Settings section, click Manage Social Tags and Notes.
10. Fill in the form as shown:

In the Type drop-down list, change the value from Tags to Notes.
Enter Starlight in the Tag/Note Contains text box.
12. A listing of any note containing the word Starlight appears. Click the checkbox to the left of the note.
13. Click Delete. A confirmation pop-up window appears. Click Yes.
How it works...
In the recipe, Starlight
is the name of the new product not yet released, but it was viewable on
the company intranet. Someone put the name of the new product on the
Note Board. There are a number of reasons, from a business point of
view, why a company would not want this information to be released
before a company announcement.
In the recipe, tracking the
product name down by URL, we were able to locate every instance of this
name and quickly delete the note references.
Notes are public by default. This should be noted in the governance policy of the organization.
There's more...
Tags can also be found and
deleted if they are not acceptable. Unlike notes, tags can be made
private to a user. After creating the tag, check the box marked Private.

Now the tag will only be visible to the user.