Editors are custom ASPX web pages hosted inside
of SharePoint. When a user attempts to use Dashboard Designer to edit
the custom tabular data source object, Dashboard Designer launches
a new browser instance to browse to the custom page and pass three
parameters to the custom tabular data source object. The parameters are
as follows:
Operation: This is always set to OpenItem.
SiteCollection: The URL to the root of the site collection containing the custom object.
ItemLocation: The relative URL from the root of the site collection to the object being edited.
With these three parameters, you can retrieve the object using the BIMonitoringServiceApplicationProxy
class and parse out any information you need to display on the ASPX
page. When the user input is completed, use those same parameters to
save the updated object back to SharePoint.
This step is necessary
only if you want to have any user-defined parameters in your data
source. If you want to just have a hard-coded data source that does not
need to take any parameters, it is not necessary to create an editor.
Note
The method for creating
custom object editors has changed from PPS 2007 to PPS 2010. In PPS
2007, it was necessary to create a custom WinForm plug-in that needed to
be packaged with Dashboard Designer. Although this sounds easy in
principle, it is difficult in implementation. Whenever Dashboard
Designer’s Click Once package is modified, it is necessary to regenerate
manifest files and re-sign the whole package.
The new method of creating
an ASPX page hosted in SharePoint is much easier to create and deploy.
It has the added bonus of being directly accessible from SharePoint
itself without using Dashboard Designer.
Creating a Custom Editor for the File System Data Source
Continuing with our
example of a custom tabular data source, the next logical step is to
develop a custom editor to allow the user to input the directory of
files to enumerate. Following is the approach we take to develop this:
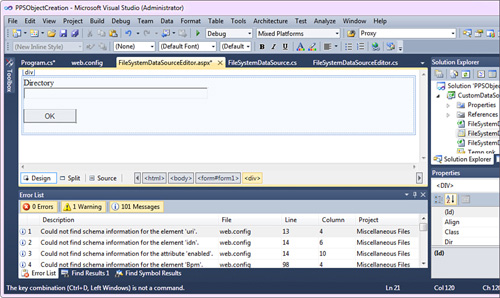
Designing the page is a fairly straightforward task in Visual Studio 2010. In our example, Figure 1
shows the layout of a simple text box that enables the user to interact
with an OK button that commits user changes to SharePoint.
The ASPX code that this generates looks like the following:
Note
As you can see in the Page
Inherits directive, we include the code-behind the same assembly as the
custom tabular data source provider for the sake of simplicity.
<%@ Page Inherits="CustomDataSource.FileSystemDataSourceEditor, CustomDataSource,
Version=1.0.0.0, Culture=neutral, PublicKeyToken=c0b442545fd021f3,
processorArchitecture=MSIL" %>
<!DOCTYPE html PUBLIC "-//W3C//DTD XHTML 1.0 Transitional//EN"
"http://www.w3.org/TR/xhtml1/DTD/xhtml1-transitional.dtd">
<html xmlns="http://www.w3.org/1999/xhtml">
<head runat="server">
    <title></title>
</head>
<body>
    <form id="form1" runat="server">
    <div>
        <asp:Label ID="labelURI" runat="server" Text="Directory"
            CssClass="ms-descriptiontext"></asp:Label>
        <br />
        <asp:TextBox ID="textboxDirectory" runat="server" Width="350px"
            CssClass="ms-input"></asp:TextBox>
        <br />
        <br />
        <asp:Button ID="buttonOK" runat="server" onclick="buttonOK_Click" Text="OK"
Width="100px" CssClass="ms-ButtonHeightWidth"/>
        <br />
        <br />
    </div>
    </form>
</body>
</html>
After the ASPX page has been
created, the next step is to develop the code that will do the work of
interfacing between the ASPX page and the SharePoint data store that
contains our custom tabular data source object.
We need some using
statements at the top of our code-behind. The System, System.Web.UI,
and System.Web.UI.WebControls are necessary. The
Microsoft.PerformancePoint.Scorecards namespace contains the BIMonitoringServiceApplicationProxy
class and related classes that enable interacting with the SharePoint
data store, and the
Microsoft.PerformancePoint.Scorecards.DataSourceProviders namespace is
necessary as we create a custom editor for a data source.
using System;
using System.Web.UI;
using System.Web.UI.WebControls; using Microsoft.PerformancePoint.Scorecards;
using Microsoft.PerformancePoint.Scorecards.DataSourceProviders;
We are going to name our class FileSystemDataSourceEditor and extend the System.Web.UI.Page class:
public class FileSystemDataSourceEditor : System.Web.UI.Page
We need to connect the HTML controls on the ASPX page to the code. We do so by overriding the CreateChildControls method and linking the textboxDirectorytextboxDirectory TextBox object that we have defined as a private variable in our class: control to the
private TextBox textboxDirectory;
protected override void CreateChildControls()
{
    base.CreateChildControls();
    if (null == textboxDirectory )
        textboxDirectory = FindControl("textboxDirectory") as TextBox;
}
The next method we need to implement is the Page_Load
method. This method gets called every time the page loads. In it, we
retrieve the data source object from the query string and set the CustomData
parameter. This parameter contains the directory to enumerate files
from the data provider, and uses that information to fill the text box
with a default value for the user. We are also going to cache the data
source in the ASP.NET ViewState so that we can save a round trip to the
server when we need to update the object after the user clicks the OK
button.
Tip
Instead of creating a proxy
object, we just use the default object offered here. There are no
differences in functionality between the two methods, so use whichever
method is most convenient for your purposes.
protected void Page_Load(object sender, EventArgs e)
{
    // initialization is only needed to be done once
    if (!IsPostBack)
    {
        EnsureChildControls();

        // Retrieve useful query string parameters
        string server = Request.QueryString[ClickOnceLaunchKeys.SiteCollectionUrl];
        string itemLocation = Request.QueryString[ClickOnceLaunchKeys.ItemLocation];

        // Retrieve the datasource
        DataSource datasource =
               BIMonitoringServiceApplicationProxy.Default.GetDataSource(
                       new RepositoryLocation(itemLocation));

        // Cache the data source object across page postbacks
        ViewState["datasource"] = datasource;

        // Fill in the text box with the current value
        if (null != datasource.CustomData)
            textboxDirectory.Text = datasource.CustomData;
    }
}
The
last method we need to implement is the method for clicking the OK
button. This method is called after the user updates the text box and
clicks the OK button. All that needs to be done here is retrieve the
data source from the cache, update the CustomData value, and then save the update to the server:
protected void buttonOK_Click(object sender, EventArgs e)
{
    EnsureChildControls();

    // Retrieve the data source from the ViewState;
    DataSource datasource = (DataSource)ViewState["datasource"];

    // Update the data source object with user changes
    datasource.CustomData = textboxDirectory.Text;

    // Commit changes to the server
    BIMonitoringServiceApplicationProxy.Default.UpdateDataSource(datasource);
}
Deploying the Data Source and Editor
When the custom tabular
data source and its associated editor have been created, the final step
is to deploy the data source and the editor to the server. This step has
three parts:
Adding the Assembly to the GAC
You can add the custom
tabular data source assembly to the GAC in several different ways. The
simplest way is to drag and drop the built and signed assembly into the
%windows%\Assembly directory. Other methods include using Gacutil.exe,
which ships as part of the .NET Framework SDK, or developing an
installer that can directly add the assembly to the GAC for you.
Note
In farms with multiple machines,
it is necessary to register the assembly on all application servers in
the farm running the PPS service.
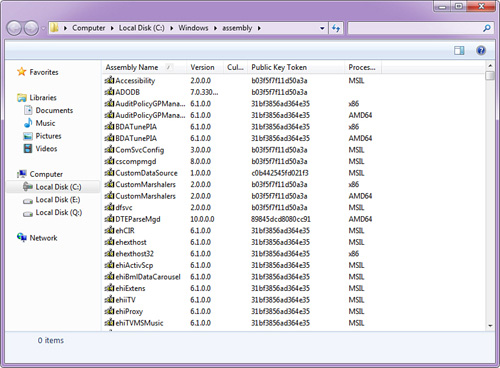
When the assembly is in the GAC, as shown in Figure 2,
note the assembly name, version, culture, public key token, and
processor architecture. You need this information when you update the
web.config file.
Deploying the Editor File to SharePoint
If you have created an editor
ASPX page, it is necessary to deploy the page to SharePoint. You can
deploy custom pages to SharePoint in a few different ways. The easiest
way is to copy the custom pages to the %ProgramFiles%\Common
Files\Microsoft Shared\Web Server Extensions\14\TEMPLATE\LAYOUTS
directory.
In our case, because we
included the code-behind for the ASPX page as part of the assembly added
to the GAC, it is not necessary to deploy the code-behind assembly
again. If the code-behind is in a different assembly, make sure it is
accessible by the ASPX page.
Note
In farms with multiple
machines, it is necessary to copy the ASPX file and any support files to
this directory on all SharePoint servers in the farm.
Updating the web.config File
After the custom tabular
data source provider has been added to the GAC and the editor file has
been deployed to SharePoint, the final step before using the object in
Dashboard Designer is to update the PPS web service web.config file
located at %ProgramFiles%\Microsoft Office
Servers\14.0\WebServices\PpsMonitoringServer.
Tip
In our example, we make a number
of changes to this file, and it is likely that you can make a number of
changes to this file over time. It is a good practice to make a backup
copy before making any changes.
1. | Open the web.config file at C:\Program Files\Microsoft Office Servers\14.0\WebServices\PpsMonitoringServer\web.config.
|
2. | In the configuration/configSections/sectionGroup node, add in the following entry:<section name="CustomFCOGroup"
type="Microsoft.PerformancePoint.Scorecards.Common.Extensions.CustomFCOSection,
Microsoft.PerformancePoint.Scorecards.Common, Version=14.0.0.0, Culture=neutral,
PublicKeyToken=71e9bce111e9429c" allowLocation="true" allowDefinition=
"Everywhere" />
This enables the creation of an additional section later where we register our custom tabular data source.
|
3. | In the configuration/Bpm node, add in a new child node named CustomFCOGroup that looks like this:
<CustomFCOGroup>
   <CustomFCO type="DataSource" subType="FileSystemDataSource" >
    <Resources
           FCOName="File System Custom Data Source"
           FCODescription="A custom data source for PPS Unleashed readers" />
     <EditorURI
uri="http://ppsunleashed/_layouts/FileSystemDataSourceEditor.aspx" />
   </CustomFCO>
   </CustomFCOGroup>
Caution
The subtype attribute on the CustomFCO node in this XML must match the value returned by the GetId method in your custom tabular data source.
Several other properties are optionally available to add here. For
example, you may add a property to control the icon used in Dashboard
Designer and satellite resource assemblies. Refer to the PPS SDK
documentation for more information on the other options available here.
|
4. | In the configuration/Bpm/CustomDataSourceProviders node, add the following entry:
<add key="FileSystemDataSource" value="CustomDataSource.FileSystemDataSource,
CustomDataSource, Version=1.0.0.0, Culture=neutral, PublicKeyToken=
c0b442545fd021f3,
processorArchitecture=MSIL" />
|
Caution
The key attribute on the add node in this XML must match the value returned by the GetId method in your custom tabular data source.
This entry specifies the
mapping between the object name and the class that implements the object
loaded from the specified assembly from the GAC. Notice that the value
attribute follows the format Namespace.ClassName, AssemblyName,
AssemblyVersion, Culture, PublicKeyToken, ProcessorArchitecture.
Using the Custom Object
After the object has been
created, Internet Information Services (IIS) should pick up the changes
automatically, and the next time the user launches or refreshes
Dashboard Designer, the updates should automatically take effect.
Tip
If something goes wrong
with loading the custom object, you can usually find detailed error
information in the application event log, usually after attempting to
use the custom object in Dashboard Designer.
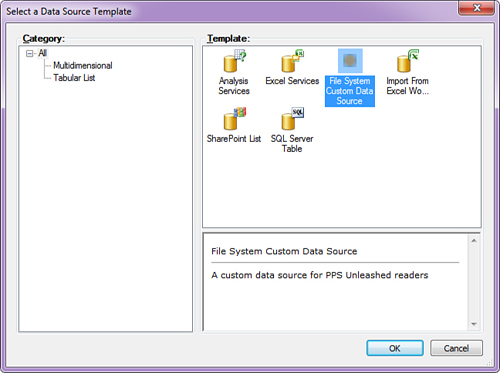
In the File System Data Source example, when you create a new data source in Dashboard Designer, as shown in Figure 3,
you see an orange ball that represents the data source that was just
registered. At this point, the data can be used just like any other
tabular data source.
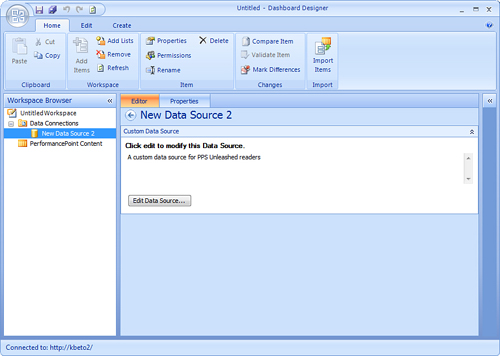
The only difference appears when editing the data source. When you open the data source in Dashboard Designer, as shown in Figure 4,
you see a button to edit the data source instead of the usual data
source configuration UI that appears for other data sources. Clicking
the Edit Data Source button brings you to the custom editor you created
earlier in a new web page.
Caution
There is one bug you will
likely run into when working with custom objects and their associated
editors. After editing the data source, it is necessary to click the
Refresh button on the Home tab of Dashboard Designer for the changes you
just made to take effect in the Dashboard Designer session you are
running.
