3. Suspending, Resuming, and Retrying Queues
Sometimes if you are experiencing message flow problems on a Hub Transport or
Edge Transport server, you need to stop queued messages from being sent so that
you can investigate problems within the queue. You then need to enable the queue
to resume normal operations. If a queue is experiencing problems sending
messages, it will try again to do so at configured intervals. Sometimes you need
to force an immediate retry. This section investigates all these
situations.
3.1. Suspending Queues
You can suspend a transport queue on a Hub Transport or Edge Transport
server if you want to prevent messages from leaving the queue. Suspending a
queue does not change the status of messages in that queue. Messages that
are in the process of delivery will finish operations. You can suspend a
queue to stop mail flow and then suspend one or more messages in the queue.
When you resume the queue, the messages that were suspended will not leave
the queue.
You can suspend a queue that has a status of Active or Retry. You can also
suspend the Unreachable queue and the Submission queue. If you suspend the
Unreachable queue, items are not resubmitted to the categorizer when the
Transport server receives configuration updates until the queue is resumed.
If you suspend the Submission queue, messages are not picked up by the
categorizer until the queue is resumed.
The Queue Viewer can be used to suspend a queue. You access the Queues tab
as described earlier in this lesson, right-click the queue, and click
Suspend. You can also select several queues and then click Suspend in the
Actions pane.
You can use commands based on the Suspend-Queue EMS
cmdlet. Like the Get-Queue cmdlet, this supports the
Filter parameter. For example, the following command suspends all queues
that have a message count equal to or greater than 500 and have a status of
Active:
Suspend-Queue -Filter {MessageCount -ge 500 -and Status -eq "Active"}
The cmdlet supports
the Confirm switch, which you can use to suppress the confirmation prompt
that appears by default when the cmdlet is run. For example, the following
command suspends the same queues as the previous command, but you do not
need to confirm the action:
Suspend-Queue -Filter {MessageCount -ge 500 -and Status -eq "Active"} -Confirm:$False
Note:
SUSPENDING A MESSAGE IN A
QUEUE
You can use the Suspend-Message cmdlet, discussed
later in this lesson, to prevent delivery of a particular message in a
queue on a computer that has the Hub Transport server role or the Edge
Transport server role installed. Suspending a message in a queue does
not suspend the entire queue.
3.2. Resuming Queues
When you resume a suspended queue on a Hub Transport or Edge Transport
server, this restarts the queue’s outgoing activities. The queue must
have a status of Suspended for this action to have any effect. When you
resume a queue, the status of messages in the queue does not change.
Messages that have a status of Suspended remain suspended and do not leave
the queue.
To use the Queue Viewer to resume queues, you must first list all the
queues that have a status of Suspended. Open the tool, access the Queues
tab, and click Create Filter, as described in the procedure to filter queues
earlier in this lesson. Then set the queue property, comparison operator,
and value drop-down lists to Status, Equals, and Suspended, respectively.
Click Apply Filter, and all the queues with a status of Suspended on the
server are displayed. You can then right-click an individual queue and click
Resume or select a number of queues and click Resume in the Actions
pane.
You can use the Resume-Queue EMS cmdlet to resume
queues. This cmdlet also supports the Filter parameter. For example, the
following command resumes all the suspended queues on the Hub Transport or
Edge Transport server on which it is entered:
Resume-Queue -Filter {Status -eq "Suspended"}
3.3. Retrying Queues
When a Hub Transport or Edge Transport server cannot connect to the next
hop, the delivery queue is put in a status of Retry. You can retry a
delivery queue by using the EMC Queue Viewer or the EMS. This forces an
immediate connection attempt and overrides the next scheduled retry time. If
the connection is unsuccessful, the retry interval timer is reset. The
delivery queue must be in a status of Retry for this action to have any
effect.
To use Queue Viewer to retry a queue, you first need to display all the
queues that have a status of Retry. To do this, you open the tool, access
the Queues tab, and click Create Filter, as described in the procedure to
filter queues earlier in this lesson. You then set the queue property, comparison
operator, and value drop-down lists to Status, Equals, and Retry,
respectively. Click Apply Filter, and all the queues with a status of Retry
on the server are displayed. You can then right-click an individual queue
and click Retry or select a number of queues and click Retry in the Actions
pane.
You can also use commands based on the Retry-Queue
cmdlet to retry transport queues. For example, the following command retries
all queues with the status of Retry on the Hub Transport or Edge Transport
server on which it is entered:
Retry-Queue -Filter {status -eq "Retry"}
The following command forces a connection attempt for all queues on a Hub
Transport or Edge Transport server that are holding messages for the domain
fabrikam.com and have a status of Retry:
Retry-Queue -Filter {NextHopDomain -eq "fabrikam.com" -and Status -eq "Retry"}
4. Managing Messages
In addition to managing message queues, you also need to manage messages
within queues. Problems with a single message can prevent an entire queue of
messages from being delivered. Sometimes you want to identify and view messages
that are greater than a specified size, that are from a particular address, or
that you suspect are spam.
4.1. Filtering Messages
You can filter messages on a Hub Transport or Edge Transport server by
message properties, search using specific criteria, and locate messages that
may be causing a mail flow problem. You can then modify the status of those
messages. You can use Queue Viewer or the EMS to search for messages by
using filter criteria.
To use Queue Viewer to set up a filter that identifies messages by
specified criteria, carry out the following procedure:
Open the tool, as previously described in this lesson.
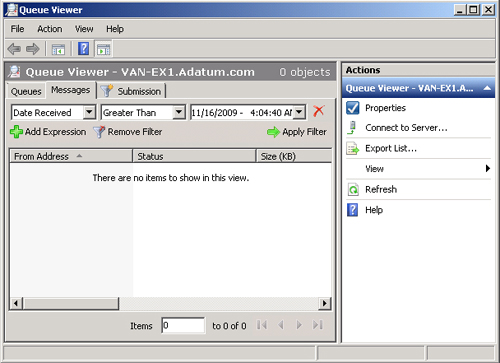
Click the Messages tab, as shown in Figure 6. A list of all messages
in all queues on the server is displayed.
Alternatively, because there can be a large number of messages on
a busy Exchange Server 2010 server, you might find it easier to
first click the Queues tab and search for the queue in which the
messages you want to access are contained. You can then right-click
the queue name and click Messages. A tab for the queue you selected
then appears.
If you elected to access the Messages tab directly, click Create
Filter. Note that this control is not available on tabs that
identify specific queues, which permit you to specify message filter
settings immediately.
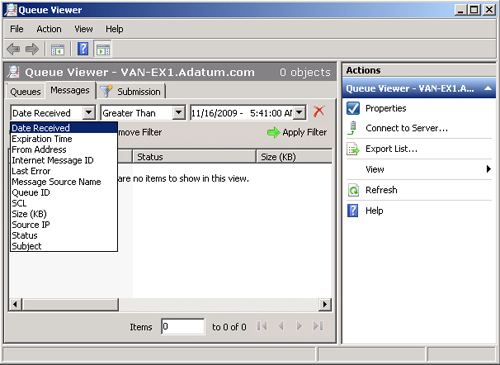
Select a message property from the message property drop-down
list. For example, if you want to identify messages that are
possible spam, click SCL. The available options are shown in Figure 7.
Select a comparison operator
from the comparison operator drop-down list. For example, if you had
selected SCL in the message property drop-down list, you might
select Greater Than Or Equals in the comparison operator drop-down
list.
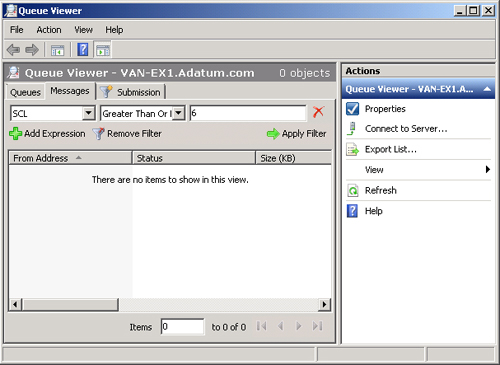
Type a value in the value drop-down list or select a value if the
property has fixed values. If the property requires a date/time
expression, change the current date/time values or click the
drop-down list to select a date from the calendar interface. For
example, to list all messages with a spam confidence level (SCL)
greater than or equal to 6, you set the filter conditions, as shown
in Figure 8.
Optionally, click Add Expression to specify additional filter
criteria. Only messages that meet all filter criteria are
displayed.
Click Apply Filter. Messages that meet the filter criteria are
displayed.
You can use the Get-Message EMS cmdlet with the
Filter parameter to filter messages. For example, the following command
lists all messages that have an SCL equal to or greater than 6 and were sent
from any sender in the Adatum.com domain:
Get-Message -Filter {SCL -ge 6 -and FromAddress -eq "*adatum.com"}
4.2. Viewing Message Properties
When you have used Queue Viewer to
identify and list a specific message, you can right-click that message and
click Properties. The Properties dialog box for a message has two tabs:
General and Recipient Information.
The General tab displays the following fields:
Identity
Subject
Internet Message ID
From Address
Status (Active, Pending Remove, Pending Suspend, Ready, Retry, or
Suspended)
Size (KB)
Message Source Name
Source IP
SCL
Date Received
Expiration Time
Last Error
Queue ID
Recipients
Retry Count
The Recipient Information tab displays the following
fields:
Address
Status
Last Error
You can also use the Get-Message cmdlet to view the
properties of a message that is queued for delivery. The following command
tabulates the sender address, recipients, subject, and received date
information for all messages that are currently in the Retry state:
Get-Message -IncludeRecipientInfo -Filter {Status -eq "Retry"} | FT FromAddress,
Recipients,Subject,DateReceived
4.3. Suspending and Resuming Messages
You can
suspend one or more messages in a queue on a Hub Transport or Edge Transport
server. When you suspend a message, you prevent its delivery. However, a
message that appears in the queue but is already in the process of delivery
will not be suspended. Instead, delivery will continue, and the message
status will be set to Pending Suspend. If the delivery fails, the message
will reenter the queue, and it will then be suspended. You cannot suspend a
message in the Submission queue or in the Poison Message queue. A message
that is addressed to multiple recipients might be located in multiple
queues. To suspend a message in more than one queue in a single operation,
you use a filter.
You can suspend a message that is listed in Queue Viewer by right-clicking
the message and clicking Suspend. You can also use the
Suspend-Message EMS cmdlet. If you want to suspend
a message identified by filter criteria or a message that appears in more
than one queue (for example, a message sent to multiple recipients), you can
use the Filter parameter. For example, the following command suspends all
messages in queues that are from any sender in the domain
BlueSkyAirlines.com:
Suspend-Message -Filter {FromAddress -eq "*blueskyairlines.com"}
The following suspends a message with the message ID 2 in the unreachable
queue on Hub Transport server VAN-EX1:
Suspend-Message -Identity VAN-EX1\Unreachable\2
You can resume a message that currently has a status of Suspended on a Hub
Transport or Edge Transport server. When you resume a message, you enable
its delivery. If you resume a message located in the Poison Message queue,
the message will be sent to the categorizer for processing.
You can use the Queue Viewer to list all suspended messages on a server or
in a selected queue by applying a filter with the message property drop-down
list set to Status, the comparison operator drop-down list set to Equals,
and the value drop-down list set to Suspended. Click Apply Filter, and all
messages that have a status of Suspended are displayed. You can now
right-click a message on the list and click Resume.
You can use the Resume-Message EMS cmdlet with the
Filter parameter to resume one or more suspended messages. For example, the
following command resumes all messages being sent from any sender in the
Fabrikam.com domain:
Resume-Message -Filter {FromAddress -eq "*fabrikam.com"}
4.4. Removing and Exporting Messages
You can remove messages that are in a queue on a Hub Transport or Edge
Transport server. When you remove a message, you can select whether to send
an NDR. You cannot remove a message from the Submission queue.
To remove a message listed in Queue Viewer, right-click it and select
either Remove Messages (with NDR) or Remove Messages (without NDR). When a
confirmation dialog box appears, click Yes.
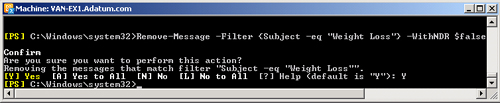
You can use the Remove-Message EMS cmdlet with the
Filter parameter to remove messages. For example, the following command
removes messages that have the subject “Weight Loss” without
sending an NDR:
Remove-Message -Filter {Subject -eq "Weight Loss"} -WithNDR $false
Figure 9 shows the
output from this command.
If you want the command to run without requiring confirmation, you can use
the Confirm switch, for example:
Remove-Message -Filter {Subject -eq "Weight Loss"} -WithNDR $false -Confirm:$False
When you want to investigate message content, you can export a message
from a queue to a file. When you do this, the message is not removed from
the queue; instead, a copy of the message is created in the specified
location as a text file that you can open using an application such as a
text editor or an email client. Optionally, you can resubmit the message by
using the Replay directory on any Hub Transport server or Edge Transport
server inside or outside your Exchange organization.
You need to use an EMS command to export a message. Queue Viewer cannot
perform this function, although you can use this tool to locate, identify,
and suspend messages before you export them. Before you export messages, the
following prerequisites must be in place:
The target directory must exist. It can be local to the Exchange
Server 2010 server on which the messages exist or a share on a
remote server. The command does not create the target directory for
you. If you do not specify a path, the current EMS working directory
is used.
The account you use must have Write permission to the destination
directory.
You need to locate and suspend messages to be exported to prevent
their delivery during the export process. A message will not be
exported unless it is suspended. Messages in the poison message
queue are already suspended. You cannot suspend messages in the
Submission queue and therefore cannot export messages from that
queue.
The destination file must have a .eml extension.
You can use the Export-Message EMS cmdlet to export a
message that you have located, identified, and suspended. You need to
identify the message, for example, by specifying its InternalMessageID. The
following command exports the message that has an InternalMessageID of 6391
and that is located in the remote delivery queue for the domain Fabrikam.com
on the server VAN-EX1 to the path
C:\ExportedMessages\Fabrikam\export001.eml:
Export-Message -Identity VAN-EX1\Fabrikam.com\6391 -Path
"C:\ExportedMessages\Fabrikam\export001.eml"
If you want to export all messages from a specific queue, you first
retrieve the messages using the Get-Message cmdlet. You
need to export each message individually, so you pipe the results of the
Get-Message operation into the ForEach-Object
PowerShell cmdlet. You need to provide an individual path and file name for
each message. In the example given below you do this by specifying a
variable, $Destination, that consists of the Internet Message ID and a .eml
extension. The Internet Message ID field contains angled brackets (> and
<), which need to be removed because they are invalid characters in a
file name. This is done using the Replace method in the temporary variable.
When the appropriate path is created for each message, that message is
exported to it.
The following command exports a copy
of all the messages from the Fabrikam.com remote delivery queue on the
server VAN-EX1 to the directory C:\ExportedMessages\Fabrikam on the local
computer using the Internet Message IDs of each message as the file name
(note that this command hangs but does not return an error if the queue
Contoso.com does not exist on server VAN-EX1):
Get-Message -Queue "VAN-EX1\Contoso.com" | ForEach-Object {$Destination="C:\
ExportedMessages\Fabrikam\"+$_InternetMessageID+".eml";$Destination=$Destination.
Replace("<","_");$Destination=$Destination.Replace(">","_");Export-Message $_.Identity |
AssembleMessage -Path $Destination
The following command exports a copy of all the messages from senders in
the BlueSkyAirlines.com domain from all queues on the server VAN-EX1 to the
directory C:\ExportedMessages\BlueSkyAirlines on the local computer using
the Internet Message IDs of each message as the file name:
Get-Message -Filter {FromAddress -like "@BlueSkyAirlines.com"} -Server "VAN-
EX1" | ForEach-Object {$Destination="C:\ExportedMessages\BlueSkyAirlines"+$_
InternetMessageID+".eml";$Destination=$Destination.Replace("<","_");$Destination=$Destin
ation.Replace(">","_");Export-Message $_.Identity | AssembleMessage -Path $Destination}
Note:
The commands to export multiple messages look more complex than they
are, mainly because of the requirement to replace the < and >
characters in the file name. Experiment with similar commands until you
are comfortable with this syntax. You will probably not be asked to
generate such commands under examination conditions, but you could be
asked to identify the correct syntax.
4.5. Tracking Messages
The configuration of message tracking logs on transport and Mailbox
servers was discussed earlier in this lesson. This section describes their
use and how an administrator would obtain a message tracking report for
troubleshooting purposes.
A unique message tracking log exists on every Windows Server 2010 Hub
Transport, Mailbox, or Edge Transport server. This is a comma-separated
value (CSV) file that contains detailed information about the history of
each email message as it travels through an individual server. You can use
the Get-MessageTrackingLog EMS cmdlet to search message
information stored in the message tracking log.
You can specify
parameters such as Sender to view entries sent from a specific email address
or Recipients to view entries sent to one or more email addresses. You can
specify start and end dates and times. Typically, you want to look at the
message tracking log on the server on which you are working, but you also
have the option of using the Server parameter to specify another Hub
Transport, Mailbox, or Edge Transport server in your organization.
You can view entries for messages with a specific EventID (for example,
BadMail, Defer Deliver, PoisonMessage, Fail, and so on). You can specify an
InternalEventID to get tracking information about a specific message. The
ResultSize parameter specifies how many messages are returned. If you want
to see all the messages that meet the other specified conditions but you do
not know how many there are, set ResultSize to Unlimited.
For example, the following command retrieves message tracking log entries
that were created between November 13, 2010, at 09:00 hours and March 21,
2011, at 17:00 hours with a Sender parameter value of
[email protected]:
Get-MessageTrackingLog -ResultSize Unlimited -Start "11/13/2010 9:00AM" -End "03/21/2011
5:00PM" -Sender "[email protected]"
A message tracking report gives detailed information
about a specific email message, and you typically use message tracking
reports during troubleshooting. Suppose, for example, that Don Hall at the
Adatum Corporation is expecting an email message from Jeff Hay at Fabrikam,
but the message does not arrive. Don contacts the Adatum Help desk, and Kim
Akers views the message tracking report for that message.
Kim uses a command based on the
Get-MessageTrackingReport EMS cmdlet. As an
administrative user, Kim can enter a command that uses the
BypassDelegateChecking parameter to enable her to view a message sent from
another user to a different user. She can specify whether the report is a
summary or a verbose report. She can use the DoNotResolve parameter to
prevent the resolution of email addresses to display names and hence improve
performance.
However, the Get-MessageTrackingReport cmdlet
requires the ID for the message tracking report. Therefore, Kim needs first
to use the Search-MessageTrackingReport EMS cmdlet to
find the message tracking report ID for the message and pass this
information to the Get-MessageTrackingReport cmdlet.
Typically, Kim might find all message tracking reports for messages from
Jeff Hay to Don Hall and use the ForEach-Object
PowerShell cmdlet to generate a report for each message.
The message tracking report typically identifies where the message is held
in the transport queues. The message could be in the unreachable queue or
the poison message queue, in which case it will not be delivered. It could
be in a queue that is currently suspended, or the message itself could be
suspended. The message could be in a queue with the status of Retry, which would indicate that
connectivity problems may be preventing next-hop delivery. You can resume a
message or a message queue or manually retry a queue as appropriate. If this
does not result in message delivery, further investigation of the message
properties (described earlier in this lesson) may be required.
The following command, entered by Kim Akers on a server in the Adatum
Exchange organization, gets the message tracking reports for all email
messages Jeff Hay has sent to Don Hall and displays a detailed message
tracking report for each email message, without resolving display
names:
Search-MessageTrackingReport -Identity "Don Hall" -Sender "JeffHay@fabrikam
.com" -ByPassDelegateChecking -DoNotResolve | ForEach-Object { Get-MessageTrackingReport
-Identity $_.MessageTrackingReportID -DetailLevel Verbose -BypassDelegateChecking
-DoNotResolve -RecipientPathFilter "[email protected]" -ReportTemplate RecipientPath }


4.6. Testing Mail Flow
Exchange Server 2010 provides you with tools to test mail flow and resolve
situations where email messages are not delivered. The EMC provides the
Microsoft Exchange Mail Flow Troubleshooter as part of the Microsoft
Exchange Troubleshooting Assistant, but the primary tool for resolving mail
flow and resolving nondelivery situations is the EMS
Test-Mailflow cmdlet.
You can use this cmdlet to diagnose whether mail can be successfully sent
from and delivered to the system mailbox on a Mailbox server. You can also
use it to verify that email is sent between Mailbox servers within a
specified time (sometimes termed the latency
threshold). The Test-Mailflow cmdlet tests
mail submission, transport, and delivery. It verifies that each Mailbox
server can successfully send itself a message. You can also use this cmdlet
to verify that the system mailbox on one Mailbox server can successfully
send a message to the system mailbox on another Mailbox server.
The Test-Mailflow cmdlet supports the
AutoDiscoverTargetMailboxServer parameter. This specifies whether a command
will automatically populate a list of target Mailbox servers to which a test
message is sent. The task queries Active Directory Directory Services (AD
DS) to discover all Mailbox servers and then sends each server a test
message.
You can use the TargetDatabase parameter to specify a target mailbox
database to which messages are sent. You can also use the TargetEmailAddress
parameter to specify a target email address when you want to send test
messages to a Mailbox server in a remote forest. The TargetMailboxServer
parameter specifies one or more Mailbox servers in the local Exchange organization
to which test messages are sent. If more than one of these parameters is
specified, the AutoDiscoverTargetMailboxServer parameter takes precedence
over the TargetEmailAddress and TargetMailboxServer parameters. The
TargetMailboxServer parameter takes precedence over the TargetEmailAddress
parameter. A system mailbox must be present on all servers involved in the
test.
Several parameters specify time-outs. The ActiveDirectoryTimeout parameter
specifies the number of seconds that elapse before the task provides an
informational message about the delay. The default value is 15 seconds. The
ErrorLatency parameter specifies the number of seconds that elapse before an
error event is logged in Microsoft System Center Operations Manager 2007.
The default value when a test message is sent to the local Mailbox server is
15 seconds. When a test message is sent to a remote Mailbox server, the
default value is 180 seconds.
The ExecutionTimeout parameter specifies the maximum time that the task
can run before the test is determined to be a failure. If no test message or
delivery report arrives before the execution time expires, the task ends,
and an error is reported. When the task is run in the EMS, the default
setting is 240 seconds. When you include the MonitoringContext parameter,
which specifies that System Center Operations Manager 2007 is being used for
server monitoring, the default setting is 15 seconds.
The Identity parameter specifies the source Mailbox server name or source
mailbox SMTP address from which a test message is sent. The default value is
the local Mailbox server. If you include the Confirm switch, this causes the
command to pause and requires you to acknowledge that you want the task to
proceed before processing continues. You do not specify a value with the
Confirm switch.
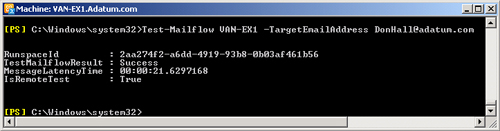
The following command tests message flow
from the Mailbox server VAN-EX1 to the Mailbox server VAN-EX2:
Test-Mailflow VAN-EX1 -TargetMailboxServer VAN-EX2
The following command tests message flow from the server VAN-EX1 to the
email address [email protected]:
Test-Mailflow VAN-EX1 -TargetEmailAddress [email protected]
Figure 10 shows that this test was
successful.
4.7. Scanning for Disconnected Mailboxes
A connected mailbox requires that a mailbox object exists in the Exchange
store and the corresponding user object exists and has Exchange properties
in AD DS. A disconnected mailbox is a mailbox object in the Exchange store
that is not connected to a user object in Active Directory. You can use the
Disable-Mailbox EMS cmdlet to disconnect a mailbox
and the Connect-Mailbox cmdlet to reconnect a
disconnected mailbox to an AD DS user account. You can use the
Remove-MailboxRemove-Mailbox cmdlet permanently removes the
mailbox object from the Exchange store. cmdlet to disconnect a mailbox and
remove the user object from AD DS. Using the
Under normal circumstances, a mailbox is marked as disconnected
immediately after the Disable-Mailbox or
Remove-Mailbox command completes. However, if you
use the Disable-Mailbox cmdlet or the
Remove-Mailbox cmdlet while the Microsoft Exchange
Information Store
service is stopped or if a mailbox is disabled by external means other than
the Disable-Mailbox cmdlet or the
Remove-Mailbox cmdlet, it is possible that the
disconnected mailbox is not marked as disconnected in AD DS, and this can
lead to problems if email messages are sent to the user.
In this situation, you can use the
Clean-MailboxDatabase EMS cmdlet to scan a mailbox
database for disconnected mailboxes that have not been marked as
disconnected within AD DS. Commands based on this cmdlet also update the
status of those mailboxes so that they are correctly marked as
disconnected.
For example, the following command scans the database Mailbox Database
1363123687 for disconnected mailboxes that are not marked as disconnected
within AD DS and updates their status so that they are correctly marked as
disconnected:
Clean-MailboxDatabase -Identity "Mailbox Database 1363123687"
