Edge Transport servers are responsible for
transmitting messages to and receiving messages from email servers on the Internet.
As the entry point for external messages, Edge Transport servers are responsible for
message hygiene, that is, cleaning messages that contain malware and discarding
messages that contain unsolicited commercial or phishing-related content. Edge
Transport servers store configuration information in an Active Directory Lightweight
Directory Services database. A special unidirectional replication process called
EdgeSync populates this database. The unidirectional nature of this replication
process ensures that Active Directory is not compromised in the event that attackers
compromise the Edge Transport server.
1. Edge Transport Role
The Edge Transport role is different from other Exchange server roles in that
you can install the role on a computer that is not a member of a domain. Edge
Transport servers are designed to be deployed in perimeter networks. Edge
Transport servers form a bridge between mail servers on the Internet and Hub
Transport servers on the internal network. You can use the Edge Transport server
to scan and discard incoming messages if these messages are found to contain
malware or have unsolicited commercial or phishing-related content.
Like other Exchange Server 2010 roles, you can deploy the Edge Transport
server role on computers running Windows Server 2008 or Windows Server 2008 R2.
Prior to deploying the Edge Transport role, you need to install the following
operating system features:
Prior to running Exchange setup, you also need to ensure that the
server’s fully qualified domain name is set. You can set the fully
qualified domain name of the host server by performing the following general
steps:
In the Computer Name tab of the System Properties dialog box, click on
the Change button.
In
the Computer Name/Domain Changes dialog box, click on the More
button.
On the DNS Suffix and NetBIOS Computer Name page, enter the DNS suffix
of the computer.
2. EdgeSync
EdgeSync is a unidirectional process that replicates transport server
configuration information, such as transport rules, from Hub Transport servers
on protected networks to Edge Transport servers on perimeter networks. EdgeSync
subscriptions mean that Edge Transport servers can be configured centrally
rather than having to make a remote desktop connection to the server on the
protected network. EdgeSync subscriptions replicate information from the Hub
Transport server to the Edge Transport server. This way, should the Edge
Transport server become compromised by an attacker, it is not possible for the
attacker to replicate information back to the internal network.
Once you configure EdgeSync, you will be unable to perform certain
configuration tasks on the Edge Transport server. The following cmdlets are
disabled on an Edge Transport server when you configure EdgeSync:
Set-SendConnector
New-SendConnector
Remove-SendConnector
New-AcceptedDomain
Set-AcceptedDomain
Remove-AcceptedDomain
New-MessageClassification
Set-MessageClassification
Remove-MessageClassification
New-RemoteDomain
Set-RemoteDomain
Remove-RemoteDomain
If you want to create an additional send connector after you have configured
an edge transport solution, you need to create it within the Exchange
organization. The new send connector configuration will then replicate through
the EdgeSync process to the Edge Transport server.
When configuring the firewall between the
screened subnet and the internal network, you will need to open port 25 between
the Hub Transport and Edge Transport servers to allow for the transmission of
messages. To allow the EdgeSync process to function, you need to open TCP port
50636 between the Edge Transport server and the Hub Transport servers on the
site connected to the perimeter network. This port must be open before you
attempt to configure the Edge subscription.
To create an Edge subscription, perform the following general steps:
Ensure that the Hub Transport and Edge Transport servers are able to
resolve each other’s DNS names.
On the Edge Transport server, use the EMS to run the
New-EdgeSubscription cmdlet.
Transfer the file generated by running the
New-EdgeSubscription cmdlet to a Hub Transport
server.
On the Hub Transport server, open the EMC and navigate to the
Organization Configuration\Hub Transport node. Click on the Edge
Subscriptions tab and then click New Edge Subscription in the Actions
pane. This will open the New Edge Subscription Wizard.
On the New Edge Subscription Wizard, specify the location of the Edge
Subscription file that you copied to the Hub Transport server. Select
the Active Directory site to which the Edge Transport server will
subscribe. Select the Automatically Create A Send Connect For This Edge
Subscription if you want to route messages through the Edge Transport
server to the Internet.
Click New to create the subscription and then click Finish to dismiss
the wizard.
You can use the following EMS cmdlets to manage Edge subscriptions:
New-EdgeSubscription
This cmdlet, when run on an Edge Transport server, allows you to
create a subscription file. You can also use this cmdlet on a Hub
Transport server to import a subscription file.
Get-EdgeSubscription
This cmdlet allows you to retrieve information about existing Edge
subscriptions.
Remove-EdgeSubscription
You can use this cmdlet to delete an existing Edge
subscription.
Start-EdgeSynchronization
You can use this cmdlet to force the edge synchronization
process.
Test-EdgeSynchronization
This cmdlet allows you to diagnose the synchronization status of
currently subscribed Edge Transport servers.
New-EdgeSyncServiceConfig
Create a new edge synchronization schedule.
Get-EdgeSyncServiceConfig
Get the properties of an existing edge synchronization
schedule.
Set-EdgeSyncServiceConfig
Modify the properties of an existing edge synchronization
schedule.
If
you add additional Hub Transport servers to a site where there is an existing
subscription, the new hub transport will not participate in the synchronization
process. To allow the new Hub Transport server to participate in the Edge
subscription, you must resubscribe each Edge Transport server to the Active
Directory site. Removing a Hub Transport server from a subscribed site does not
cause problems unless the removed Hub Transport server is the last server in
that site. When you deploy a new Edge Transport server on the perimeter network,
you must subscribe that Edge Transport server to the Active Directory site, but
it is not necessary to resubscribe the existing Edge Transport servers.
3. Clone Edge Transport Server
If you want to configure a second or third Edge Transport server on your
organization’s perimeter network, you are likely to want to ensure that
each Edge Transport server has the same configuration. Rather than manually
attempt to replicate the server’s configuration, you can use special
scripts to import and export the server’s configuration.
Cloning the configuration of an Edge Transport server does not replicate
EdgeSync subscription settings or server certificates. You will need to create a
new EdgeSync subscription for the new Edge Transport server.
The following settings are replicated to the new server when you clone the
configuration:
Send and receive connectors
Accepted domains
Remote domains
IP allow list
IP block list
The following anti-spam configuration settings are cloned: content
filter configuration, recipient filter configuration, address rewrite
entries, and attachment filter entries.
To clone an Edge Transport server, perform
the following general steps:
Ensure that you have already installed the Edge Transport server role
on the target server.
From the EMS, run ExportEdgeConfig.ps1 on the prepared Edge Transport
server. Running this command will create an XML file. Transfer this file
across to the target server.
You will need to edit the XML file to include the following
information:
After you have edited the XML file, from the EMS run
ImportEdgeConfig.ps1 on the target server to verify and apply the
configuration.
4. Address Rewriting
In some cases, it is necessary to rewrite email addresses into a more
consistent format when they are sent to hosts on the Internet. For example, two
organizations may merge into a third organization that has a new name. Users in
each original organization may continue to receive email using their original
addresses, but address rewriting would allow mail flow to be configured so that
all outbound messages would have the sender address associated with them
rewritten so that it matched the domain name of the new third organization. For
example, Fabrikam and Contoso are merging into a new organization named Adatum.
Kim Akers’s email address is [email protected], and Sam
Abolrous’s email address is [email protected]. An address rewriting
policy can ensure that both Kim’s and Sam’s email addresses are
rewritten so that they appear in the format first [email protected]
even though neither address is originally in that format. This would make
Kim’s and Sam’s addresses, when rewritten, [email protected] and
[email protected].
Address rewriting on an Edge Transport server requires that address rewriting
agents be enabled. To enable the inbound and outbound transport agents, run the
following EMS commands:
Enable-TransportAgent -Identity "Address Rewriting Inbound agent"
Enable-TransportAgent -Identity "Address Rewriting Outbound agent"
You can verify that the address rewriting agent is enabled by using the
Get-TransportAgent cmdlet and verifying that both the
Address Rewriting Inbound Agent and the Address Rewriting Outbound Agent are
enabled.
You use the New-AddressRewriteEntry cmdlet to configure
address rewrite entries. You can configure address rewrite entries for single
addresses, single domains, or multiple domains.
For example, to change the address [email protected] to
[email protected], issue the following command:
New-AddressRewriteEntry -name "Sam to Helpdesk" -Internal [email protected]
-ExternalAddress [email protected]
To change all email addresses from the tailspintoys.com domain to the
wingtiptoys.com domain, issue the following command:
New-AddressRewriteEntry -name "Tailspintoys to Wingtiptoys" -InternalAddress
tailspintoys.com -ExternalAddress wingtiptoys.com
To change all email addresses from Contoso.com subdomains, such as
Australia.contoso.com and Fiji.contoso.com, issue the following command:
New-AddressRewriteEntry -Name "All Contoso Subdomains" -InternalAddress *.contoso.com
-ExternalAddress Contoso.com -OutboundOnly $True
Note:
Know under which circumstances it is necessary to resubscribe Edge
Transport servers.
Practice: Configuring Transport Servers
In this set of practice exercises, you will configure a Hub Transport
server and an Edge Transport server.
EXERCISE 1 Configure accepted
domains
In this practice exercise, you will configure the domains wingtiptoys.com
and tailspintoys.com as accepted domains. To complete this exercise, perform
the following steps:
Log on to server VAN-EX1 using the Kim Akers user account.
In the EMC, select the Organization Configuration\Hub Transport
node. In the Actions pane, click on New Accepted Domain.
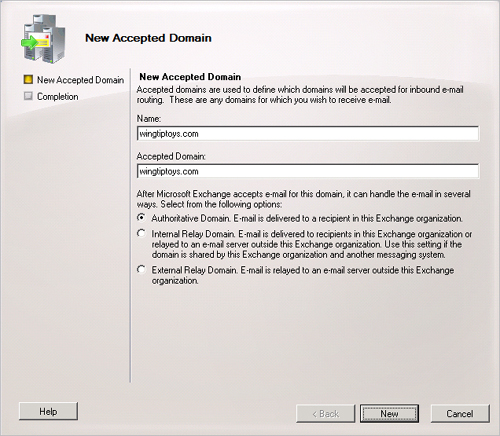
In the New Accepted Domain dialog box, enter wingtiptoys.com in the Name and
Accepted Domain fields. Select the Authoritative Domain option, as
shown in Figure 1, and then click New.
Click Finish.
Open the EMS and issue the following command:
New-AcceptedDomain -Name 'Tailspintoys.com' -DomainName 'Tailspintoys.com'
-DomainType 'Authoritative'
Use the EMC to verify that both the tailspintoys.com and the
wingtiptoys.com domains have been configured as accepted domains in
the Exchange organization.
EXERCISE 2 Configure remote
domains
In this exercise, you will configure cohovineyard.com and fabrikam.com as
remote domains. To complete this exercise, perform the following
steps:
In the EMC, ensure that the Organization Configuration\Hub
Transport node is selected.
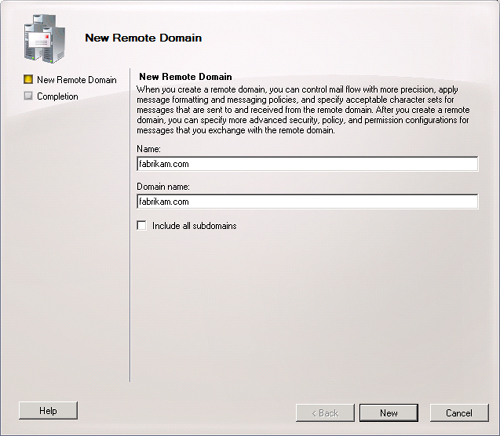
In the Actions pane, click on New Remote Domain. In the New Remote
Domain dialog box, enter fabrikam.com in the Name and Domain Name fields, as
shown in Figure 2, and then click New.
Click Finish.
In the
EMS, issue the following command:
New-RemoteDomain -Name 'cohovineyard.com' -DomainName 'cohovineyard.com'
Use the Get-RemoteDomain cmdlet to verify the
creation of the fabrikam.com and cohovineyard.com remote
domains.
EXERCISE 3 Configure email address
policies
In this exercise, you will configure an email address policy that so that
users who are members of the Wingtip Toys Department are able to receive
mail with a wingtiptoys.com email address as well as their adatum.com e-mail
address. To complete this exercise, perform the following steps:
From the EMC, select the Organization Configuration\Hub Transport
node. In the Actions pane, click on New E-Mail Address
Policy.
On the Introduction page of the New E-Mail Address Policy Wizard,
enter the name WingTip Toys
Policy and then click Next.
On the Conditions page, select Recipient is in a Department. Click
on the underlined word specified. In the Specify Department dialog
box, type Wingtip Toys, click
Add, and then click OK. Click Next.
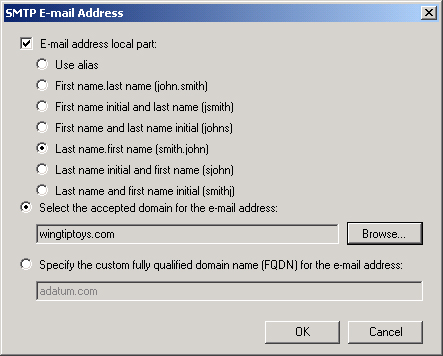
On the E-Mail Addresses tab, click Add. In the SMTP E-Mail Address
dialog box, select Last Name.First Name and then select the Select
The Accepted Domain For The E-Mail Address and click Browse. Click
on Wingtiptoys.com and then click OK. Verify that the SMTP E-Mail
Address dialog box matches what is shown in Figure 3 and then click OK.
Click Next twice and then click New. Click Finish to close the New
E-Mail Address Policy Wizard.
EXERCISE 4 Prepare server for and install the Edge
Transport server role
In this exercise, you will prepare a new server to function as an Edge
Transport server for your existing Exchange Server 2010 deployment. To
complete this exercise, perform the following steps:
Log on to server VAN-DC and create a new DNS record et.adatum.com
that maps to the IP address 10.10.0.50. Ensure that when you create
the host record, you also create the PTR record in the reverse
lookup zone.
Log on to the computer that you have installed Windows Server 2008
R2 on using the Administrator account and the password
Pa$$w0rd.
Open an elevated command prompt and issue the following
commands:
Netsh interface ipv4 set address "Local Area Connection" static 10.10.0.50

Netsh interface ipv4 set dnsservers "Local Area Connection" static 10.10.0.10
primary

Netdom renamecomputer %computername% /newname:VAN-ET
Restart the computer and log back on using the Administrator
account. Open an elevated PowerShell session and then enter the
following commands:
Import-Module ServerManager

Add-WindowsFeature NET-FrameWork,RSAT-ADDS,ADLDS -Restart
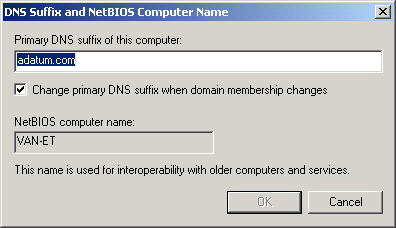
After the server restarts, log in as Administrator. From the Start
menu, right-click on Computer and then click on Properties. Click on
Advanced System Settings, click on the Computer Name tab, and then
click on Change. Click on the More button. In the DNS Suffix And
NetBIOS Computer Name dialog box, shown in Figure 4, enter adatum.com and then click OK. Restart the computer
when prompted.
After the server restarts, log in as Administrator and use Windows
Explorer to navigate to the location of the Exchange installation
files. Run Setup.exe. If prompted, click Yes in the User Account
Control dialog box.
On the splash screen, click on Step 3: Choose Exchange Language
Option. Click on the Install Only Languages From The DVD option.
Click on Step 4: Install Microsoft Exchange. On the Introduction
screen, click Next.
On the License Agreement screen, select I Accept The Terms In The
License Agreement and then click Next.
On the Error Reporting screen, verify that No is selected and then
click Next.
On the Installation Type screen, click Custom Exchange Server
Installation and then click Next.
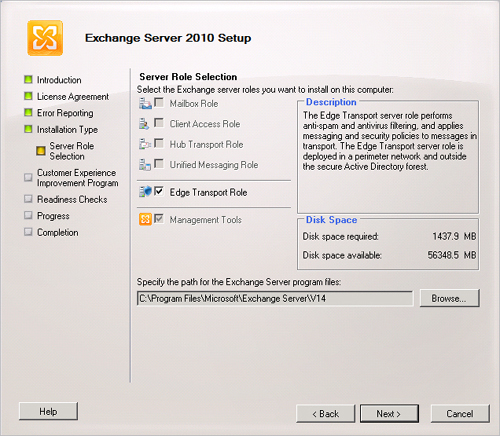
On the Server Role Selection screen, shown in Figure 5, click on the Edge
Transport Role and then click Next.
Ensure that I Don’t Wish To Join The Program At This Time is
selected on the Customer Experience Improvement Program page and
then click Next.
After the readiness checks complete, click Install.
After the install completes, de-select the Finalize Installation
Using Exchange Management Console option and then restart the
server.
EXERCISE 5 Configure and perform Edge Transport
server synchronization
In this exercise, you will configure the Edge Transport server that you
installed in Exercise 4 to perform an edge synchronization. To complete this
exercise, perform the following steps:
If you have not already done so, log on to server VAN-ET with the
Administrator account.
From the EMS, issue the following command:
New-EdgeSubscription -FileName "C:\VAN-ET.xml"
Click Start. In the search box, type \\van-ex1\c$ and then press Enter.
Copy c:\VAN-ET.xml to the \\VAN-EX1\c$ directory.
Log on to server VAN-EX1 using the Kim Akers user account.
Click on the Organization Configuration\Hub Transport node and
then click on New Edge Subscription. This will bring up the New Edge
Subscription dialog box.
Click Browse next to Active Directory Site, select Default First
Site Name, and then click OK. Click Browse next to Subscription
File, navigate to C:\VAN-ET.xml, and click Open. Verify that the New
Edge Subscription dialog box matches what is shown in Figure 6 and then click New.
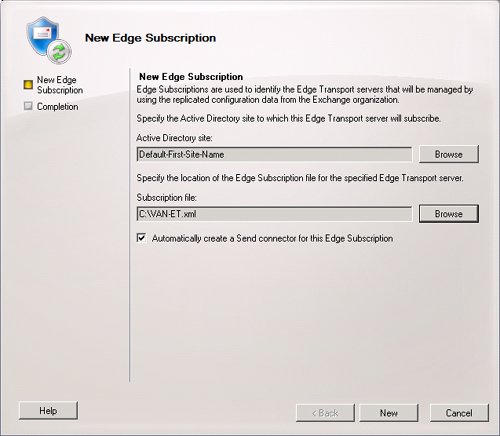
Click Finish to close the New Edge Subscription Wizard.
From the EMS, issue the Get-EdgeSubscription
command. Verify that VAN-ET is returned as a subscription.
