1. Hub Transport Servers
Hub Transport servers process all messages that transit an Exchange Server
2010 organization. Hub Transport servers deliver internal or externally sourced
messages to user mailboxes and forward messages bound for hosts on the Internet
to Edge Transport servers. A component on the Hub Transport server, called the
categorizer, determines what to do with each message
based on recipient information in the message header. The categorizer expands
distribution lists, identifies alternative recipients, and processes recipient
forwarding addresses. The categorizer also applies policies, routes messages,
and converts content. Hub Transport servers receive messages through the SMTP
protocol from other transport servers or by picking them up from a
sender’s Outbox using the store driver. Hub Transport servers use send and
receive connectors to transmit messages to other locations.
If your organization does not use an Edge Transport server, you can configure
the Hub Transport server to relay messages directly to hosts on the Internet,
such as a third-party smart host. It is also possible to enable the Edge
Transport server anti-spam agents on the Hub Transport server role as well as
configure a Hub Transport server to scan messages for malicious content by
deploying antivirus protection.
You must deploy a Hub Transport server in each Active Directory site that
hosts an Exchange server with the Mailbox server role. You can install the Hub
Transport role on servers that already host the Client Access and Mailbox server
roles. You can deploy more than one Hub Transport server in each site to provide
redundancy without having to configure Domain Name System (DNS) round-robin or
network load balancing.
2. Accepted Domains
An Exchange organization can accept messages for a particular email domain
only if that mail domain is set up as an accepted domain. Accepted domains are
also domains for which Exchange is able to send email. For example, if your
organization needs to send and accept email for the Contoso.com and Fabrikam.com
domains, you need to configure both of these domains as accepted domains. By
default, the domain name associated with the forest in which you install
Exchange is the default accepted domain for your Exchange organization.
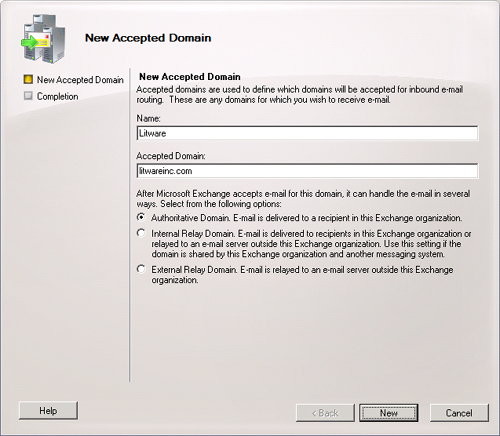
When you configure an accepted domain, you need to specify whether the
accepted domain will be authoritative, an internal relay domain, or an external
relay domain. Figure 1, the
first page of the New Accepted Domain Wizard, displays this choice. The
differences between each of these types of accepted domain is as follows:
Authoritative Domains
Accepted domains
for which the Exchange organization accepts and stores email
messages from external locations. For example, at Contoso,
Contoso.com is an authoritative domain, as Contoso.com transport
servers deliver messages addressed to Contoso.com recipients to
mailboxes hosted on Contoso.com mailbox servers. The default
authoritative domain for an organization is the fully qualified
domain name of the forest root domain.
Internal Relay Domains
Accepted domains for which the Exchange organization will accept
email messages from an external location but forwards them to
another mail system located on the internal network. For example, a
subsidiary company of Contoso is running a third-party mail system
on the internal network. The domain related to this mail system is
configured as an accepted domain, but Hub Transport servers route
messages directed to recipients at this domain to those internal
mail servers rather than delivering the messages to Exchange mailbox
servers. You can also use internal relay domains when an
organization has more than one Active Directory forest or when
recipients in a single email domain are spread between Exchange and
a third-party email system. To function properly, internal relay
domains require that you configure a send connector to that domain
on your organization’s Hub Transport servers.
External Relay Domains
An accepted domain for which the Exchange organization will accept
email messages from external locations but does not process them
locally and forwards these incoming messages to an external mail
server. For example, Contoso.com transport servers might accept
messages to recipients with email addresses associated with the
domain proseware.com domain, but these transport servers
automatically route these messages to a mail server that exists
outside the organization’s internal or perimeter network. To
function properly, external relay domains require that you configure
a send connector to the external domain on your organization’s
Edge Transport servers.
You can create a new accepted domain by clicking on New Accepted Domain in the
Actions pane when the Organization Configuration\Hub Transport node is selected
in Exchange Management Console (EMC). Creating an accepted domain involves
specifying the domain name and a label for the name, choosing between the domain
being an authoritative, internal, or external relay domain.
You can use one of the following Exchange Management Shell (EMS) cmdlets to
manipulate accepted domains:
New-AcceptedDomain
This cmdlet is used to create new accepted domains. Use the
DomainType parameter to specify whether the domain will function as
an authoritative, external relay, or internal relay domain.
Get-AcceptedDomain
This cmdlet can be used to list the properties of existing
accepted domains.
Set-AcceptedDomain
This cmdlet allows you to modify the properties of an existing
accepted domain.
Remove-AcceptedDomain
This cmdlet allows you to remove an existing accepted
domain.
3. Remote Domains
Remote domains allow you to control the types of messages and message formats
sent from users in your organization to a specific external domain. When you
install Exchange, a default remote domain is created that has the label
represented by an asterisk (*). This default remote domain is responsible for
the settings applied to all outgoing messages except those configured for
specific remote domains. You can edit the properties of a remote domain or
create new remote domains through the Organization Configuration\Hub Transport
node in the EMC.
You create a new remote domain by clicking on New Remote Domain when the
Organization Management\Hub Transport server node is selected from within the
EMC and then clicking on New Remote Domain in the Actions pane. When you create
a new remote domain, you need to provide a label and the domain name and specify
whether all subdomains of that domain will be included. You configure items such
as MIME character sets and out-of-office message settings after you create the
remote domain by editing the properties of the remote domain.
By configuring a remote domain, you can configure whether specific external
domains receive out-of-office messages from recipients in your organization, as
shown in Figure 2. For example,
you may have configured the default remote domain so that no out-of-office
messages are sent to external recipients but decide to configure a special
remote domain for a partner so that he or she receives out-of-office
notifications.
Remote domain
message format options allow you to configure whether automatic replies,
automatic forward, delivery reports, and the sender’s name are forwarded
to a remote domain. It also allows you to specify whether Exchange rich text
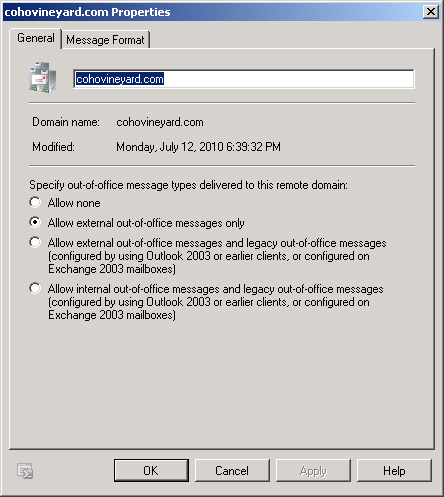
format is used and which MIME and non-MIME character set is used. Figure 3 shows the cohovineyard.com remote
domain configured to use the Cyrillic (ISO) character set. You would configure a
specific remote domain message format when the default is appropriate. For
example, there are four separate Cyrillic MIME character sets, and when messages
are sent using the wrong character set, messages are not formatted correctly for
their intended recipient. In general, you will need to discuss which character
set is appropriate for a specific remote domain with a representative of the
recipients in that domain.

Four EMS cmdlets allow you to configure and manage remote domains:
New-RemoteDomain
Create a new remote domain entry
Set-RemoteDomain
Modify an existing remote domain entry
Get-RemoteDomain
View the properties of an existing remote domain
Remove-RemoteDomain
Remove an existing remote domain entry
