The Computer Associations
node under Operating System Deployment in the ConfigMgr console contains
mappings used for User State Migration. These organize the migration of
user state and settings from a source to destination computer. The
mappings specify source and target systems identified by Media Access
Control (MAC) address and the type of migration. There are two types of
migrations:
The mapping entries also record the date that
state data was captured and restored, the location where state data is
stored, and the encryption key for the state data.
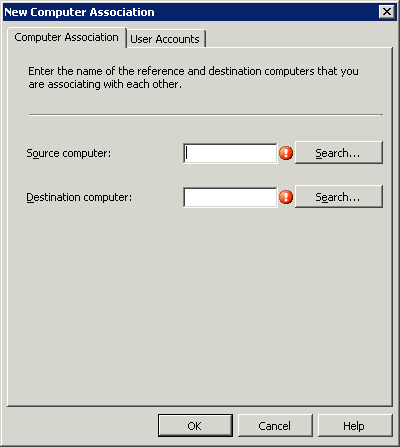
For side-by-side migrations, you manually create
computer associations. Right-click Computer Association (Site Management
-> Computer Management -> Operating System Deployment
-> Computer Associations) and choose New -> Computer Association
to launch the New Computer Association dialog box, shown in Figure 1.
This dialog allows you to specify the source and destination computer.
You can use the User Accounts tab to specifically limit which profiles
are captured. You must create a side-by-side computer association
manually before an applicable task sequence is run on a system. If one
does not exist, ConfigMgr automatically creates an in-place computer
association.
After creating an association, you can right-click it to view the following information:
The next sections discuss recovering previously
captured user data and importing computers previously unknown to
Configuration Manager.
Recovery
To recover previously captured user data
manually, you must first extract the encryption key and the user state
store location from the computer association. These display by selecting
View Recovery Information from the context menu of an association used
to capture data, as shown in Figure 2. You can then pass the key and the state location on a command line to USMT using the /decrypt option. Sample syntax would be
loadstate <state store path> /i <migapp.xml> /i <miguser.xml> /i  <migsys.xml>
/decrypt /key:<encryption key>
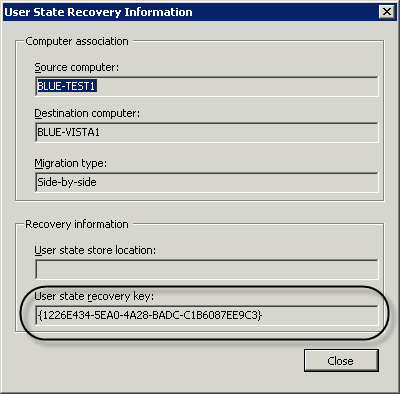
Miguser.xml, migapp.xml, and migsys.xml are the xml configuration files used to capture the state.
Caution: Possible Data Loss
Recovering
previously captured user data restores the data contained in the state
store to the system where the command is run, which might cause local
data to be overwritten.
Unknown Computer Support
If you want to use a new system as a reference
computer or deploy an image to a new system using PXE that does not have
a client agent on it, you must make the system known to ConfigMgr; this
capability is known as unknown computer support. You can do this using a computer association or the MDT, or with the unknown system resources functionality available in R2.
Using Computer Associations
When PXE or a boot disk initiates a deployment,
the MAC address or System Management BIOS (SMBIOS) GUID is passed to
ConfigMgr. To allow ConfigMgr to respond to an unknown system, create a
new system resource specifying either the MAC address or SMBIOS GUID of
the unknown system. You do this, in the ConfigMgr console in the
Operating System Deployment node, by right-clicking Computer Association
and choosing Import Computer Information to launch the Import Computer
Information Wizard. The wizard allows you to add a single or multiple
computers:
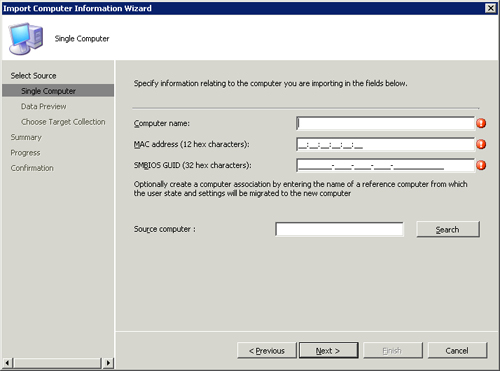
- To add a
single computer, choose Import single computer from the first page of
the wizard. The next page is the Single Computer page, shown in Figure 3.
Enter the desired computer name and either the MAC address or SMBIOS
GUID of the new system. You can obtain this information when PXE booting
a system from the PXE boot screen or by checking the smspxe.log. You
can also get this information shipped to you by the computer
manufacturer when it sends you the hardware. (Although ConfigMgr
administrators often don’t see the shipment manifest.)
Tip: Locating the smspxe.log
If the PXE deployment point is on a site server, the smspxe.log is located in %ProgramFiles%\SMS_CCM\Logs; otherwise, you can find it in %windir%\system32\ccm\logs.
- Importing
computers one at a time can be time-consuming; alternatively, you can
import multiple computers at once using a file formatted with
comma-separated values (CSV). You can create this file with Microsoft
Excel, Notepad, or any other text editor and save the file using plain
text format. The file must contain the desired names of the systems and
either their MAC addresses or SMBIOS GUIDs, comma-separated. Optionally,
you can specify the source computer for user and system state
migration.
To import multiple computers, choose the Import computers using a
file option from the Import Computer Information Wizard. The wizard
prompts you for the CSV file to use and allows you to map the data in
the file to the correct columns.
The last page of the wizard is the same whether
you import a single or multiple computers: You can choose to add the
new systems to the All Systems collection or to one that you specify.
You should choose to import the new systems into one of your OSD
collections so that the appropriate task sequence-based advertisements
also apply to your new systems.
Tip: SMBIOS GUID
The way most PXE boot screens display the GUID
does not correspond to the way ConfigMgr expects it; the GUID is the
same but displayed differently. The result is ConfigMgr will not find
the system, causing the task sequence to be unavailable or the PXE boot
to fail. If you choose to use SMBIOS GUIDs, the best place to get them
is from the smspxe.log on the PXE service point.
Using the MDT
The
MDT offers an alternative way to handle unknown systems when PXE
booting; it installs a VBScript-based PXE filter that automatically
creates a resource in ConfigMgr for systems that do not already have
one. This resource is identical to that created with the method just
described in the “Using Computer Associations” section.
Using Unknown System Resources in R2
ConfigMgr 2007 R2 introduces a new method to handle unknown systems: an unknown system resource.
You can place this resource in collections using direct membership
rules like any other resource in ConfigMgr. ConfigMgr then applies
advertisements applicable to this resource to any unknown systems
encountered. There are actually two unknown system resources:
In addition to these two new resources,
ConfigMgr creates a new collection, called All Unknown Computers. These
two resources are initially members of this collection, so you can use
it to target OSD deployments.
Unknown computer support in R2 is enabled by
checking a check box on the ConfigMgr PXE service point properties
dialog box . You can also enable unknown computer support
for removable boot media by checking the Enable unknown computer support
check box on the security page of the Task Sequence Media Wizard.
Note: Unprovisioned Computers
Installing ConfigMgr 2007 R2 also adds a new
node to the Operating System Deployment subtree in the ConfigMgr
console, called Unprovisioned Computers. When ConfigMgr begins an OSD
deployment to an unknown computer, it creates a new system resource for
the new unknown computer and assigns it a unique identifier. When the
deployment finishes successfully, the resource is removed from the
Unprovisioned Computers node. If the deployment fails, the resource
remains in this node.
In general, the
resources in this node are informational only and used to track
deployments to previously unknown computers using the new unknown
computer resources.
