Verifying the Computer’s Network Settings
If you inspect
the client computer and you receive unexpected settings in the network
adapter, there could be many possible causes. If the client is expected
to use Dynamic Host Configuration Protocol (DHCP), you need to ensure
that the network adapter is correctly receiving the DHCP information.
If you discover that
the IP address of the client machine is in the range 169.254.0.0 through
169.254.255.255, you are using Automatic Private IP Addressing (APIPA).
Therefore, your client is not receiving DHCP information from the DHCP
server.
Using the Repair Feature
You can perform many
steps in one step by using a new Windows Server 2003 feature inside the
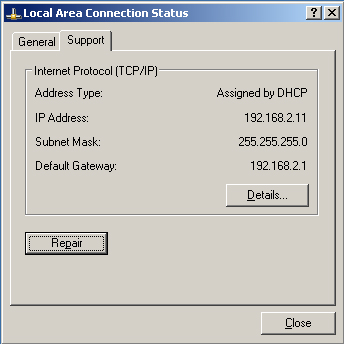
graphical user interface (GUI)—the network Repair feature. You can find
this feature while inspecting the status of a network adapter, as shown
in Figure 5.

Clicking the Repair button
initiates many actions as if they were each typed on the command line.
The commands are performed in the order listed in Table 1.
Table 1. Repair Actions
| Action Performed by the Repair Function as if It Were Performed on the Command Line | Action |
|---|
| Ipconfig/renew | Attempts to renew the DHCP lease |
| Arp –d* | Flushes the Address Resolution Protocol (ARP) cache |
| Nbtstat –R | Reloads the NetBIOS cache |
| Nbtstat –RR | Sends the NetBIOS computer name to Windows Internet Name Service (WINS) for an update |
| Ipconfig /flushdns | Flushes the DNS cache |
| Ipconfig /registerdns | Registers the name with the DNS server |
Tip
The Repair feature is the same for Windows Server 2003 and Microsoft Windows XP Professional. |
Tip
The Repair button also initiates a wireless IEEE 802.11x Authentication Restart. |
Verifying the DHCP Server
If the client computer is
not receiving an IP address and at least a primary DNS server address,
the client will certainly not be able to find the Internet. The
following are some reasons the DHCP information might not be delivered
to the client:
A router is blocking the Boot Protocol (BOOTP).
No DHCP relay agent exists on segments without BOOTP relay.
All addresses in the DHCP scope are used up.
Furthermore, while
you are inspecting the DHCP server, you might also verify that the
address range it is distributing is OK, that the gateway is valid, and
that the DNS servers point to a location that makes sense for your
organization.
You might also
encounter a situation in which some clients can connect to the Internet
and others cannot. After inspecting the clients’ networking
characteristics, you discover that some machines are configured
differently from others. However, all client computers are configured
for DHCP. In this case, you might have what is known as a rogue
DHCP server—that is, a DHCP server that is set up in an ad-hoc fashion,
perhaps for testing purposes. If this is the case, this server is
likely providing the target clients with incorrect information—namely,
the gateway, DNS server address, or both.
Microsoft Windows 2000
and Windows Server 2003 servers running DHCP must be authorized in the
Active Directory directory service in order to serve as DHCP servers. If
they are not, they automatically shut down. Use Dhcploc.exe, which is
found in the Windows Server 2003 Support Tools, to discover DHCP servers
that should not be authorized or other DHCP servers that do not need to
be authorized, such as older Microsoft DHCP servers or non-Microsoft
DHCP servers.
Bridging Multiple Networks
You might be asked to
troubleshoot connections to the Internet that start from wireless
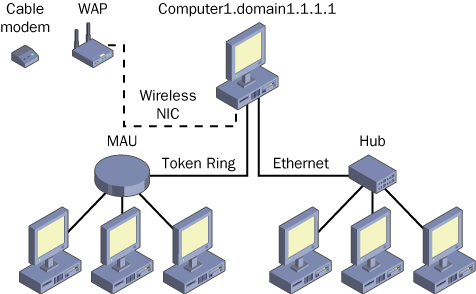
machines. In some cases, you might want to share a single Wireless
Access Point (WAP) with multiple and varying connection topologies, as
shown in Figure 6.

In
this example, an Internet connection is joined to a single WAP. The WAP
then communicates with the wireless network interface card (NIC) in the
server. Additionally, the server has an Ethernet connection and a token
ring connection attached to other networks.
When you enable network bridging
on this connection, all points entering the server (wireless, token
ring, and Ethernet) appear on the same network. Hence, they can all
share the wireless connection and get out to the Internet.
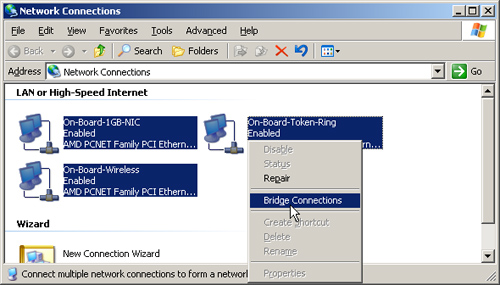
To bridge the networks,
hold down Ctrl as you click the multiple connections on the server. Then
right-click and select Bridge Networks, as shown in Figure 7.

When
you configure network bridging, you allow traffic from the wireless,
Ethernet, and Token Ring NIC to share the same network space. Hence, a
single wireless NIC can be the outbound gateway to disparate networks.
If asked to troubleshoot connectivity to the Internet, you should take several steps:
In the properties on the General tab of the bridged connection, verify that all networks are indeed being bridged.
The
bridge itself should have its own IP address. Verify this by running
Ipconfig /all. If the bridge does not have its own IP address, remove
the bridge and recreate it.
Check the physical connectivity among all segments on the bridge.