One of the best ways to ensure that your SharePoint
farm’s content is always available to your users is by spreading the
responsibility for serving that content across multiple SharePoint
servers via a practice known as load balancing.
Load balancing is most commonly applied to servers in a SharePoint
environment that is assigned the Microsoft SharePoint Foundation Web
Application role (in SharePoint 2007, these were often referred to as
Web front-end [WFE] servers; you may notice that term used again here
for simplicity’s sake), but SharePoint 2010’s new Service Application
architecture introduces a new approach that allows other critical
aspects of a SharePoint farm to be distributed across multiple points of
failure, such as Search or Business Connectivity Services.
Interestingly, the implementation and configuration of load balancing of
these Service Applications are built into the SharePoint product, but
load balancing of the WFEs that deliver SharePoint to your users is not.
The next two sections address the ins and outs of configuring load
balancing for your WFEs, followed by an examination of each server role
that is available in SharePoint 2010 and how (or if) they can be made
highly available.
SharePoint is designed to
allow for the use of multiple WFEs in a load-balanced configuration,
serving up content to users on a single host name. Even though users may
be making complex requests to SharePoint, the servers are able to
answer those requests in a uniform manner, even if during a single
session end users are directed to multiple servers for their content.
You can load-balance by installing a hardware or software solution in
front of your SharePoint WFE servers that forwards a Web request
directed at a single host name to one of the WFE servers. If one of the
servers in your load-balanced pool is overwhelmed and crashes, the load
balancer can redirect traffic away from the affected server to the other
members of the pool, ensuring a higher level of service continuity than
what is possible with a single server.
Load-Balancing Software
Load-balancing software is
pretty easy to describe: by installing and configuring an application on
the SharePoint WFEs that you want to load-balance, you can distribute
client requests across all those servers. It requires no special
hardware and usually comes with a lower price tag than hardware-based
solutions. In fact, the most common load-balancing software solution for
SharePoint, Windows Network Load Balancing (NLB), is available as a
Windows Server 2008 Feature, meaning it can be added free of charge to
any server running Windows Server 2008, at any time. This section guides
you through enabling and configuring an NLB cluster to load-balance the
HTTP traffic directed at your SharePoint farm’s WFE servers, as well as
discusses the challenges of using NLB with SharePoint. It is by no
means the only way you can use a software product to load-balance
SharePoint, but it is the most prevalent option available.
Caution
Even
though NLB and the Windows Server 2008’s failover clustering (formerly
known as Microsoft Cluster Service or MSCS in Windows Serve 2003)
feature share some of the same terms and concepts, they are two distinct
technologies intended to provide solutions for different problem sets.
Failover clustering is best suited for applications that require
transactions to occur in a synchronous order and be aware of their
position within that order, referred to as the application’s state.
Applications that need to frequently update large amounts of data in a
specific sequence, such as SQL Server, are excellent candidates for
clustering via failover clustering. NLB is targeted at applications that
operate primarily in a “stateless” manner, such as IIS Web servers. The
transactions used by these applications generally have no knowledge of
the transactions that came before or after them; each one is treated as
an independent operation. Keep in mind that Share-Point’s Web traffic
isn’t always stateless, in fact, it often isn’t, which is why some NLB
settings, such as affinity , are used
differently for SharePoint than they may be for other Web-based
applications.
About Windows Network Load-Balancing Services
Windows NLB is designed to
be a scalable, reliable, high-availability solution for applications
that communicate via the Internet Protocol (IP). It allows up to 32
servers to be placed into a server farm cluster to avoid outages or
performance losses for a single host name. To configure an NLB cluster, a
single host name and its IP address serve as a “virtual” IP that
receives all traffic directed at the application and reroutes it to one
of the member servers within the NLB cluster. If a member of the cluster
fails, NLB automatically removes the server from the cluster and
distributes its load among the rest of the servers in the cluster until
service is restored on the affected server.
NLB does not require
special hardware to configure or use its functionality. No hardware
devices or storage area network (SAN) configurations are required. For
optimal use, the member servers in the NLB cluster should have two
network interface cards (NICs), but you can certainly use NLB if the
servers have only one NIC. Configure each member server to allow network
communication with the server via IP, because NLB relies on this
protocol to communicate with the cluster and direct traffic through it.
What’s New in Windows Server 2008 and Windows Server 2008 R2
Although Windows Server
2003 was usually the operating system (OS) of choice for SharePoint 2007
deployments, the 2010 release of the SharePoint platform runs only on
Windows Server 2008 or Windows Server 2008 R2. The 2008 release, as well
as the R2 release, of the Windows Server OS brought with it several
enhancements and new features for NLB. It is important to understand if
the environment you’re working with in SharePoint 2010 is using Windows
Server 2008 or Windows Server 2008 R2, because there are important
differences between what each OS can and cannot do. The two sections
that follow summarize the changes made to NLB in both releases.
NLB Enhancements and Additions in Windows Server 2008
The
following key components or functions have been significantly updated
or added to NLB’s feature set by Microsoft with the release of the
Windows Server 2008 OS:
Networking.
NLB now fully supports IPv6 for traffic between servers and offers
enhanced driver performance and scalability through its support of the
Network Driver Interface Specification (NDIS) v6.1.
Multiple network addresses. NLB now supports the clustering of multiple dedicated IP addresses per node in the NLB cluster.
WMI enhancements. The MicrosoftNLB
namespace within Microsoft’s Windows Management Instrumentation (WMI)
has been updated to support NLB’s IPv6 and multiple IP address
enhancements.
Enhanced interaction with Forefront TMG.
When used in conjunction with Microsoft’s Forefront Threat Management
Gateway (TMG) 2010 Enterprise Edition, NLB offers better notification of
potential attacks and management of multiple IP addresses per node.
NLB Enhancements and Additions in Windows Server 2008 R2
With the release of the
Windows Server 2008 R2 OS, Microsoft has updated its NLB solution with
even more new or improved features, including these:
Improved affinity. NLB’s affinity functionality (see the “NLB Session Affinity and Share-Point”
section that follows for more information on NLB Affinity) has been
updated to allow for relationships between nodes and clients to be held
longer, even if they are disconnected.
PowerShell support. The PowerShell scripting language now allows for the scripting of NLB’s configuration and management activities.
Flexible upgrades.
Existing NLB clusters created on Windows Server 2003 can be upgraded
all at once to Windows Server 2008, or member servers can be upgraded
one at a time, a process known as rolling upgrades.
Health monitoring.
Microsoft has released an NLB-specific management pack for use with its
enterprise monitoring product, System Center Operations Manager (SCOM)
2007.
NLB’s Operational Modes
You can configure NLB to
operate in two modes: Unicast and Multicast. You must set all the member
servers within an NLB cluster to the same operational mode, regardless
of whether Unicast or Multicast is selected.
Unicast.
In Unicast mode, the Media Access Control (MAC) address assigned to the
NIC for clustered traffic is overridden by a virtual MAC address that
the NLB generates. Each server in the cluster uses the same MAC, which
means that each member server receives all traffic
directed at the cluster. Unicast mode can cause conflicts with
network-switching hardware, leading to dropped traffic to and from the
cluster or to the switch being flooded by traffic it can’t redirect.
Multicast.
In Multicast mode, a second MAC address is added to the NIC of each
member server in the cluster, and the original MAC address for the NIC
is retained. The NLB generated MAC address sends and receives traffic
directed at the NLB cluster’s virtual IP address. The original MAC
address sends and receives traffic directed specifically at the member
server on its own IP address. With Multicast mode, your network
administrators can create static entries in the cluster’s network switch
that point to the ports used by the cluster, removing the risk of
flooding your switch. Windows Server 2008 also introduces a new
Multicast option—Internet Group Management Protocol (IGMP)
multicast—which enables IGMP support for limiting switch flooding by
limiting the NLB cluster’s traffic to only those ports on the switch
serving the cluster hosts and not all its ports. If you are using IPv4
addresses in your network, you can only use Class D IP addresses (that
is, addresses in the 224.0.0.0 to 239.255.255.255 range) as your
clustered IP address with the IGMP multicast cluster operation mode.
Although Unicast mode is
enabled by default when creating an NLB cluster, Multicast mode is the
operating mode often recommended for NLB clusters. Multicast mode
provides more functionality when only a single NIC can be used on member
servers in the cluster; it avoids the issue of switch flooding as long
as static entries are created in the switch to properly map the
cluster’s address to the ports being used by the cluster. Unicast, on
the other hand, does not function well (some would say it doesn’t
function at all) if your server has only one NIC, and it causes switch
flooding no matter what you do. If your networking hardware does not
allow for the creation of static port entries, Unicast is the route you
should take. But, if your networking hardware does allow it, and most
modern hardware is now Multicast-compatible, Multicast is the way to go.
Tip
When planning how to
configure your NLB cluster, make sure to consult and involve your
organization’s network administrators. Not only can they provide details
on how your network is configured and how that impacts your design, but
they can also give you valuable recommendations and constraints based
on their knowledge of the network that your SharePoint environment uses.
Caution
There has been a dramatic
increase in the use of virtualized servers in IT environments in recent
years, and with good reason; virtual machines (or VMs) offer a number of
compelling features, such as quick deployment, optimization of physical
resources, and flexibility of management. If you are implementing NLB
on VMs in your SharePoint environment and plan to use Unicast mode as
your cluster’s operational mode, there are additional
considerations you need to make for the configuration of your virtual
network resources, both NICs and switches. VMware has published an
excellent white paper (http://www.vmware.com/files/pdf/implmenting_ms_network_load_balancing.pdf)
that we recommend you review for more detailed information on the
subject and how you need to configure your virtual environment for NLB
and Unicast.
How to Configure Windows NLB Services
The following instructions
detail the steps necessary to install and configure NLB to create a
cluster containing two physical servers. Each server has two NICs
installed, but the cluster is going to be configured to operate in
Multicast mode so that only one NIC on each server is used for the
cluster. The user executing these steps must be a local administrator on
each of the servers in the cluster. The member servers in the cluster
have unique IP addresses assigned to each of their NICs, and an IP
address is available to serve as the cluster’s “virtual” address.
Log on to the server you want to add to an NLB cluster as an administrator.
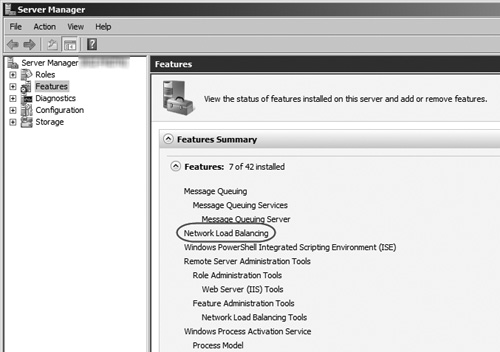
Open
the Server Manager if it is not already open, and click on the Features
item in the left menu. The Network Load Balancing Feature should be
enabled on the server, as shown in Figure 1. If it is not enabled, add the Network Load Balancing Feature to the server before continuing.
Click the Start button and navigate to All Programs, Administrative Tools, Network Load Balancing Manager.
This opens the Network Load Balancing Manager application, as shown in Figure 2.

From the Cluster menu, select the New option to open the New Cluster : Connect window (see Figure 3) and create a new NLB cluster.
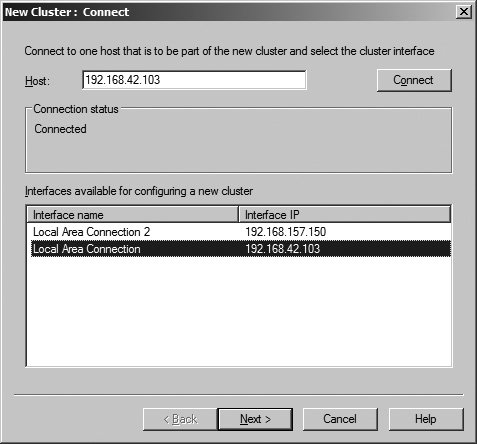
When
the New Cluster : Connect window opens, enter the IP address and subnet
mask for the first host to be added to the cluster, and click the
Connect button. The NLB Manager searches for the server based on the IP
address entered, and if found displays the names and IP addresses of any
NICs on the target server that are available to be added to the new
cluster in the Interfaces Available for Configuring a New Cluster list.
Select the row for the NIC to be added to the cluster in the list, and
click the Next button to continue. Figure 6.3
depicts the New Cluster : Connect window after a host to be added to
the cluster has been located and a NIC on the server has been selected.
Caution
In a Multicast configuration
such as the one this process describes, you should leave at least one of
a server’s NICs out of the NLB cluster. This NIC is needed to enable
traffic to directly reach the server on its own unique address; adding
it to the cluster would not permit the Multicast configuration to
function properly.
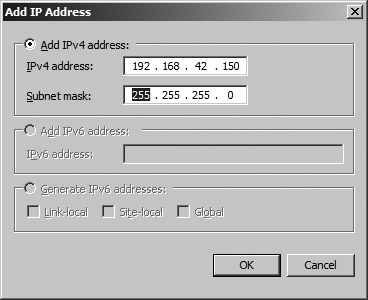
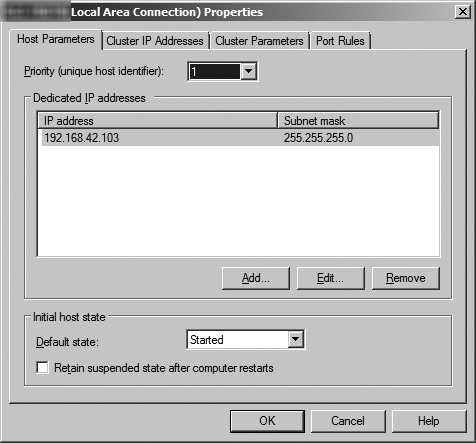
When the New Cluster : Host Parameters window opens (see Figure 4),
if you want to add additional host IP addresses to the cluster, click
the Add button to open the Add IP Address window (shown in Figure 5).
In this window, enter the required information for the server’s
dedicated IP address, and click the OK button. You can enter IP
addresses in IPv4 format, or IPv6 format as long as your network is set
up to use that implementation of the Internet Protocol. (If it is not
set up for IPv6, this option is disabled.) After entering the dedicated
IP address for the server, click the Next button to continue. If you
want, you can continue without adding additional IP addresses. If you
want to have multiple hosts participating in this cluster, though, you
must add them in this dialog box.

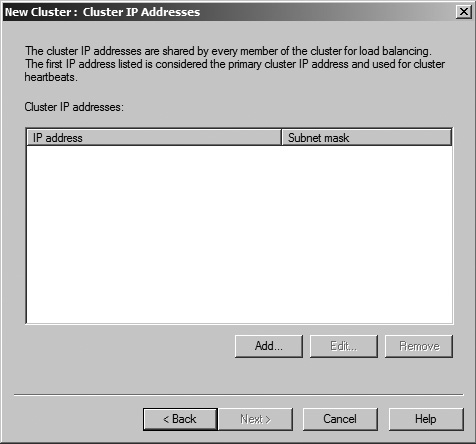
The New Cluster : Cluster IP Addresses window is now opened, as shown in Figure 6.
IP addresses added in this window are the target addresses that client
computers use to access your SharePoint sites that are then
load-balanced between the hosts in the NLB cluster. The IP address you
enter here is the shared address that you should direct your users to
use to access your load-balanced SharePoint site; the cluster takes the
traffic to this IP address and redirects it to individual server nodes
within the cluster. To add an IP address, click the Add button to open
the Add IP Address window (identical to the Add IP Address window shown
for Host IP Addresses in Figure 5).
In this window, enter the required information for the clustered IP
address, and click the OK button. The IP address entered must be a
static IP address; NLB disables the Dynamic Host Configuration Protocol
(DHCP) settings on each NIC it configures, which is why static IP
addresses are required. You can enter IP addresses in IPv4 format, or
IPv6 format as long as your network is set up to use that implementation
of the Internet Protocol. (If it is not set up for IPv6, this option is
disabled.) After entering the IP address for the cluster, click the
Next button to continue.
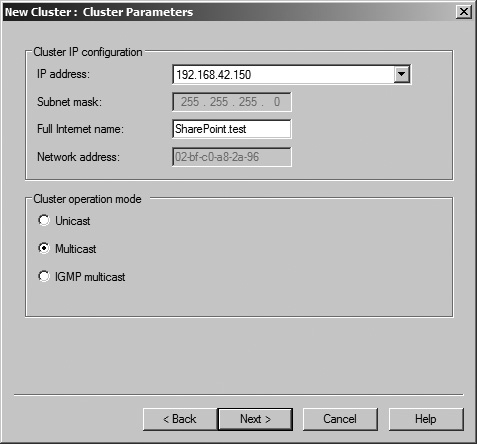
The New Cluster : Cluster Parameters window opens, as shown in Figure 7,
allowing you to configure the shared Uhostname for the new cluster you
are creating and select the cluster’s operation mode. Enter the host
name for the load-balanced host name of your SharePoint sites in the
Full Internet Name text field; select the radio button for the desired
cluster operation mode, which in this case is Multicast; and then click
the Next button to continue.
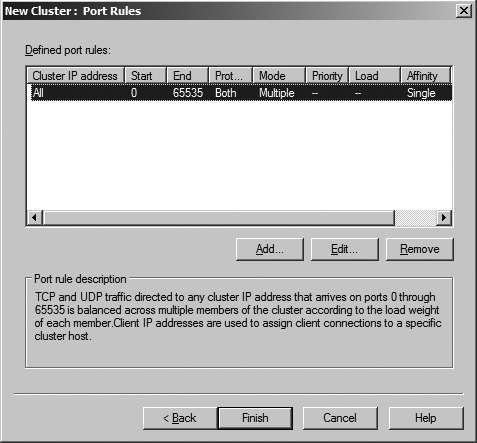
The New Cluster : Port Rules window is now opened, as shown in Figure 8. By default, a single rule has already been created to encompass every TCP and UDP port on
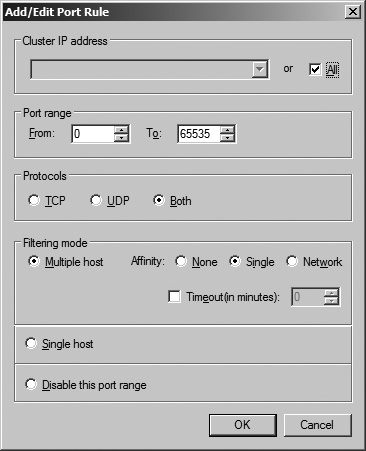
the clustered IP address. If you want to modify that rule, click the
Edit button to open the Add/Edit Port Rule window (shown in Figure 9).
In this window, you can apply the rule to the entire cluster or a
single IP address if there are multiple in the cluster, change the range
of ports included in the cluster for the IP address, select the
Internet Protocol that the cluster uses, set its Filtering Mode, set its
Affinity, or disable the selected range of ports for the cluster. To
accept the defaults for the rule, click the Finish button to initiate
the configuration of the cluster.
Note
An NLB cluster’s Affinity
setting configures how “sticky” a session is between a client and a host
within the cluster. If None is selected for a cluster’s Affinity, each
client session is directed by the load balancer to the next available
host in the cluster, regardless of whether the client previously was
communicating with a specific host. Selecting Single sets a client to
always be directed to the same host within a given session, regardless
of its traffic load. The Network option directs requests from the same
TCP/IP Class C address range, such as clients using multiple proxy
servers to access the cluster, to a specific host in the cluster.
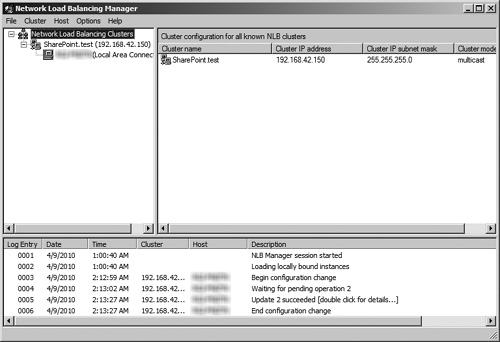
When
the cluster configuration operation completes, the cluster is shown in
the Network Load Balancing Manager screen in the left window pane under
the Network Load Balancing Clusters entry (see Figure 10).
To add hosts to the cluster, right-click on the new cluster’s name and
select the Host Properties option from the menu. This opens the Host
Properties window for the cluster (see Figure 11), allowing you to complete step 7 to add subsequent hosts to the cluster.
Caution
As you add servers to the
cluster, remember that you must assign each server a unique identifier
determining its priority within the cluster. Also, you can configure
affinity individually for each host, giving you greater opportunities
for both flexibility and complexity within the cluster.
Windows NLB and SharePoint
When implementing Windows NLB
with SharePoint, you need to keep in mind and consider two main issues:
operational mode and session affinity. You can configure each of these
items in different ways, and your choices can have a definite impact on
the functionality and performance of your SharePoint environment.
NLB Operational Mode and SharePoint
You
are most likely to decide between Unicast and Multicast based on the
configuration of your environment’s networking hardware. If your servers
in the NLB cluster are configured with multiple NICs and flooding your
switches is not an issue, Unicast is the best-fitting operational mode.
If your servers have only one NIC or switch flooding impacts the
performance of your network, Multicast makes the most sense. If you are
building your servers from the ground up, the recommended approach is to
install more than one NIC and go with Unicast, but these
recommendations are based on general situations, and your specific
requirements and environment may dictate otherwise. Regardless of the
operational mode you select, make sure to apply this setting uniformly
across all servers in the NLB cluster; each node must use the same
setting, or you’ll encounter errors.
Note
If you use Multicast in your
cluster, make sure that your network’s hardware is compatible.
Specifically, your hardware must be able to accept the Address
Resolution Protocol (ARP) replies generated by the multicast nodes in
the NLB cluster or allow administrators to create a static ARP entry to
properly resolve the addresses that the cluster is using. Although most
modern networking hardware is now compatible with the functionality and
settings required to make NLB work, you may still encounter legacy or
niche hardware that is not compatible. You need to confirm that your
infrastructure meets the needs of your solution and thoroughly test the
full configuration before using it in a production environment.
NLB Session Affinity and SharePoint
Internet traffic,
by design, is intended to be stateless. That is, each transaction
between a client and a server is supposed to be self-contained and
unconnected so that it can be routed by the most efficient means
possible regardless of how communication operated in the past. Some
SharePoint sites, such as public-facing sites using SharePoint’s Web
content management functionality, are truly stateless, and each host
within an NLB cluster should be set to None to take advantage of that
stateless nature and focus on using the cluster to improve performance
and stability.
But the reality of the
situation is that not all traffic over a network, even a big network
like the Internet, is stateless. And, although SharePoint is in many
ways a typical stateless Internet application, this is not always the
case. Some functionality, such as workflows or InfoPath forms, is prone
to errors in load-balanced SharePoint environments where clients can
communicate with any WFE server at any point in time. To avoid these
errors and place a greater emphasis on data integrity, each node in your
NLB cluster should have Affinity set at Single so a client’s repeated
traffic becomes “sticky” by being directed back to the same WFE server
for each trip. This ensures continuity in these transactions that do
require the persistence of state for proper operation.
Advantages of NLB and SharePoint
The
most obvious advantage of using Windows NLB is cost. Because SharePoint
requires the Windows Server operating system, you already obtained the
right to use NLB when you purchased your Windows Server licenses. NLB
does not require the additional purchase of expensive, proprietary
hardware to enable HA for serving up your SharePoint content. Windows
NLB also allows administrators to manage the NLB configuration by
logging into your SharePoint servers, providing a central location for
the administration of your environment’s critical platforms.
Drawbacks of NLB and SharePoint
Windows NLB is not a
sophisticated load-balancing solution. It can require specific or at
times unusual networking hardware to function effectively. Its network
bandwidth requirements make it a poor choice for load balancing across
diverse locations for geographic redundancy. For a single NLB cluster to
be spread across two datacenters, the connection speed between those
datacenters must have response times of 500 milliseconds or less, a
capability that could be difficult over extremely long distances and in
certain wide area network (WAN) situations. (Your network must be
capable of supporting a subnet that can span across a WAN connection.)
Another possible solution for multiple sites is to create a separate NLB
cluster in each location and direct traffic to one or the other via a
Domain Name Services (DNS) round robin solution, but this approach does
not truly distribute traffic loads between the sites.
Perhaps NLB’s biggest
drawback is its inability to detect when a host within a cluster is no
longer serving live content. If the IIS Web server in one of your
SharePoint WFEs has crashed and is no longer sending Web pages to
requesting clients, the NLB cluster continues to direct traffic to the
Web server until its service is restored or the host is manually removed
from the cluster. This can have a definite impact on your environment,
because some end users are going to see intermittent errors while that
downed server is still being used by the cluster—and that can be
difficult to troubleshoot. It also requires manual intervention by an
administrator, not only to remove the affected server from the cluster,
but to determine which server is displaying the errors in the first
place. Differentiating between load-balanced servers can be difficult
when each is generating the same content, adding additional challenges
to your ability to provide stable and consistent service via NLB.
