Creating New Domain Group Policies
To create a new domain Group Policy Object, perform the following steps:
1. | Log on to a designated Windows Server 2008 R2 administrative system.
|
2. | Open the Group Policy Management Console.
|
3. | Expand the domain to expose the Group Policy Objects container and select it.
|
4. | Right-click the Group Policy Objects container and select New.
|
5. | Type in a name for the new GPO.
|
6. | If
the starter GPO functionality in the domain is enabled and if a
suitable starter GPO exists, click the Source Starter GPO menu and
select either (None) or the desired starter GPO.
|
7. | Click OK to create the GPO.
|
8. | As
necessary, edit the security filtering, configure delegation, configure
the GPO status, and edit the settings. These steps are detailed in the
section “Managing GPO Security Filtering.”
|
9. | After the GPO is configured, back up the GPO.
|
10. | Create GPO links and configure advanced link options, as required.
|
11. | Close the GPMC tool.
|
Creating and Configuring GPO Links
After a GPO is created and
configured, the next step is to link the GPOs to the desired Active
Directory containers. To link an existing GPO to an Active Directory
container, perform the following steps:
1. | Log on to a designated Windows Server 2008 R2 administrative system.
|
2. | Open the Group Policy Management Console.
|
3. | Add the necessary domains or sites to the GPMC, as required.
|
4. | Expand the Domains or Sites node to expose the container to which the GPO will be linked.
|
5. | Right-click the desired site, domain, or organizational unit, and select Link an Existing GPO.
|
6. | In the Select GPO window, select the desired GPO or select multiple GPOs and click OK to link.
|
Advanced GPO Link Configuration
After a GPO link is created, it
is enabled by default. Each link has its own configuration options,
which include link enforcement and the ability to enable and disable the
link. To change the default configuration of a GPO link, perform the
following steps:
1. | Log on to a designated Windows Server 2008 R2 administrative system.
|
2. | Open the Group Policy Management Console.
|
3. | Add the necessary domains or sites to the GPMC, as required.
|
4. | Expand the Domains or Sites node to expose the GPO-linked container.
|
5. | If the GPO link is to be enforced, right-click on the desired GPO link, and select Enforced to enforce the link.
|
6. | If
the GPO link will be changed from enabled to disabled, right-click on
the desired GPO link and select Link Enabled to check the link (enabled)
or uncheck the link (disabled).
|
Managing GPO Status
GPO status controls whether
the entire GPO is enabled, disabled, or if only the Computer
Configuration or User Configuration node is enabled. GPO status is
applied to the GPO itself, so all links will be affected by any changes
to the GPO status. To view or modify the status of a GPO, perform the
following steps:
1. | Log on to a designated Windows Server 2008 R2 administrative system.
|
2. | Open the Group Policy Management Console.
|
3. | Expand the domain to expose the Group Policy Objects container and expand it.
|
4. | Select the desired GPO and select the Details tab in the right pane.
|
5. | On the Details tab, in the GPO Status drop-down menu, note the current status of the GPO.
|
6. | If the GPO status needs to be changed, click the drop-down list arrow and select one of the following options:
|
7. | After you select the desired GPO status, a confirmation window opens; click OK to complete the status change.
|
Creating and Linking WMI Filters to GPOs
When applying security
filtering to a GPO is not granular enough to target a specific set of
computers, a WMI filter can be linked to the GPO. For this example, we
will create a WMI filter that includes a computer with an operating
system name of Windows 7. To create the example WMI filter, perform the
following steps:
1. | Log on to a designated Windows Server 2008 R2 administrative system.
|
2. | Open the Group Policy Management Console.
|
3. | Expand the domain and select the WMI Filters container.
|
4. | Right-click on the WMI Filters container and select New.
|
5. | In the Name section, type in Windows 7 WMI Filter.
|
6. | In the Description section, type in WMI filter to include only Windows 7 workstations.
|
7. | Click the Add button to create the WMI filter query.
|
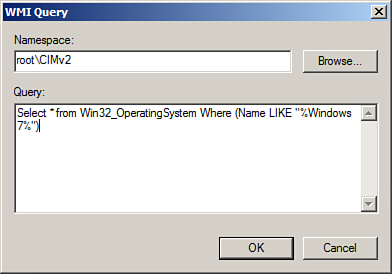
8. | In the Query section, type Select * from Win32_OperatingSystem Where (Name LIKE "%Windows 7%") to show a GPO WMI filter similar to the one shown in Figure 2.

|
9. | Click OK to save the query and return to the WMI Filter window.
|
10. | Click Save to create the WMI filter in the domain.
|
To link an existing WMI filter to a GPO, perform the following steps:
1. | Log on to a designated Windows Server 2008 R2 administrative workstation.
|
2. | Open the Group Policy Management Console.
|
3. | Expand the domain to expose the Group Policy Objects container and expand it.
|
4. | Select the desired GPO and select the Scope tab in the right pane.
|
5. | At
the bottom of the Scope tab, in the WMI Filter section, click the WMI
Filter drop-down list arrow, and select the desired filter.
|
6. | A confirmation dialog box will open; click Yes to apply the WMI filter to this GPO. |