DHCP Configuration
You must have a working
DHCP server with an active scope on the network and, of course, DNS and
Active Directory Domain Services are also required. The DHCP services
are used to supply the PXE client computer with an IPv4 address during
the installation of the image. When the WDS server is installed, it
automatically registers in Active Directory with a DHCP server to allow
for PXE clients to locate the WDS server without having to reconfigure
any DHCP options. Of course, the WDS server also registers with the DNS
server so it can be located during the network boot process. If this
registration process by the WDS server is successful, it should have a
DNS record and it should be listed as an authorized DHCP server when
viewing the authorized DHCP server using the DHCP console. If the WDS
server is not listed as an authorized server, the properties of the WDS
server should be reviewed again for the settings in the Advanced tab, to
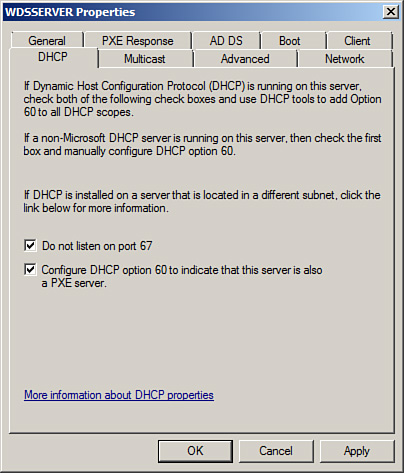
authorize the DHCP server. If, for some reason, the WDS server is also the DHCP server,
the WDS server property pages will need to be opened and the DHCP page
will need to be enabled so that the DHCP server does not listen on Port
67 and so DHCP option 60 is added to the DHCP server, as shown in Figure 3.
If
a DHCP server is running on the network but it is not a Microsoft DHCP
server, option 60 will need to be added and configured on the DHCP
server to enable PXE clients to locate the WDS server.
Adding a Boot Image to the WDS Server
After the WDS server is
configured as desired, it is time to add the initial boot image to the
server. When a system is booted using PXE boot and connects to a WDS
server, a boot image is used to prepare the client system to install a
Windows image. The boot image contains the WDS client and Windows PE.
Legacy imaging systems utilized a flavor of DOS and DOS-based network
drivers to boot a system and connect it to the imaging server. With the
Windows 7 default boot image, boot.wim,
the Windows PE contains an extensive list of network drivers and most
systems can be booted to WDS and successfully install an image. Using
the Windows 7 or Windows Server 2008 R2 boot.wim
images allows for the largest inclusion of network and storage drivers
for image deployment. Boot images are also used to create capture images
and discover images. One important point to note is that the boot.wim
from Windows 7 x86 architecture will list both x86 and x64 install
images if the WDS client architecture can support both. x64 boot images
will only list x64 install images once connected to the WDS server even
if the hardware supports both x86 and x64. To add a boot image to the
WDS server, perform the following steps:
1. | Log
on to the Windows Server 2008 R2 system that has the WDS role installed
with an account with local administrator and domain administrator
rights.
|
2. | Click Start, click All Programs, click Administrative Tools, and select Windows Deployment Services.
|
3. | When
the Windows Deployment Services console opens, if the local server is
not listed under the Servers node, it must be added by right-clicking on
Servers in the tree pane and selecting Add Server. Specify the local
server and click OK to add it to the console.
|
4. | In the tree pane, select and expand the WDS server.
|
5. | Right-click the Boot Images node and select Add Boot Image.
|
6. | When
the Add Image Wizard opens, the first page prompts for the location of
the boot image file. If the Windows 7 installation media is not in the
WDS server’s local CD/DVD drive, locate it on the network.
|
7. | Click
the Browse button to locate the Windows installation media on the
server or on the network. After the media is located, open the Sources
folder on the root of the Windows 7 installation media, select the boot.wim file, and click Open to add it.
|
8. | Back in the Add Image Wizard window, if the boot image path and file are listed, click Next to continue.
|
9. | On
the Image Metadata page, either accept the default boot image name and
description or type in a new one, and click Next to continue.
|
10. | Next review the summary page and click Next to continue. This starts the process of adding the boot image to the WDS server.
|
11. | After the process completes, click Finish on the Task Progress page to close the wizard.
|
12. | Back
in the Windows Deployment Services console, select the Boot Images node
in the tree pane and in the tasks pane verify that the new boot image
has been added.
|
13. | Close the Windows Deployment Services console and log off of the server.
|
Adding Install Images to the WDS Server
After the initial boot image is
added to the WDS server, installation images can be added. Windows
Server 2008, Windows 7, Windows Vista SP1, and Windows Server 2008 R2
installation media contain the compatible Windows Imaging (WIM) format
file. These WIM files can be directly added to the WDS server as install
images. To install the initial install image, perform the following
steps:
1. | Log
on to the Windows Server 2008 R2 system that has the WDS role installed
with an account with local administrator and domain administrator
rights.
|
2. | Click Start, click All Programs, click Administrative Tools, and select Windows Deployment Services.
|
3. | When
the Windows Deployment Services console opens, if the local server is
not listed under the Servers node, it must be added by right-clicking on
Servers in the tree pane and selecting Add Server. Specify the local
server and click OK to add it to the console.
|
4. | In the tree pane, select and expand the WDS server.
|
5. | Right-click the Install Images node and select Add Install Image.
|
6. | On
the Image Group page, either select an existing image group to store
the file in, or create a new image group by typing in a valid name. For
this example, we will create a new image group named Windows 7. When you
are finished, click Next.
|
7. | On the Image File page, browse to the location of the install.wim Install Image file. For our example, in the Windows 7 installation media, browse to the Sources folder, select the install.wim file, and click Open.
|
8. | Back on the Image File page, verify the path, and click Next to continue.
|
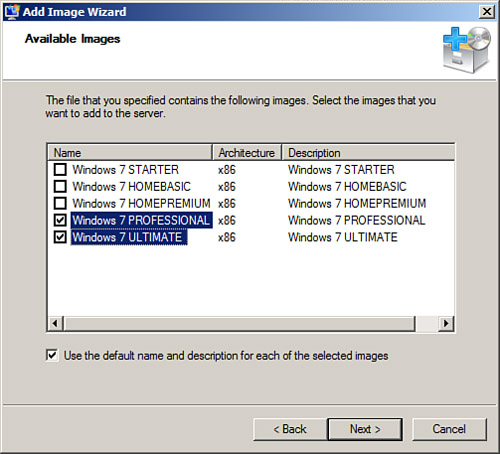
9. | On the Available Images page, depending on the particular install.wim
file, several images might be listed. Select only the images that the
company or organization is licensed for. Select each of the desired
images to install in the Windows 7 image group by checking the boxes
next to the desired install images, as shown in Figure 4. Click Next to continue.
|
10. | On
the Summary page, review the list of install images that will be loaded
into the WDS server, and click Next to begin the process.
|
11. | After the images are uploaded into the WDS server, click Finish on the Task Progress page to return to the WDS console.
|
If necessary or desired, the
WDS administrator can now also add additional boot and install images
for both x86 and x64 architectures.
