3. Configuring Mailbox Properties
When you create a user mailbox
using the EMC, it is not possible to specify settings such as mailbox
quotas and proxy addresses that will be applied to or associated with
the mailbox. You can configure these options after mailbox creation by
editing mailbox properties using the EMC or by setting them through the Set-Mailbox cmdlet in the EMS.
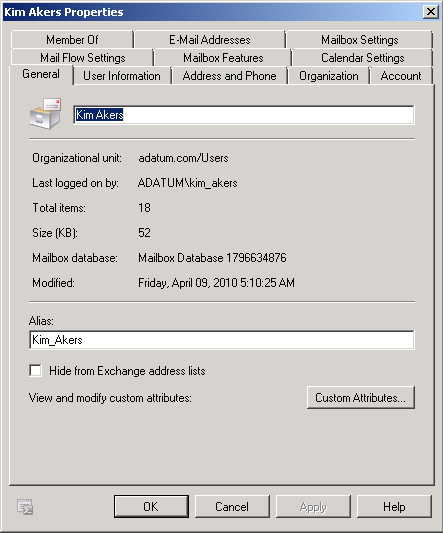
The main difficulty
that most administrators encounter when modifying mailbox properties
through the EMC is determining which tab of the properties dialog box,
shown in Figure 5,
holds the setting that they wish to modify. In the following pages, you
will learn how to configure specific mailbox properties, such as quota,
message size, and mailbox delegation, through both the EMC and the EMS.
Note:
CONFIGURE MAILBOX PROPERTIES
To learn more about configuring mailbox properties, consult the following TechNet link: http://technet.microsoft.com/en-us/library/bb124255.aspx.
3.1. Configuring Mailbox Quotas and Deleted Item Retention
Although
mailboxes inherit quota and deleted item retention settings from the
mailbox database that hosts them, it is possible, using the EMS and EMC,
to configure quota and deleted item retention settings on a per-mailbox
basis. Settings applied at the mailbox level override settings applied
at the mailbox database level. This allows you, as an Exchange
administrator, to make exceptions for individual users should their
needs reasonably diverge from everyone else in the organization without
having to create a new mailbox database to cater to these specific
needs.
The settings that you can configure for quota and deleted item retention are as follows:
Issue Warning At (KB) This quota value determines the threshold at which a warning will be automatically be emailed to the user.
Prohibit Send At (KB)
This quota value determines the threshold at which a user will be
prohibited from sending new messages. Outlook and Outlook Web App (OWA)
users will be presented with a message explaining why they have been
blocked when this threshold is reached.
Prohibit Send And Receive At (KB)
This quota value determines when a user will be prohibited from sending
and receiving messages. Any messages that are sent to a mailbox that
has exceeded this threshold will be returned to the sender with an error
message informing them that the destination mailbox has exceeded its
storage quota.
Keep Deleted Items For (Days)
This value determines the period where it is possible to recover a
deleted mailbox item without performing a restore from backup. The
default value is 14 days.
Do Not Permanently Delete Items Until You Back Up The Database
When this option is set, deleted items are not removed until a database
backup occurs, even if the deleted item retention period has expired.
You should note that while
it is possible to configure mailbox item retention on a per-mailbox
level, it is not possible to configure disconnected mailbox retention
settings at this level. You will learn more about disconnected mailbox
retention later in this lesson. To configure individual mailbox quotas
using the EMC, perform the following general steps:
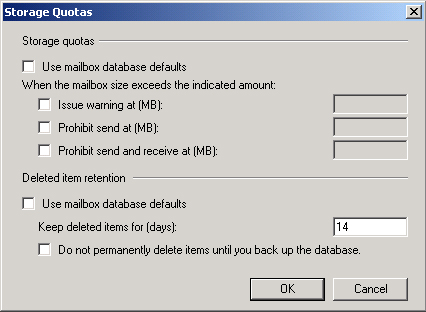
From the Recipients Configuration\Mailbox node, edit mailbox properties and navigate to the Mailbox Settings tab.
Click Storage Quotas and then click the Properties button.
Remove the check box next to Use Mailbox Database Defaults in the Storage Quotas and Deleted item retention areas shown in Figure 6.
If you want to use the database defaults for one of these settings but
not the other, do not remove the check box for the setting you want
inherited from database properties. If you remove the Use Mailbox
Database Defaults check box but do not configure a setting for each of
the quota entries, Exchange assigns the user an unlimited quota for that
entry.
To configure storage quota settings on a per-mailbox level from the EMC, use the Set-Mailbox
command. For example, to configure Rich Haddock’s mailbox so that it
had a warning quota of 200 MB, a prohibit send quota of 250 MB, and a
prohibit send and receive quota of 280 MB, issue the following command:
Set-mailbox rich_haddock -IssueWarningQuota 209715200 -ProhibitSendQuota 262144000
-ProhibitSendReceiveQuota 293601280 -RetainDeletedItemsFor 21.00:00:00
-UseDatabaseQuotaDefaults  $false -UseDatabaseRetentionDefaults $false
Note:
CONFIGURE MAILBOX QUOTAS
For more information on configuring mailbox quotas, consult the following TechNet article: http://technet.microsoft.com/en-us/library/aa998353.aspx.
3.2. Message Size Restrictions
You can configure message
size restrictions to limit the size of messages that a user associated
with a mailbox can send and/or receive. For example, you could configure
message size restrictions so that a user mailbox is able to accept only
messages under 10 MB in size but the same user is able to send messages
over 20 MB in size. Exchange calculates message size on the basis of
the sum of the message body and attachments, though in general
attachment size is significantly greater than message body size. To
configure message size restrictions from the EMC, perform the following
general steps:
From mailbox properties, select the Mail Flow Settings tab.
Click on Message Size Restrictions in the list and then click on the Properties button.
Configure the maximum sending and receiving message size in KB and then click OK.
To configure message size restrictions from the EMS, use the Set-Mailbox
cmdlet with the MaxSendSize and MaxReceiveSize parameters. For example,
to configure Kim Akers’s mailbox so that she can send messages that are
a maximum of 20 MB in size and receive messages that are a maximum of
15 MB in size, use the following command:
Set-Mailbox -Identity "Kim_Akers" -MaxSendSize 20mb -MaxReceiveSize 15mb
Note:
CONFIGURING MESSAGE SIZE
For more information about configuring message size, consult the following TechNet link: http://technet.microsoft.com/en-us/library/bb124708.aspx.
3.3. Additional Email Addresses
You can configure
Exchange mailboxes to accept incoming messages on a variety of email
addresses. For example, you might want to assign the
[email protected] address to Kim Akers’s mailbox, which is already
addressable with the [email protected] email address. Additional
email addresses assigned to Exchange mailboxes are sometimes known as
proxy addresses.
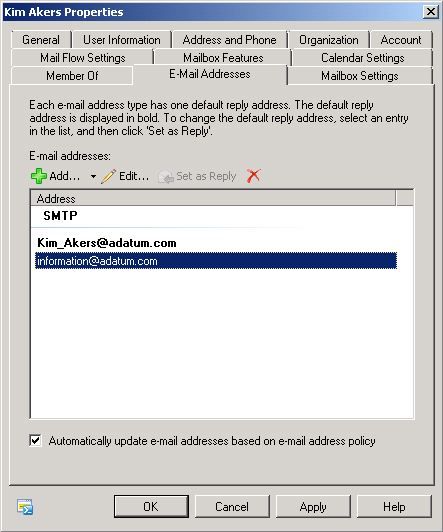
To assign a proxy address to a mailbox using the EMC, perform the following general steps:
From mailbox properties, select the E-Mail Addresses tab.
Click
Add. In the address dialog box, enter the new email address and click
OK. The new email address will be shown in the list of email addresses,
as Figure 7 shows.
Use the Set-Mailbox cmdlet to add proxy addresses to an existing mailbox using the EMC. When you use the Set-Mailbox
command to add an address, the existing address will be removed unless
an email address policy is in place. You can add additional email
addresses using multivalued properties. For example, to add the
[email protected] proxy address to Brian Perry’s mailbox, use the
following command:
$Temp = Get-Mailbox -Identity "Brian Perry"
$Temp.EmailAddresses += ("smtp:[email protected]")
Set-Mailbox -Identity "Brian Perry" -EmailAddresses $Temp.EmailAddresses
Note:
ADDING EMAIL ADDRESSES TO MAILBOXES
For more information about adding email addresses to existing user mailboxes, consult the following link: http://technet.microsoft.com/en-us/library/bb123794.aspx.
3.4. Configuring Mailbox Client Access Protocols
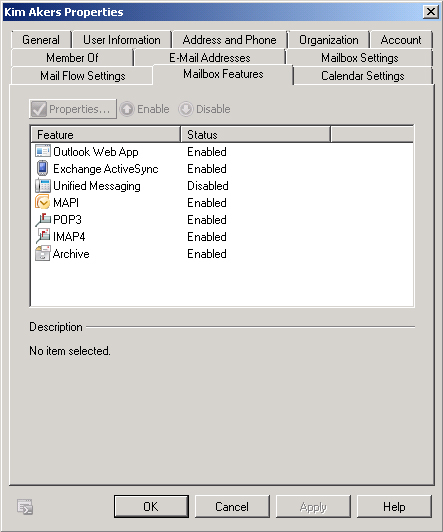
Mailbox features, such as
Outlook Web App, Exchange ActiveSync, POP3, IMAP4, and MAPI Access, can
be enabled or disabled on the Mailbox Features tab of a mailbox’s
properties, as shown in Figure 8. To enable or disable a feature, select the feature and then click Enable or Disable as appropriate.
You can configure which features are enabled or disabled using the Set-CASMailbox
cmdlet and the ImapEnabled, MAPIEnabled, OWAEnabled, and POPEnabled
parameters. For example, to disable POP3, IMAP4, and OWA access to the
Don Hall mailbox, issue the following command:
Set-CASMailbox "Don Hall" -POPEnabled $false -ImapEnabled $false -OWAEnabled $false
Note:
ENABLING AND DISABLING CLIENT ACCESS FOR MAILBOXES
To learn more about how to
enable or disable certain client access features on a per-mailbox basis,
consult the following link on TechNet: http://technet.microsoft.com/en-us/library/bb125264.aspx.
3.5. Mailbox Anti-Spam Functionality
Spam confidence level
(SCL) is a figure calculated by Exchange that assigns a numeric value to
the likelihood that a message contains unsolicited commercial email,
also known as spam. A message assigned a value of 0 has a low
probability of being spam, and a message assigned an SCL of 9 has a high
probability of being spam. To configure anti-spam functionality for
mailboxes using the EMS, use the Set-Mailbox cmdlet with the following parameters:
AntiSpamBypassEnabled This parameter specifies whether the mailbox skips anti-spam checks. Can be set to $true or $false.
RequireSenderAuthenticationEnabled Determines whether sender authentication is required. Can be set to $true or $false.
SCLDeleteEnabled Determines whether messages that meet the configured SCLDeleteThreshold are deleted. Can be set to $true, $false, or $null.
SCLDeleteThreshold A value between 0 and 9 at which a message is deleted if the SCLDeleteEnabled parameter is set to $true.
SCLJunkEnabled
Determines whether messages that meet the configured SCLJunkThreshold
are moved to the Junk E-Mail folder. Can be set to $true, $false, or
$null.
SCLJunkThreshold
Determines the SCL threshold value, between 0 and 9, at which messages
will be moved into the Junk E-Mail folder if the SCLJunkEnabled
parameter is set to $true.
SCLQuarantineEnabled
Determines whether messages that meet the configured
SCLQuarantineThreshold are placed in quarantine for later review. Can be
set to $true, $false, or $null.
SCLQuarantineThreshold
Determines the SCL threshold value, between 0 and 9, at which messages
will be quarantined if the SCLQuarantineEnabled parameter is set to
$true.
SCLRejectEnabled Determines whether messages that meet the configured SCLRejectThreshold are rejected. Can be set to $true, $false, or $null.
SCLRejectThreshold
Determines the SCL threshold value, between 0 and 9, at which messages
will be rejected if the SCLRejectEnabled parameter is set to $true.
Note:
MAILBOX ANTI-SPAM FEATURES
For more information on configuring Exchange 2010 anti-spam features at the mailbox level, consult the following TechNet link: http://technet.microsoft.com/en-us/library/bb123559.aspx.
3.6. Mailbox Delegation
You can configure permissions
so that it is possible for one user to send email messages on behalf of
another user. You can also configure permissions so that one user has
the ability to view the contents of another user’s mailbox. This may be
necessary for a variety of reasons, such as an administrative assistant
needing to view the contents of a manager’s mailbox or allowing that
assistant to send messages on that manager’s behalf. It is possible to
configure the following permissions on Exchange mailboxes:
Send-As Permission
When a user has been granted the Send As permission for another
mailbox, the user is able to send mail as that user but is not able to
receive mail as that user. The user is also unable to view that user’s
mailbox. For example, if Rich Haddock is granted the Send As permission
on Kim Akers’s mailbox, he is able to send messages to other recipients
with Kim Akers’s identity.
Full Access Permission
When a user has been granted the Full Access permission for another
mailbox, the user is able to view the contents of that mailbox but is
not able to send messages as that user.
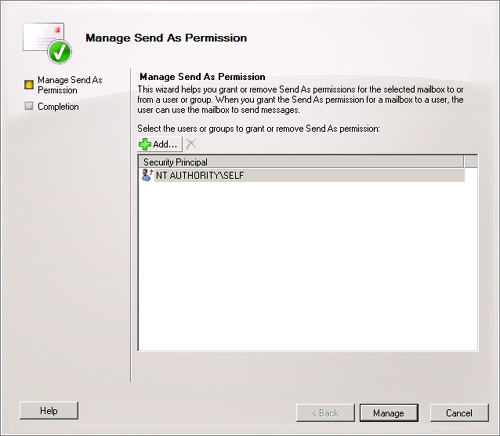
To configure Send As permission from the EMC, perform the following steps:
In Mailbox\Recipient Configuration node, select the mailbox that you want to delegate the Send As permission on.
In
the Actions pane, click on the Manage Send As Permission item. This
will open the Manage Send As permission dialog box, shown in Figure 9. Click Add and then specify the user to which you wish to assign this permission.
To configure the Send As permission from the EMS, use the Add-ADPermission cmdlet
with the ExtendedRights parameter. For example, to configure Don Hall’s
mailbox so that Kim Akers has the Send As permission on the mailbox,
use the following command:
Add-ADPermission "Don Hall" -User "adatum\kim_akers" -Extendedrights "Send As"
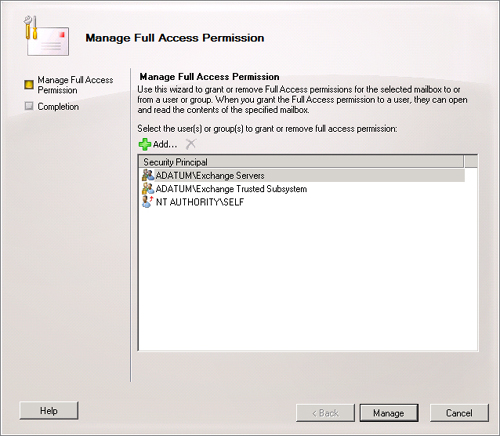
To configure the Full Access permission from the EMC, perform the following steps:
In the Mailbox\Recipient Configuration node, select the mailbox on which you want to delegate the Full Access permission.
In the Actions pane, click on the Manage Full Access Permission item.
In the Manage Full Access Permission dialog box, shown in Figure 10,
click Add. Select the user that you wish to delegate the Full Access
permission to, click OK, and then click Manage to close the dialog box.
To delegate the Full Access permission on a mailbox using the EMS, use the Add-MailboxPermission
cmdlet with the AccessRights parameter. For example, to grant Kim Akers
the Full Access permission on Oleg Anashkin’s mailbox, issue the
following command:
Add-MailboxPermission -Identity "Oleg Anashkin" -User "adatum\Kim_Akers" -AccessRights
Fullaccess -InheritenceType all
Note:
FULL ACCESS AND SEND AS PERMISSIONS
To learn more about Full Access and Send As permissions for mailboxes, consult the following TechNet article: http://technet.microsoft.com/en-us/library/aa997244.aspx.
3.7. Forwarding and Out-of-Office Replies
Forwarding allows all
messages that are sent to one Exchange mailbox to be forwarded to
another address. This address can be another mailbox or contact within
the Exchange organization. When you configure forwarding, you can choose
to forward messages and not have them delivered to the original mailbox
or to have messages both delivered to the original destination mailbox
as well as forwarded to the configured address. To configure a
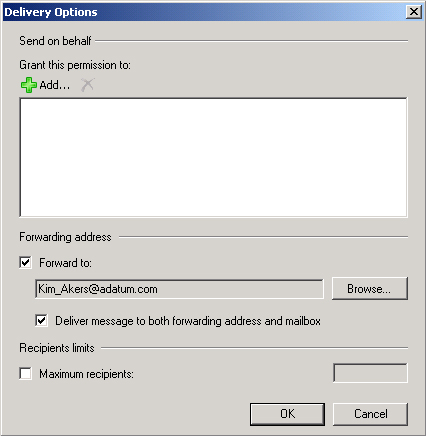
forwarding address using the EMC, perform the following general steps:
Select the mailbox in the list on the Recipient Configuration\Mailbox node and then click Properties in the Action pane.
On
the Mail Flow Settings tab, select Delivery Options and then click
Properties. This will bring up the Delivery Options dialog box.
In
the Delivery Options dialog box, enable the Forward To: check box and
then click Browse. Select the destination address and then click OK.
Select the Deliver Message To Both Forwarding Address And Mailbox option
if required, as shown in Figure 11.
To configure forwarding from the EMS, use the Set-Mailbox
cmdlet with the ForwardingAddress and DeliverToMailboxAndForward
parameters. For example, to configure Don Hall’s mailbox so that all
messages sent to it are both forwarded to Kim Akers’s mailbox and
delivered to Don Hall’s mailbox, issue the following command:
Set-Mailbox -Identity "Don Hall" -ForwardingAddress "[email protected]"
-DeliverToMailboxAndForward $true
Note:
MAIL FORWARDING
For more information about configuring mail forwarding for a mailbox, consult the following TechNet article: http://technet.microsoft.com/en-us/library/dd351134.aspx.
You can use the Set-Mailbox
cmdlet with the ExternalOofOptions parameter to specify what type of
out-of-office reply can be set by a particular user mailbox. The values
that you can set for the ExternalOofOptions parameter are External and
InternalOnly. When you set the External option, the mailbox user is able
to set an out-of-office message that will be forwarded to both Internal
and External recipients. When you set the InternalOnly option,
out-of-office messages will be sent only to internal recipients and will
not be sent to external recipients. To configure Kim Akers’s mailbox so
that out-of-office messages are limited to Internal recipients only,
use the following EMS command:
Set-Mailbox "Kim Akers" -ExternalOofOptions InternalOnly
