As you begin to work with managing the disks and
storage for your Windows Server 2008 R2 server, you need to have a firm
handle on the basics of the terminology used. We'll define some key
terms and then go into how to work with storage, how to work with
partitions, and how to use DiskPart.
1. Learn Disk Management and Storage Terminology
Before you start creating
and working with the drives on your server, it is important to have a
solid understanding of the basic terminology associated with using the
disk storage on your server. Table 1 defines some of the basic terms.
Table 1. Basic Disk Management Terminology| Term | Definition |
|---|
| Basic disk | These are the default disk types in a Windows environment and have been around since MS-DOS. | | Dynamic disk | Dynamic disks are used to create volumes that will span multiple hard drives. These drives can also be used for simple volumes. | | Foreign disk | You will see a Foreign Disk option when you take a dynamic disk from one server and place it in another server. | | Partitions | These
define how you break up your physical drives. Partitions can be primary
partitions, extended partitions, or logical drives. | | Simple volume | This is the most basic type of volume and can be created and used only on one physical disk. | | Spanned volume | Spanned
volumes combine two or more physical disks and allow you to create a
volume larger than a single physical disk on your system. The disks in a
spanned volume need to be dynamic disks. | | Striped volume | Striped
volumes combine two or more physical disks. The data stored on these
volumes is striped, which means when data is written to the drives, it
is written alternatively in equal amounts across both physical drives.
Striped volumes are faster than spanned or mirrored volumes; however,
they do not provide any redundancy. The disks in a striped volume need
to be dynamic disks. This is also known as RAID 0. | | Mirrored volume | Mirrored
volumes combine two disks that are duplicates of each other. This
provides you with an identical copy of data stored on two different
disks and therefore some protection against data loss. This is also
known as RAID 1. | | RAID | RAID
stands for Redundant Array of Independent (or Inexpensive) Disks. RAID
drives are broken into different levels, and with the exception of RAID
0, all levels of RAID offer data protection and redundancy from a failed
drive or volume. | | Master boot record (MBR) | The
MBR is part of the hard drive system used by the BIOS. The MBR is used
to store all the initial boot-processing information for performing the
initial boot sequence of the operating system. The MBR has been around
for a long time and is primarily used for smaller hard drives and is not
recommended if your drive is larger than 2TB. | | GUID partition table (GPT) | The
GPT, like the MBR, is another system used by the BIOS to load the
initial boot sequence of the hard drive. The GPT is a newer form of the
MBR but utilizes the extensible firmware interface for working with the
drives. GPT drives can have more than four partitions and are designed
to work with large and small drives, particularly drives larger than
2TB. However, GPT drives are not recognized by all previous versions of
Windows. |
2. Work with Your Storage
You'll now learn how to work
with your disks and create partitions. Although these may not be
day-to-day activities, this will create the foundation for storing data
on your server. To begin working with your storage on your Windows
Server 2008 R2 server, you'll need to open the Disk Management utility
for your server. This utility will work with your locally connected hard
drives; however, USB- and FireWire-connected drives are not supported
by the Disk Management utility.
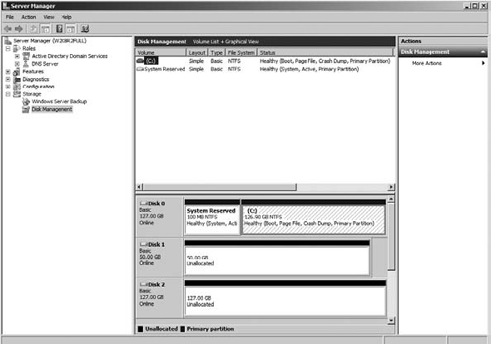
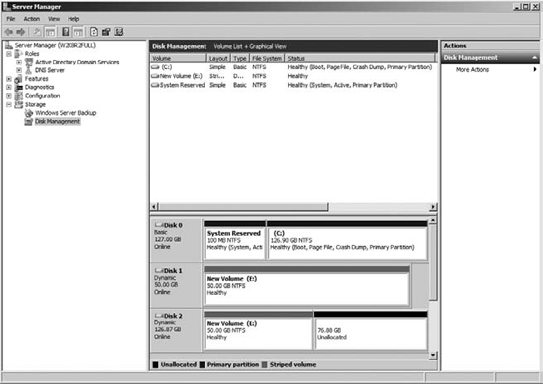
Open Server Manager by selecting Start => Administrative Tools => Server Manager. In the Server Manager tree, click Storage. In Storage, click Disk Management, and you will see a screen similar to Figure 1.
2.1. Convert a Basic Disk to a Dynamic Disk
In the Disk Management
tool, you will see your volumes and disks listed on your server. When
you first put your physical disks on the system, they will most likely
be basic disks. You can choose to leave them as basic or convert them to
dynamic. You will want to convert these disks to dynamic disks when you
need to create spanned and striped volumes. It is recommended that you
convert these disks prior to creating partitions or placing any data on
the volumes.
To convert a disk to dynamic, follow these steps:
Open Server Manager by selecting Start => Administrative Tools => Server Manager. In the Server Manager tree, click Storage. In Storage, click Disk Management. Right-click the disk you want to convert. Select Convert To Dynamic Disk. Select the disk or disks in the bottom window of the middle pane you want to convert, and click OK.
2.2. Import a Foreign Disk
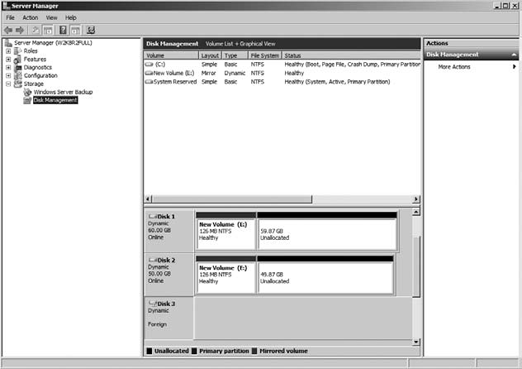
When you move a dynamic disk
from one server to another server, the drive will be labeled as Foreign.
You can see an example of a foreign disk in Figure 2.
Before you can use the drive, you need to import it:
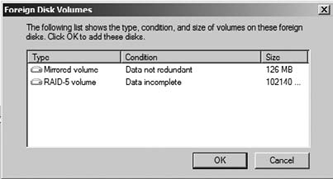
Open Server Manager by selecting Start => Administrative Tools => Server Manager. In the Server Manager tree, click Storage. In Storage, click Disk Management. Right-click the disk in the bottom window of the middle pane you want to import. Select Import Foreign Disks. On the Import Disk screen, select the disks you want to import, and click OK. In the Foreign Disk Volumes dialog box, you will see what volumes currently exist on the drive, as shown in Figure 3. Review the volumes, and click OK.
|
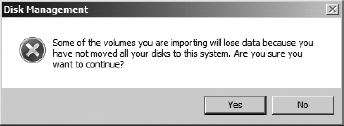
You may see a warning
about some of your volumes losing data, as shown here. This typically
will occur when you import disks and volumes that may have been part of a
RAID volume. If you are ready to import and have reviewed the message
about your volumes and lose data, click Yes.
|
|
2.3. Create Simple Volumes
Before you can use your disks
for storage, you will generally need to create volumes on the drives for
use within your server. Creating simple volumes is fairly
straightforward:
Open Server Manager by selecting Start => Administrative Tools => Server Manager. In the Server Manager tree, click Storage. In Storage, click Disk Management. Right-click the unallocated space in the bottom window of the middle pane you want to create the volume on. On the Welcome screen, review the message, and click Next. Select the size you want to make the volume, and click Next. Select
how you want to mount the volume. You can choose to mount to a drive
letter, mount to a folder on an existing drive, or not assign any mount
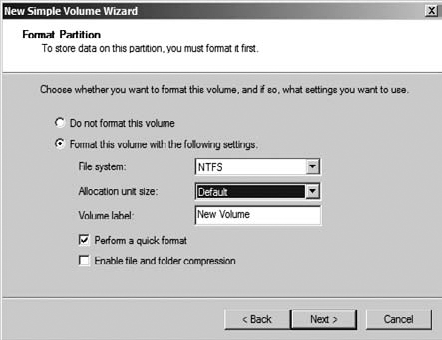
point. After you make your selection, click Next. Next, you can select how to format the drive. After you make your selection, click Next. You will see a screen similar to Figure 4. Review the summary screen, and click Finish.
2.4. Create Spanned and Striped Volumes
Creating spanned and striped
volumes is similar to creating simple volumes. These types of drives
require your disks to be dynamic disks, and they require two or more
drives to create. The ability to create these types of volumes is
determined by the number of drives and amount of unallocated space you
have available on your Windows Server 2008 R2 server. When you
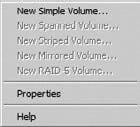
right-click the unallocated space and you see the options grayed out, as
shown in Figure 5, this will tell you do not have the needed disks or unallocated space to create the volumes.
Creating a spanned volume is similar to creating a simple volume:
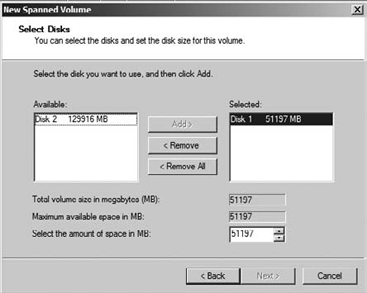
Open Server Manager by selecting Start => Administrative Tools => Server Manager. In the Server Manager tree, click Storage. In Storage, click Disk Management. Right-click the unallocated space in the bottom window of the middle pane you want to create the volume on. Click New Spanned Volume. On the Welcome screen, review the message, and click Next. On the Select Disks screen, as shown in Figure 6, select the disks you want to use for the volume, and click Add to place them in the Selected section.
Select the size you want to make the volume, and click Next. Select
how you want mount the volume. You can choose to mount to a drive
letter, mount to a folder on an existing drive, or not assign any mount
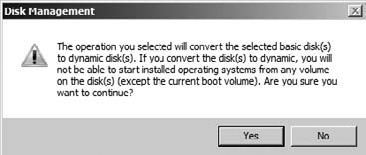
point. After you make your selection, click Next. Next, you can select how to format the drive. After you make your selection, click Next. Review the summary screen, and click Finish. You will see a warning dialog box, as shown in Figure 7, if the drives need to be converted to dynamic drives for spanned volumes. After you review the warning, click Yes.
Creating a striped volume is
similar to creating spanned volumes. It is important for you to
understand that striping helps improve the performance of your hard
drive. However, it does have one risk. If you lose one hard drive from
the striped volume, you will lose all the data across the entire volume.
Open Server Manager by selecting Start => Administrative Tools => Server Manager. In the Server Manager tree, click Storage. In Storage, click Disk Management. Right-click the unallocated space in the bottom window of the middle pane you want to create the volume on. Click New Striped Volume. On the Welcome screen, review the message, and click Next. On
the Select Disks screen, select the disks you want to use for the
striped volume, and click Add to place them in the selected option. Select the size you want to make the volume, and click Next. Select
how you want mount the volume. You can choose to mount to a drive
letter, mount a folder on an existing drive, or not assign any mount
point. After you make your selection, click Next. Next, you can select how to format the drive. After you make your selection, click Next. Review the summary screen, and click Finish. You will see a warning dialog box, as shown in Figure 7, if the drives need to be converted to dynamic drives for striped volumes. After you review the warning, click Yes.
NOTE
When you create a
striped volume, it will make the partitions on all disks the same size.
|