3. Work with Partitions
After you create your
partitions, you can perform a variety of tasks on the drives, including
reformatting, deleting, and extending. All of these tasks are done in
the Disk Management utility. In addition, you can perform almost all of
these tasks by merely right-clicking the volumes.
3.1. Format a Partition
You need to format a
partition to prepare the drive for use. When you format the volume, you
will lose all your existing data, so make sure you have a backup of the
volume if you want to save any of the data on it.
Open Server Manager by selecting Start => Administrative Tools => Server Manager.
In the Server Manager tree, click Storage.
In Storage, click Disk Management.
Right-click the volume you want to format.
Next, you can select how to format the drive. After you make your selection, click Next.
Review the warning about erasing the data on the volume, and click OK.
3.2. Delete a Partition
If you need to repurpose
the drive or get rid of an existing partition, you can delete your
partitions. Remember, when you delete a volume, you will lose all your
existing data, so make sure you have a backup of the volume if you want
to save any of the data from it.
Open Server Manager by selecting Start => Administrative Tools => Server Manager.
In the Server Manager tree, click Storage.
In Storage, click Disk Management.
Right-click the volume you want to delete.
Review the warning about erasing the data on the volume, and click Yes.
3.3. Extend a Partition
You may find you have
an existing volume that is not large enough to meet your current needs
for data storage on your server. In that case, you can extend the volume
with disks that have unallocated space on them. When you extend an
existing volume, you create a new spanned volume.
Open Server Manager by selecting Start => Administrative Tools => Server Manager.
In the Server Manager tree, click Storage.
In Storage, click Disk Management.
Right-click the volume in the bottom window of the middle pane you want to extend.
On the Welcome screen, click Next.
On
the Select Disks screen, select the disks you want to use to extend the
volume, and click Add to place them in the selected option.
Select the size you want to make the volume. You can select a size for each disk individually. Click Next.
Review the summary screen, and click Finish.
You
may see a warning dialog box about the drives needing to be converted
to dynamic drives. After you review the warning, click Yes.
3.4. Shrink an Existing Volume
If you have an existing volume
you want to shrink, you can reduce the size through the Disk Management
utility. After you shrink the volume, any space you removed from the
volume will become unallocated space.
Open Server Manager by selecting Start => Administrative Tools => Server Manager.
In the Server Manager tree, click Storage.
In Storage, click Disk Management.
Right-click the volume in the bottom window of the middle pane you want to shrink
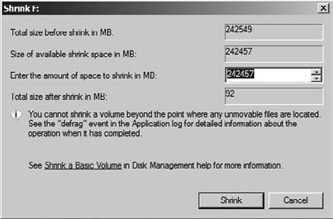
You can select the size you want to shrink the volume by; you will see a screen similar to Figure 9.
This allows you to choose the amount you want to reduce from the
volume. You cannot shrink the volume to smaller than the existing data
on the volume. After you make your selection, click Shrink.

4. Use DiskPart
You may want to use the command
prompt to work with your drive partitions, and in the case of Server
Core installation, you will need to use the command prompt to work with your partitions. Windows Server 2008 R2 provides a command-line utility called DiskPart that you can use to work with disks and partitions. To access DiskPart, follow these steps:
To open a command prompt, select Start => All Programs => Accessories => Command Prompt.
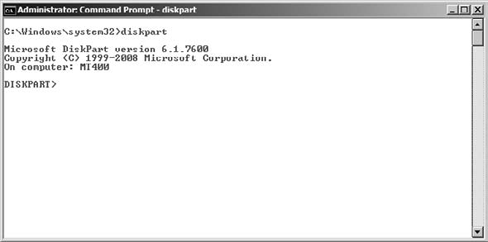
At the command prompt, type diskpart, and hit Enter. You will see a screen similar to Figure 10, with the DiskPart utility loaded and waiting for you to enter commands.

After you load DiskPart,
you need to use commands to perform tasks such as creating volumes,
formatting partitions, extending volumes, and so on. You can also take
the commands, combine them in a script, and then use DiskPart to process the commands in the file. For example, typing diskpart /s c:\diskscript.txt will run DiskPart with the commands listed in diskscript.txt.
Table 2 describes some of the common commands used in DiskPart.
Table 2. DiskPart Switches
| Switch | Description |
|---|
| select | This allows you to select the disk, partition, or volume. Using the select command allows you to access the information about the select object with the detail or list command. Before you can use the detail or list commands, you need to use the select command to set the object you want to work with. |
| detail | This displays detailed information about the object you have currently selected. |
| list | This displays existing information about your server's storage; you can list the disk, volume, or partitions. |
| create | This allows you to create volumes, partitions, or volumes. |
| format | This allows you to format the partitions. This command's true power comes from using it in a script. |
| extend | This allows you to use the command prompt to extend an existing volume. |
NOTE
When you are working with disks and using the select
command to target disks on your system, it is important to note how the
drives are numbered. Drives are numbered beginning with 0. That means
the first drive in your system is drive 0. So, if you wanted to use the select command to select the first disk, the command would look as follows:
select disk 0
4.1. DiskPart Script Examples
Here are some examples of basic scripts you can run with DiskPart
to help you see how you can utilize this powerful command. You can
create simple script files using Notepad. If you have created the script
file, you can type diskpart /s <path and name of the script file>.
The following script will select and list the partitions of disk 1 and output detailed information about partition 1:
select disk 1
list partition
select partition 1
detail partition
The following script will
convert disk 2 to dynamic, format the disk with NTFS, create a new
volume that's 1GB, assign a drive letter of G, and add a label of "New
DiskPart Drive":
select disk 2
convert dynamic
create volume simple size=1000 disk=2
assign letter g
select volume g
format FS=NTFS label="New DiskPart Drive" quick
The following script will
convert disk 2 and disk 3 to dynamic, create a mirrored volume of 2GB,
assign a drive letter of M, format the new mirrored volume with NTFS,
and add a label of "New Mirrored Drive":
select disk 2
convert dynamic
select disk 3
convert dynamic
create volume mirror size=2000 disk=2,3
assign letter m
select volume m
format FS=NTFS label="New Mirrored Drive" quick
As you can see, DiskPart is extremely powerful, and it provides a great tool for scripting your disk management tasks.