Active Directory (AD) was first introduced with the
release of Windows 2000 Server. Most of the core functionalities have
remained the same through Windows Server 2003, Windows Server 2008, and
now Windows Server 2008 R2. However, with each release, Microsoft has
made some performance improvements and added new features. In this
section, we will take a look at some of the new AD features in Windows
Server 2008 R2. Let us take a look at some of these new enhancements.
Active Directory Recycle Bin
AD now includes an undelete
option known as the Recycle Bin. The AD Recycle Bin acts a lot like the
Windows recycle bin we are all very familiar with. The AD Recycle Bin
stores objects for 180 days (by default) after they are deleted from AD.
This allows for easy full fidelity recovery of deleted AD objects using
PowerShell commands. The one main requirement to use this feature is
that your AD forest be in Windows Server 2008 R2 native mode, and all
domain controllers in the domain need to be running Windows Server 2008
R2.
Offline domain join
Offline domain join is a new
feature in Windows Server 2008 R2 and Windows 7 that allows you to join a
computer to an AD domain without having connectivity to a domain controller. The offline domain join is a three-step process described subsequently:
The djoin
command line tool is run on a Windows 7 or Windows Server 2008 R2
computer that is joined to the domain. The djoin/provision option is
used to provision a computer account for the computer for which you want
to perform an offline domain join. This generates a file to be used by
the computer that will be joining the domain.
The file is copied to the computer that will be joining the domain via offline domain join. The djoin
command is run with the /requestODJ parameter. This will copy the
offline domain join file to the Windows directory and instruct the
computer to join the domain on boot.
Boot
the computer when connected to the network hosting the AD domain. The
domain join process will automatically join the computer to the domain.
The offline domain join
process can be very useful when you are automatically deploying a large
number of computers, or if you want to give someone the ability to join a
computer to the domain, without them needing special privileges in AD.
The following will walk you through the process to perform an offline
domain join.
In this process, we will be
using two computers. LABDC1 will be the domain controller hosting the
contoso.com domain. Srv1 will join the LABDC1 domain using the offline
domain join process.
1. | Log on to the domain controller (LABDC1).
|
2. | Open a command prompt and enter the command djoin/provision/domain contoso.com/machine Srv1/SaveFile C:\djoinprovision.txt (see Figure 1).
This command is telling the computer to run the djoin provisioning
process for the contoso.com domain. Create a djoin file for the server
Srv1 and save it as C:\djoinprovision.txt. After running the command,
you should receive confirmation that the offline domain join file was
created successfully.

|
3. | You
now need to copy the file to the computer you want to join to the
domain. You can use any method you prefer to copy the file. We just need
to have it on the machine that we want to join to the domain.
|
4. | Log
on to the server we want to join to the domain (Srv1). Check the
computer properties to ensure that the computer is a member of a
workgroup and not joined to the domain (See Figure 2).

|
5. | Open a command prompt and run the command djoin/requestODJ/loadfile C:\djoinprovision.txt/Windowspath C:\Windows (see Figure 3). This command is telling the computer that on next boot, it
should join the domain using the information provided in the file
C:\djoinprovision.txt. You should see a success message and a notice
stating you must reboot the computer to enable it to complete the
offline domain join process.

|
6. | You
can now power down or reboot the computer as you normally do after
joining a computer to a domain. At this point, the computer is joined to
the domain and needs to reboot for changes to take effect on the local
machine.
|
7. | Log on to the computer and view computer properties to verify it was indeed joined to the domain (see Figure 4).

|
Active Directory Best Practices Analyzer
AD now includes a best
practices analyzer (BPA). BPAs for other Microsoft products have been
around for several years. The most popular of these is the Exchange
Server BPA. BPAs do exactly as their name implies.
The BPA will scan your servers and analyze software configurations. It
will then compare those configurations to a list of best practices
provided by the Microsoft product group responsible for that particular
piece of software. As an AD administrator, you should run the AD BPA not
only after deploying AD but also on a regular basis postinstallation or
when significant configuration changes have been made to your
environment. Let us explore the AD BPA in more detail.
1. | The
AD BPA is automatically installed with the Active Directory Domain
Services Role. You can access the BPA by selecting the AD node in Server
Manager, then scrolling down to the BPA as seen in Figure 5.

|
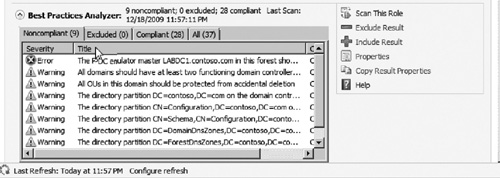
2. | To run the BPA, click the Scan this Role link. This will start a scan of the AD domain services on the server.
|
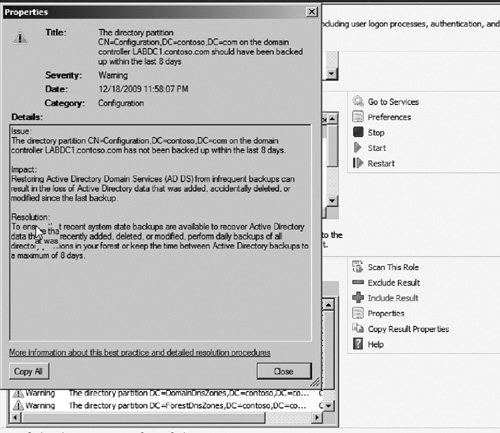
3. | After
the scan completes, results of the scan will be displayed inside the
BPA window. You can immediately see any noncompliant configuration
settings or warnings under the noncompliant tab. You can also click on any alert to see full details of the issue and how to resolve it (see Figure 6).

|
4. | You can click the Compliant tab if you want to see the rules that were run in which the system was in compliance with best practices configurations.
|
5. | The
BPA can be rerun at any time from Server Manager. Run this tool and
remediate any issues on a regular basis to ensure that your AD domain
remains highly reliable and healthy.
|
Active Directory Web Services
Windows Server 2008
R2 AD includes Web services that provide remote management capabilities
for AD. The AD Web services are primarily built to allow administrators
to remotely administer AD using PowerShell. This allows you to send
PowerShell commands to a remote domain controller from your local PC or
other management server. Additionally, the AD Web services provide a way
for developers to write applications that use the Web services to
interact with AD.
Managed Service Accounts
Many applications and network
services require the use of service accounts. These accounts are
typically dedicated to a specific application and have passwords set to
never expire. This ensures no accidental service disruption due to a
password expiring. This, however, poses a security problem, especially
for organizations which must comply with various government
regulations. Microsoft has addressed this issue with a new feature
known as Managed Service Accounts. Managed service accounts allows the
AD to automatically manage the passwords and Service Principal Names
(SPNs). AD will automatically manage and change the password on a
regular basis and ensure that the service using the account gets the
password update. A managed service account is created using the
New-ADServiceAccount PowerShell cmdlet.
Active Directory Administrative Center
The new Active Directory Administrative Center (see Figure 7)
provides a way for administrators to perform regular management tasks
via an easy-to-use interface built on top of PowerShell. This means that
as an administrator, you can use the GUI interface to perform a task
and the GUI then makes a call to a PowerShell script or cmdlet to
complete the requested task. Most of the same functions you perform in
Active Directory Users and Computers (ADUC) can be performed in the new
Active Directory Administrative Center rich GUI interface. Whether you
are a new or seasoned Windows administrator, you will want to check out
the new AD Admin Center.

ADAC provides enhanced
features such as the ability to manage multiple domains from a single
pane of glass, a comprehensive search, and an integrated password reset
tool. You may choose to use this tool over ADUC for many of the common
day-to-day administrative tasks for AD, such as resetting passwords or
creating new user accounts. ADAC is accessed from the Administrative
Tools folder in the Start Menu.
Active Directory Module for PowerShell
Windows
Server 2008 R2 is the first Microsoft server operating system to
include PowerShell as part of the standard OS installation. To go along
with the built-in PowerShell functionality, Windows Server 2008 R2
includes a series of cmdlets to administer AD via PowerShell. Using the
AD Module for PowerShell, you can use PowerShell to administer users,
computers, groups, domains, and domain controllers.
The AD Module for
PowerShell allows you to perform many of the core AD tasks from the
PowerShell command line. By using PowerShell, you can easily automate
common tasks or save scripts for future use. PowerShell also allows you
to more easily update hundreds or thousands of accounts with a few
simple commands. The following types of tasks can be performed within
PowerShell with the AD Module loaded:
User and Computer Account Administration
Create and Administer Groups
Create and Administer Managed Service Accounts
Create and Administer Organizational Units
Create and Administer Password Policies
Manage the Forest or Domain
Manage Domain Controllers
Search for and Modify Objects in the Domain
Whether you are a “command line
junkie” or new to PowerShell, the new module for AD could easily become
one of your primary administrative tools. It could end up saving your
hours of time by automating updates and streamlining the process to
update mass numbers of objects. You can access the AD Module for
PowerShell from the Administrative Tools folder in the Start Menu.
Read-only SYSVOL for Read-Only Domain Controllers
In Windows Server 2008 R1
(RTM), the SYSVOL folder was writable on Read-Only Domain Controllers
(RODC). Windows Server 2008 R2 now makes the SYSVOL folder read-only on
RODCs.