Now we have created our project let’s look at the
business layer. The classes in the business layer will encapsulate the
key properties of MCMS objects such as Name, Path, Value, and ID (equating to MCMS’s Guid
property). All the objects in our object model must be serializable,
that is, it must be possible to convert them into XML so they can be
transferred via Web services. We cannot transfer the standard PAPI
objects directly via ASP.NET Web services as there is no immediate way
to serialize them to XML. Therefore, we will be recreating portions of
the MCMS object model in our own classes that do support serialization
so they can be sent and received by ASP.NET Web services.
The PAPI classes do not contain default constructors, hence cannot be serialized into XML.
We will develop the following classes:
The classes are prefixed with Lightweight so they will not be confused with the classes in the Microsoft.ContentManagement.Publishing
namespace. These classes will be used by our Web service layer and will
be transferred as XML via the ASP.NET Web service we are going to
build.
For development of these classes, we will start with the least dependent classes and work our way up the hierarchy.
Maintaining Custom Properties
The ASP.NET Web service
will load and maintain the custom properties of postings. To facilitate
this, we will create two objects, namely LightweightCustomProperty and LightweightCustomPropertyCollection.
The LightWeightCustomProperty object is essentially like the CustomProperty
object found in the MCMS PAPI—with one major difference: it is
serializable; all its properties and methods can be re-packaged as XML,
ready to be consumed by a Web service and understood by InfoPath. The LightWeightCustomPropertyCollection object will basically store a collection of LightWeightCustomProperty objects, very much like the CustomProperties object from the PAPI.
We’ll start by creating the LightWeightCustomProperty class:
1. | In Visual Studio .NET, right-click on the McmsAuthoringWebService project and add a class called LightweightCustomProperty.
|
2. | Add the Microsoft.ContentManagement.Publishing namespace to the file:
using System;
using Microsoft.ContentManagement.Publishing;
namespace McmsAuthoringWebService
{
  /// <summary>
  /// Summary description for LightweightCustomProperty.
  /// </summary>
  public class LightweightCustomProperty
  {
  . . . code continues . . .
}
|
3. | Add the following public variables to the class:
/// <summary>
/// The name of the custom property name in MCMS
/// </summary>
public string Name;

/// <summary>
/// The Current value of the custom property in MCMS
/// </summary>
public string Value;
Name and Value should more properly be defined as properties but in this example, they have been defined as public variables for brevity.
|
4. | For
an object to be serialized, it must have a constructor that takes no
arguments. This default constructor is needed by the .NET Framework
during serialization, and is added by VS .NET when we create a class.
However, we also need to add the following constructor that accepts
values for the public variables as its arguments:
/// <summary>
/// Instantiate the custom property setting the Name and Current value.
/// </summary>
/// <param name="_Name">The name of the custom property</param>
/// <param name="_Value">The current value of the custom property</param>
public LightweightCustomProperty(string _Name, string _Value)
{
  this.Name = _Name;
  this.Value = _Value;
}
|
5. | The custom property values will be saved back to the relevant MCMS posting. So let’s create the Save() method, which sets the custom property’s value for the posting passed in as a parameter.
/// <summary>
/// Save the custom property value
/// </summary>
/// <param name="_Posting">The posting to be updated</param>
public void Save(Posting _Posting)
{
  // Get the custom property of the posting and set the value
  _Posting.CustomProperties[this.Name].Value = this.Value;
}
|
A posting may use a
template with multiple custom properties defined. To store this
collection of custom properties, we will define a strongly typed
collection of LightweightCustomProperty objects called LightweightCustomPropertyCollection.
1. | Create a new class in Visual Studio .NET and give it a name of LightweightCustomPropertyCollection. Add the namespace Microsoft.ContentManagement.Publishing to it, and make it extend System.Collections.CollectionBase.
using System;
using Microsoft.ContentManagement.Publishing;
namespace McmsAuthoringWebService
{
  /// <summary>
  /// Summary description for LightweightCustomPropertyCollection.
  /// </summary>
  public class LightweightCustomPropertyCollection
                   : System.Collections.CollectionBase
  {
    . . . code continues . . .
  }
}
|
2. | As LightweightCustomPropertyCollection is a strongly typed collection, the default property will be a LightweightCustomProperty.
/// <summary>
/// The indexed LightweightCustomProperty
/// </summary>
public LightweightCustomProperty this[int index]
{
  get
  {
    // Cast the list item to a LightweightCustomProperty
    return(this.InnerList[index] as LightweightCustomProperty);
  }
  set
  {
    this.InnerList[index] = value;
  }
}
|
3. | We will now define the Add() method that we will need in order to add a LightweightCustomProperty to the collection.
/// <summary>
/// Add an item to the collection
/// </summary>
/// <param name="item">The LightweightCustomProperty to be added</param>
public void Add(LightweightCustomProperty item)
{
  this.InnerList.Add(item);
}
|
4. | The LightweightCustomPropertyCollection will be populated by a Microsoft.ContentManagement.Publishing.Posting object so we will define the Load() method. The Load() method will enumerate the custom properties of the posting and for each custom property it will instantiate a LightweightCustomProperty and add it to the collection.
For the purposes of this example we are only maintaining custom properties of type Text. This code could be extended to support custom properties of type Selection.
/// <summary>
/// Load the lightweight custom property collection from a posting.
/// </summary>
/// <param name="_Posting">Posting to be loaded from</param>
public void Load(Posting _Posting)
{
  if (_Posting != null)
  {
    // Loop through the custom properties
    foreach (CustomProperty _CustomProperty in _Posting.CustomProperties)
    {
      // Check if the cutsom property is of type 'text'
      // (custom properties will have > 0 allowed values)
      if (_CustomProperty.AllowedValues.Count == 0)
      {
        // Instantiate a lightweight custom property and
        // add it to the collection
        this.Add(new LightweightCustomProperty(_CustomProperty.Name,
                 _CustomProperty.Value));
      }
    }
  }
}
|
5. | We also need to be able to save all the custom properties that are held in the collection.
/// <summary>
/// Save the collection of custom properties
/// </summary>
/// <param name="_Posting">
/// Posting to save the custom property value to
/// </param>
public void Save(Posting _Posting)
{
  // Loop through the custom properties in the collection
  foreach (LightweightCustomProperty _LightweightCustomProperty in this)
  {
    // Save the custom property against the posting
    _LightweightCustomProperty.Save(_Posting);
  }
}
|
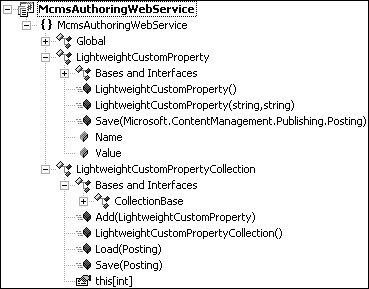
Now we have defined our classes for maintaining the custom properties, the project should look like this in Class View: