4. Synchronizing Offline Files
When you reconnect to the network, Windows Vista automatically synchronizes
the files. This means that Windows Vista does two things: First, it
updates your local copy of an offline folder by creating copies of any
new or changed files in the shared network folder. Second,
it updates the shared network folder with the files you changed while
you were offline. This synchronization occurs automatically when you log
on to the network and when you log off the network. You can also
synchronize the offline files yourself. You have four choices:
Open the shared network folder and click Sync in the task pane
Open the Sync Center, click View Sync Partnerships, double-click Offline Files, select the offline folder, and click Sync
Open the Sync Center, click View Sync Partnerships, double-click Offline Files, and click Sync All
Right-click the Sync Center icon in the notification area, and click Sync All
You can also set up a synchronization schedule,
either based on a time or on one or more events, as described in the
next two sections.
Scheduling a Synchronization by Time
If you want synchronization to occur
automatically, and you know when you want it to occur, follow these
steps to set up a time-based sync schedule:
1. | In the Sync Center, click View Sync Partnerships.
|
2. | Click Schedule. The Offline Files Sync Schedule dialog box appears.
|
3. | If you have already created a sync schedule, click Create a New Sync Schedule; otherwise, skip to step 4.
|
4. | Leave the check box activated beside each folder you want to include in the synchronization, and click Next.
|
5. | Click At a Scheduled Time.
|
6. | Use the Start On controls to specify the date and time when you want synchronization to begin.
|
7. | Use
the Repeat Every controls to specify the numbers of minutes, hours,
days, weeks, or months you want to occur between synchronizations.
|
8. | Click More Options to see the More Scheduling Options dialog box with the following options (click OK when you’re done):
Start Sync Only If: The Computer Is Awake—
Leave this check box activated to ensure that the synchronization
occurs only if the computer isn’t in Standby or Hibernate mode.
Start Sync Only If: The Computer Has Been Idle for at Least X Minutes/Hours—
Activate this check box to tell Vista to synchronize only when you’re
not using your computer. Use the spin box to set the amount of idle time
that must occur before the sync begins.
Start Sync Only If: The Computer Is Running on External Power— Activate this check box to avoid running the synchronization when your portable computer is running on batteries.
Stop Sync If: The Computer Wakes Up from Being Idle— Activate this check box to have Vista abandon the sync if you start using your computer.
Stop Sync If: The Computer Is No Longer Running on External Power— Activate this check box to have Vista stop the sync if you switch your portable computer to battery power.
|
9. | Click Next.
|
10. | Type a name for the schedule and then click Save Schedule.
|
Scheduling a Synchronization by Event
If you want the synchronization to occur
automatically, and you know when you want the synchronization to occur,
follow these steps to set up a time-based sync schedule:
1. | In the Sync Center, click View Sync Partnerships.
|
2. | Click Schedule. The Offline Files Sync Schedule dialog box appears.
|
3. | If you have already created a sync schedule, click Create a New Sync Schedule; otherwise, skip to step 4.
|
4. | Leave the check box activated beside each folder you want to include in the synchronization, and click Next.
|
5. | Click On an Event or Action.
|
6. | Specify the events or actions that trigger the sync by activating one or more of the following check boxes:
I Log On to My Computer— Activate this check box to start the sync when you log on.
My Computer Is Idle for X Minutes/Hours— Activate this check box to start the sync when your computer has been idle for the number of minutes or hours that you specify.
I Lock Windows— Activate this check box to start the sync when you lock your computer.
Note
You lock your computer either by selecting Start, Lock, or by pressing Windows Logo+L.
I Unlock Windows— Activate this check box to start the sync when you unlock your computer.
|
7. | Click More Options to see the More Scheduling Options dialog box (described in the previous section).
|
8. | Click Next.
|
9. | Type a name for the schedule and then click Save Schedule.
|
5. Handling Synchronization Conflicts
When
Windows Vista synchronizes your offline files, it might find that a
file has changed both on the network share and on your offline computer.
In that case, the Sync Center icon displays a Sync Conflicts Have Occurred message. Here’s what you do:
1. | Click the Sync Conflicts Have Occurred message to open the Sync Center.
|
2. | Click View Sync Conflicts. The Sync Center displays a list of the conflicts.
|
3. | Select the conflict you want to work with.
|
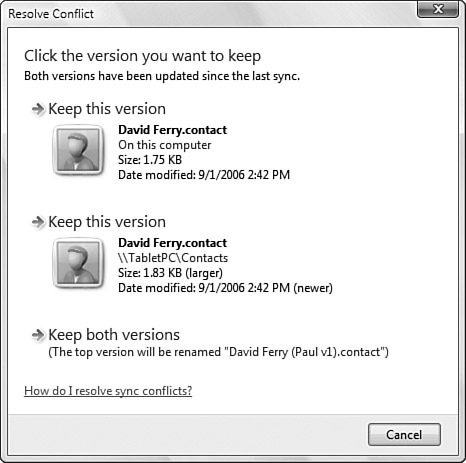
4. | Click Resolve. Vista displays a Resolve Conflict dialog box similar to the one shown in Figure 3.
|
5. | Click the version you want to keep, or click Keep Both Versions to have the offline version saved under a modified filename.
|
6. Adjusting Disk Space Used for Offline Files
Vista sets aside a finite amount of disk space
on your system to store both offline files and temporary offline files.
(The latter are local copies of network files that you’ve used recently.
Vista keeps these files cached automatically so that you can use them
offline if you need them.) Vista assigns a limit on the amount of disk
space both types of offline files can use on your system. These limits
are a percentage of the size of the %SystemDrive%, and the
larger the drive, the higher the percentage. For example, on a 15GB
drive, Vista sets a limit of about 15% of total disk space (about 2GB)
for both types of offline files; on a 200GB drive, Vista sets a limit of
about 25% of total disk space (about 50GB) for both types of offline
files. If you find these limits are too high or too low, you can adjust
them by following these steps:
1. | Select Start, Control Panel, Network and Internet, Offline Files. Vista opens the Offline Files dialog box.
|
2. | Display the Disk Usage tab. As shown in Figure 4,
this tab tells you the amount of disk space you’re currently using for
offline files and for the offline files cache, and it also tells you the
current limits for both types.

|
3. | Click Change Limits and then enter your UAC credentials. The Offline Files Disk Usage Limits dialog box appears.
|
4. | Use the Maximum Amount of Space All Offline Files Can Use slider to set the limit for offline files.
|
5. | Use the Maximum Amount of Space Temporary Offline Files Can Use slider to set the limit for the offline files cache.
|
6. | Click OK to return to the Offline Files dialog box.
|
7. | Click OK.
|
