3D animators are familiar with the idea that every
object (or layer) has a pivot point. In After Effects, there are two
fundamental ways to make a layer pivot around a different location:
Change the layer’s own anchor point, or parent it to another layer.
After Effects is
generally designed to preserve the appearance of the composition when
you are merely setting up animation, toggling 3D on, and so forth.
Therefore, editing an anchor point position with the Pan Behind tool
triggers the inverse offset to the Position property. Parent a layer to
another layer and the child layer maintains its relative position until
you further animate either of them. If you set up your offsets and
hierarchy before animating, you may find fewer difficulties as you
work—although this section shows how to go about changing your mind once
keyframes are in place.
To
simply frame your layers, Layer > Transform (or context-click a
layer > Transform) includes three methods to fill a frame with the
selected layer:
Ctrl+Alt+F (Cmd+Opt+F) centers a layer and fits both horizontal and vertical dimensions of the layer, whether or not this is nonuniform scaling.
Ctrl+Alt+Shift+H (Cmd+Opt+Shift+H) centers but fits only the width.
Ctrl+Alt+Shift+G (Cmd+Opt+Shift+G) centers but fits only the height.
Those shortcuts are a handful; context-clicking the layer for the Transform menu is nearly as easy.
Anchor Point
The Pan Behind tool (Y)
repositions an anchor point in the Composition or Layer viewer (and
offsets the Position value to compensate). This prevents the layer from
appearing in a different location on the frame in which you’re working.
The Position offset is for that
frame only, however, so if there are Position keyframes, the layer may
appear offset on other frames if you drag the anchor point this way. To
reposition the anchor point without changing Position:
Change the anchor point value in the Timeline panel.
Use the Pan Behind tool in the Layer panel instead.
Hold the Alt (Opt) key as you drag with the Pan Behind tool.
Any of these options lets
you reposition the anchor point without messing up an animation by
changing one of the Position keyframes.
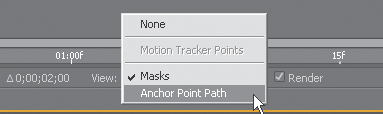
You can also animate the
anchor point, of course; this allows you to rotate as you pan around an
image while keeping the view centered. If you’re having trouble seeing
the anchor point path as you work, open the source in the Layer panel
and choose Anchor Point Path in the View pop-up menu (Figure 1).
Parent Hierarchy
Layer
parenting, in which all of the Transform settings (except Opacity,
which isn’t really a Transform setting) are passed from parent to child,
can be set up by revealing the Parent column in the Timeline panel.
There, you can choose a layer’s parent either by selecting it from the
list or by dragging the pick whip to the parent layer and using the
setup as follows:
Parenting remains valid even if the parent layer moves, is duplicated, or changes its name.
A parent and all of its children can be selected by context-clicking the parent layer and choosing Select Children.
Parenting can be removed by choosing None from the Parent menu.
Null Objects (Ctrl+Alt+Shift+Y/Cmd+Opt+Shift+Y) exist only to be parents; they are actually 100 x 100 pixel layers that do not render.
You probably knew all of that. You might not know what happens when you add the Alt (Opt) key to Parent settings:
Hold Alt (Opt)
as you select the None option and the layer reverts to the Transform
values it had before being parented (otherwise the offset at the time
None is selected remains).
Hold Alt (Opt) as you select a Parent layer and its Transform data at the current frame is applied to the child layer prior to parenting.
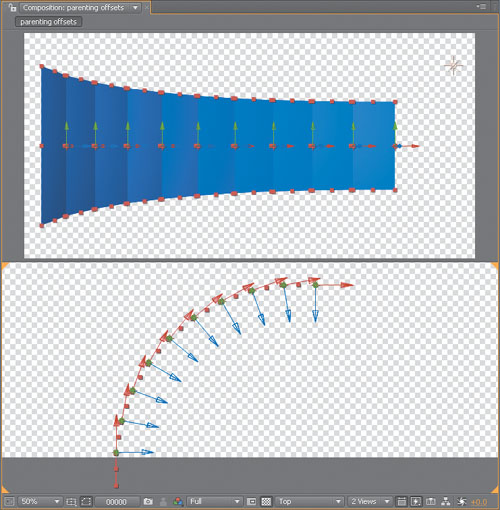
This last point is a very cool
and easily missed method for arraying layers automatically. You
duplicate, offset, and parent to create the first layer in a pattern,
then duplicate that layer and Alt+Parent (Opt+Parent) it to the previous duplicate. It behaves like the Duplicate and Offset option in Illustrator (Figure 2).