While using mobile computers, sometimes you are
connected to a corporate network and other times you are not. Sometimes
you might want to work on the files stored on a network server even when
you are not connected to the network that holds the network server. You
might also want to connect mobile devices such as phones and PDAs to
your mobile computer or desktop computer so that information can be
copied back and forth.
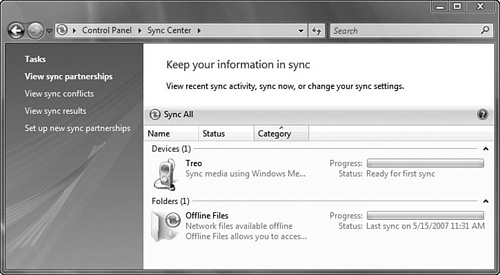
The new Windows Vista Sync Center
provides a single easy-to-use interface to manage data synchronization
between multiple computers, including network servers, and with mobile
devices you connect to your computer. To start the Sync Center, click
the Start button, click All Programs, click Accessories, and then click
Sync Center.
To set up
synchronization between two computers, you create a sync partnership
between two or more sync locations, which specifies what files and
folders to sync, where to sync them, and when (see Figure 1).
You can schedule an automatic sync on a daily, weekly, or monthly
basis, or when a specific event occurs, such as every time you log on to
your computer. You can also perform a manual sync at any time, such as
when you are getting ready to disconnect a mobile PC from the network
and want to make sure you have the latest copies of files on a network
server.
Note
The ability to sync
with network folders is not included in Windows Vista Starter, Windows
Vista Home Basic, and Windows Vista Home Premium.
Every
time you sync files between two locations (such as between a computer
and a mobile device), Sync Center compares the files in both locations
to determine whether they still match or whether any have changed. It
determines whether any files need to be updated to stay in sync.
If the files differ,
Sync Center determines which version of each file to keep and copies
that version to the other location, overwriting the other version there.
It selects the most recent version to keep, unless you have set up the
sync partnership to sync differently. Sometimes Sync Center will prompt
you to choose which version of a file to keep. This usually occurs when a
file has changed in both locations since the last sync. When this
happens, Sync Center will notify you of a sync conflict, which you must
resolve before it can sync the items in conflict.
When you set up
the synchronization, you may set up a one-way or two-way
synchronization. In one-way sync, files are copied from a primary
location to a secondary location, but no files are ever copied back to
the primary location. In two-way sync, Sync Center copies files in both
directions, keeping the two locations in sync with each other. Most sync
partnerships are automatically set up to perform either one-way or
two-way sync, although some sync partnerships let you choose.
You might set up
two-way sync between a network folder and your computer, where you
instruct Sync Center to copy the newest version of any file it finds to
the other location, overwriting any older versions of the same file.
This is a good way to sync if you work with the same files on both the
network folder and your computer, and you want to make sure you always
have the most recent version of every file you’ve worked on.
You might set up one-way
sync for a portable music player, for example, where you instruct Sync
Center to copy every new music file from your computer to the mobile
device but never to copy music files in the other direction (from the
device to your computer).
Offline Folders
To create an offline folder,
open a network folder, right-click a file or folder, and select Always
Available Offline. Windows automatically creates a copy of that file or
folder on your computer. Anytime you reconnect to that network folder,
Windows will sync the files between your computer and the network
folder. You can also sync them manually at any time.
In
addition, you can encrypt your offline files to help secure private
information. Of course, when you encrypt offline files, only your user
account can access the cached data.
To configure offline
files, click Control Panel, then click Network and Internet, and then
click Offline Files. From the General tab in the Offline Files dialog
box, you can enable or disable offline files by clicking the top button.
You can also use the General tab to open Sync Center and view your
offline files (see Figure 2).
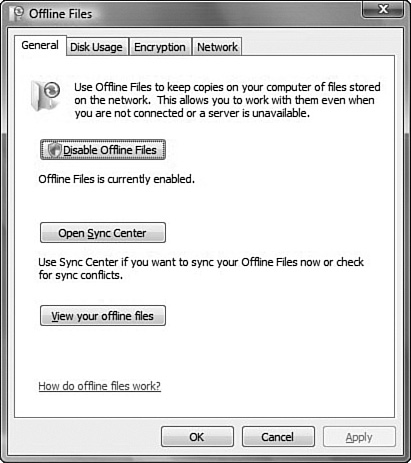
The Disk Usage tab
enables you to see how much disk space is currently being used by
offline files and enables you to change the limits of storage that
offline files will use. The Encryption tab enables you to encrypt or
unencrypt your offline files.
The Network tab
enables you to choose to automatically work on any locally cached
offline files when your connection to the network is slow. You can also
choose how often to check for a slow network connection.
When a shared
resource is made available on a network, you can control the cache
settings for that shared resource. This enables you to determine how
remote users access files inside each of your shares. The cache settings
are defined on the computer on which the shared resource resides.
The
Caching settings for shared folders are configured by clicking Advanced
Sharing, on the Sharing tab of the folder’s Properties sheet. The
options are as following:
Only the files and programs that users specify will be available offline.
This setting is the default and enables any files or programs in the
share to be available offline to users but users must make the decision.
All files and programs that users open from the share will be automatically available offline. This setting ensures that any files a user accesses from this share while online will be available offline.
Optimized for performance. This check box enables the caching to take place in the background therefore helping to optimize network performance.
Files or programs from the share will not be available offline. This setting disables caching from the share.
Connecting Mobile Devices
Many mobile devices
can connect to your Windows Vista computer and synchronize data and
files between the two. Typically, you connect your device to your
computer either using a USB cable or cradle, or through a wireless
signal (infrared, Bluetooth, or WiFi). Most devices ship with a USB
cable or cradle, and most modern computers are equipped with infrared or
Bluetooth.
If you connect a mobile
device using Bluetooth technology, you need to configure the device as
discoverable. You also need to set up the passkey to associate the
device with the Bluetooth signal. This ensures that each device is
connected to the device to which it is intended to connect.
Before
you can synchronize information with devices, you must set up sync
partnerships. To create a sync partnership with a portable media player,
you just need to do the following:
1. | Connect
your device to a computer running Windows Vista and open Sync Center.
Windows Vista includes drivers for many common devices, but you can also
obtain drivers from the CD that came with your device or from Windows
Update.
|
2. | Set up a sync partnership. Clicking Set Up for a Media Device Sync Partnership opens Windows Media Player 11.
|
3. | Select
some media files or a playlist to synchronize to the device. To select
media, just drag it onto the Sync dialog box on the right side of
Windows Media Player.
|
4. | Click
Start Sync. When your chosen media has transferred to the device, you
can disconnect it from your computer and close Windows Media Player.
|
You can sync your
contacts with some mobile devices, allowing you to take your contacts
with you wherever you go. To sync contacts with a mobile device, the
device must be able to read the contact file that Windows creates for
each individual contact. The device must also be compatible with Sync
Center, which Windows uses to sync files between a computer and a mobile
device.
If you have
Exchange Server 2003 or later deployed in your organization, take
advantage of its integration with Windows Mobile, which provides direct
push e-mail using ActiveSync technology, Global Address List lookup, and
numerous security features.
